Content Solutions DocumentationPublished Date: January 11, 2024 Downloaded: December 22, 2024, 11:05 am |
|
Content Solutions Documentation |
Convert to order with Electronic Signature (E-sign)
January 11, 2024
Overview
Electronic signature is another way to convert quotes to orders with your end contact without them having to login to the store. The system will produce an electronic document with form fields to be completed based on the selected document template at the time of send. Just like a regular quote it uses what’s selected on the delivery window to determine what to display to the viewer. Once accepted by the end customer all the e-sign form data is captured and stored with the final PDF document. When enabled, users on quotes will have the up arrow Electronic Signature option in the send button.
Document Workflow: Quote > Send/Electronic Signature > Out for E-sign (document is locked) > Accepted by end contact > converted to Sales Order
- If changes need to be made the document can be Revoked, edited, and resent back out to the end contact.
- End Contacts can Decline the quote and it is converted to a ‘Declined’ quote status. The quote can still be edited and resent.
Enabling Electronic Signature
To enable this feature, an Admin with access to the Document Templates must go to the E-sign sub-tab, click and save the “Enable Electronic Signature” checkbox.
Control Panel > Document Templates > E-sign sub-tab
Quote Name; is document name to be displayed when the document page is viewed. Usually it is a middle stage like Quotation or Proposal.
Required Fields – these are non-editable and will always be captured with the document. Purchase Order # relies on the customer’s PO setting. Title is not required and although customary, can be deactivated if needed.
Custom Fields – Fields you can use to capture additional data; for example a checkbox for viewing terms and conditions. These fields will not show on the form preview on the enable page.
Messaging with the HTML editor.
- Accepted – confirmation message to be displayed to the end contact
- Declined – confirmation message to be displayed to the end contact
System E-mails
It is important to properly setup and review your system generated templates to make sure the correct communication merge fields are being used. These are located in System Emails in Admin.
To the Contact/Signers
- E-sign Link To Customer – Sends an email of quote with e-sign document link to a customer. (manual from the Send button)
- E-sign Order Confirmation To Customer – Sends an email attachment of the electronically signed (e-sign) document to the customer.
- E-sign Signature Required Notification – Sends an email to the next signer when e-sign requires multiple signatures. (for multiple signers)
- E-sign Signer Accepted Notification To Customer – Sends an email to the signer when e-sign requires multiple signatures. (for multiple signers)
To the Sales Team
- E-sign Accepted Notification – Sends a notification email to the SalesRep when a document is accepted via e-sign.
- E-sign Declined Notification – Sends a notification email to the SalesRep when a document is declined via e-sign.
- E-sign Viewed Notification – Sends a notification email to the SalesRep when a document out for e-sign gets viewed.
- E-sign Signer Accepted Notification – Sends an email to the SalesRep between signers when e-sign requires multiple signatures. (for multiple signers)
Three templates are intended for use with multiple signers and will include a table that displays the list of signers and the statuses of where the document is in the signing process (noted above).
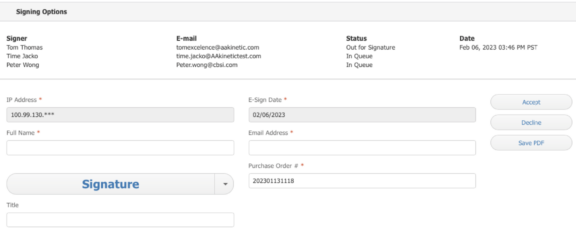
- Use merge tag, <signer_table> for showing all singers on the email. This table is similar to what the users see in the Signing Options section shown on the E-sign document page.
- Use merge tag, <esign_comment>, to allow signer comments to be displayed on email templates.
Example of systems generated emails sent to a sales user’s inbox.

E-sign Usage
The system will allow for multiple signers but defaults to the end contact as the primary signer.
-
Sending documents for Electronic Signature will accept multiple signatures for a single quote or proposal document. Signatures can be both internal and external, it’s based on signer email addresses, and will be delivered to the recipients in the order that they are placed in the Send window. Once you have launched the Send E-Sign Link window from the top of the document preview page, click on the Add Signer button to the right of the “To” “Name” field, and another To field row will appear.

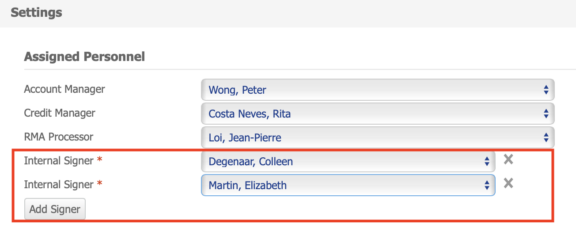
- Assign internal approvers at the account level. Designate an internal approver(s) for electronic signature at the account level in the Assigned Personnel section on account settings edit. Designated signers will pre-populate the “To” signer(s) field when the user selects Send for Electronic Signature. This implementation includes the introduction of the “Internal Signer” field to the account settings. Available signers are users with the existing access right for SO Approval, “Ability to approve for Credit Hold or Review All Orders”. Not all users with account access will be able to adjust this setting.

- When a document is ‘Out For E-sign’ internal users may view the document by clicking on the E-sign Doc URL located in the Doc Status field in the left side of the document header. Sales Reps will also get notification when the E-sign is viewed.
- Signers may pass the document link to another signer within their company, this will not update the signer table that was generated when the document was sent. The signer information will be captured in the activity log and in the signed PDF attachment.
-
Other E-Sign features for regular and multiple signatures include:
-
The signing options section expands below the document for better readability.
-
All submissions will be captured in the document activity log plus they are stored on the document PDFs. This includes comments made on the accept form.
-
E-Sign Form Page to includes assigned Signer information in a table with these fields: Name, Email, Status of the signer (Out for Signature, In Queue, or Signed), and a signed date/time stamp.
-
It as also possible to display internal custom line item fields for e-sign documents. After clicking Send / Send for Electronic Signature, in send delivery window with the document preview, select the “Item Custom Fields (int.) *” checkbox and update preview to allow those fields to show. The Confidential warning will appear internally to users but not to the end contact when viewing the document for signature.
-
-
- Attached files can be made accessible to users via e-sign. By using the External File Links document component on the default quote template, users will see the file names and have active links (it must be added if it isn’t already on the layout like External document links below). Once the quote gets sent for e-sign the attachment links to be accessible on to e-sign signing page. Important: be sure to have the “Allow Store users the ability to view and add document attachments.” enabled in Company Settings > Documents > Misc section to use this feature.
-
-
Signer form fields displayed at the bottom of the document have been translated into Spanish, French and Portuguese for stores that are using that language by default.
-
