
Content Solutions DocumentationPublished Date: January 7, 2021 Downloaded: June 23, 2026, 5:35 pm |
 |
Content Solutions Documentation |
Release 8.0.0
January 7, 2021
ChannelOnline 8.0.0 Release Notes
ChannelOnline 8.0 focuses on some minor improvements that will affect document edit usability, imported file management (documents and images), three level categorization, and supplier updates. On the backend, we have updated the following Admin sections: personnel pages, items admin, catalogs and price profiles, and other upgrades.
- Documents
- Accounts
- Items & Catalog Admin
- File Cabinet (Formerly Image Gallery)
- Personnel
- Storesite
- Supplier Updates
- XML/Import/Export
- Additional Improvements
- Bug Fixes
DOCUMENTS
Enhancements have been made to help edit documents centered around contract or bid pricing and multiple line edits.
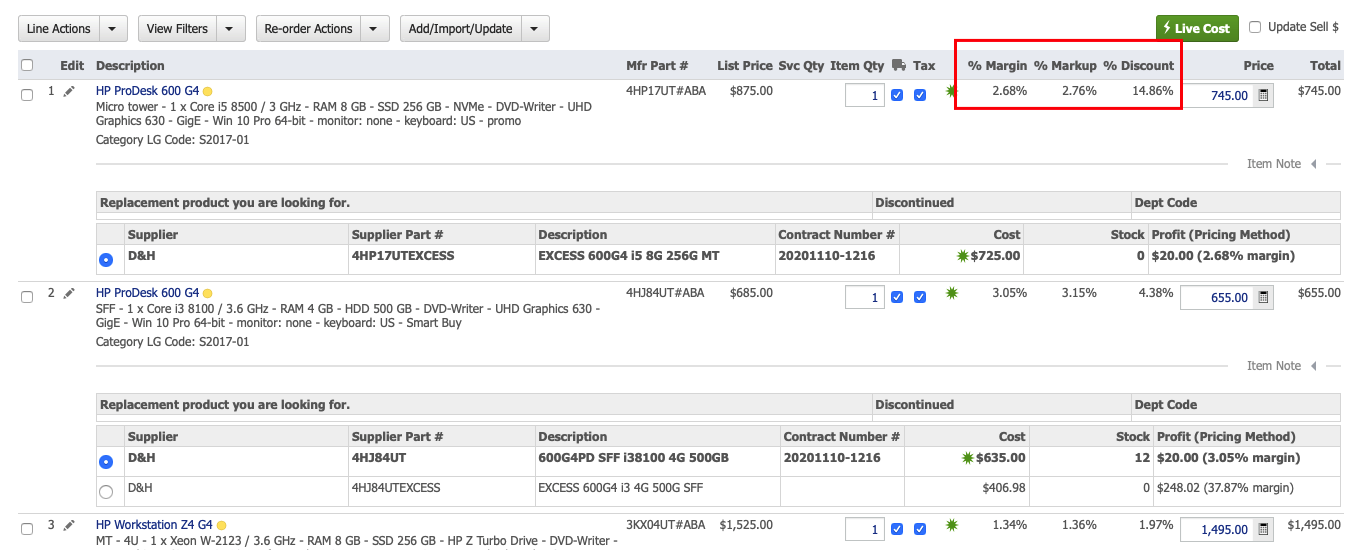
- ChannelOnline now provides the ability for you to enable a 2nd or 3rd column for Margin % / Mark up % / Discount off List on your internal document view. When enabled, another version of the existing column will appear next to the original column. All three options, Margin % / Mark up % / Discount off List, will be available for use in the 2nd and 3rd columns. It will not be activated by default but will require to be manually enabled by an administrative user. To enable, go to Admin > Company Settings > Documents. Within the Quotes section, enable the columns by selecting the corresponding checkbox for the desired display.

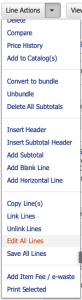
- When on the Standard Plus view for a quote or sales order, users have the ability to edit multiple line items and multiple fields at a single time. This new filter was added to the Line Actions dropdown at the top of the product table on Standard Plus view. Once “Edit All Lines” gets selected, all editable fields will open up on the document making it easier to edit areas like description, cost, and contract information. The key benefit is to edit the supplier cost and add a contract numbers to multiple line items at the same time, versus going line by line on each page or opening each line item’s edit lightbox. Once all the needed changes have been made, select “Save All Lines” from the same Line Actions dropdown to save the updated information. This additional feature is automatically enabled.
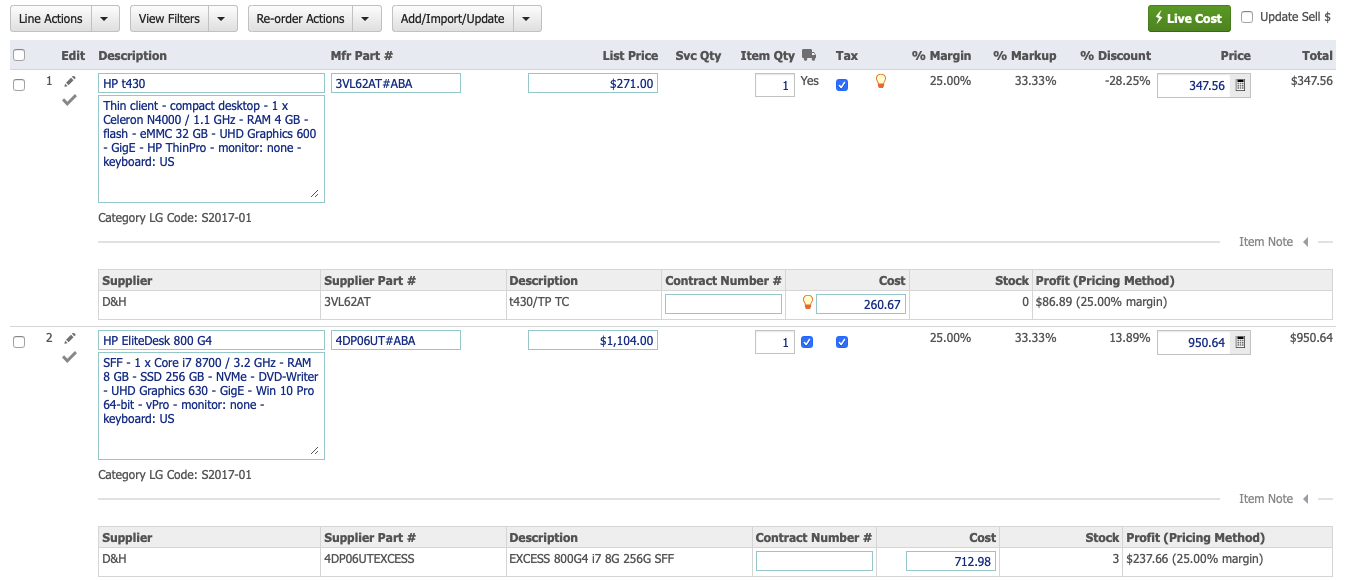
- Ability to mass update supplier multiple item costs from the Profit box at the bottom of the quote from within Standard Plus view has been added. To use this functionality, users must be on the Standard Plus view. Just scroll to the bottom of the page and select the Cost radio button. Upon selection, all the editable line fields will open up. Remember to select the checkboxes next to the line items you want to update. Then enter the amount you need to adjust cost by selecting from margin, markup or discount off list, and a contract # of appropriate. The contract # will be added to the selected supplier on all selected item lines. Don’t forget to hit Save in the footer when completed.
- Paragraphs can be edited in the line item edit window just like products on documents. Now if you are in the edit window, clicking through Next Item and Previous Item will display paragraphs for editing.
- New Tax access right affecting document users. Included in the Access Rights Profile list under document, access “Ability to uncheck/check taxable flag in documents”. If disabled, users will not be able to change the tax flag at the line level or access the tax field in the totals section. This feature is enabled by default in all system default access right profiles.
- We now show the created on date, “Creation Date”, on the document list page for document tab, purchasing tab, and account view. This feature is enabled by default in all system default access right profiles. Custom profiles may need to be updated.
- Like with products, Price History is now available for Service and Labor items that are on a document.
ACCOUNTS
Enhancements have been made to help manage contract or bid pricing at the account level (not the supplier level) and apply that pricing to a specific quote.
Account Contract Management
This feature makes it easier to add contract pricing from multiple bids, manufacturers, and suppliers to a single account.
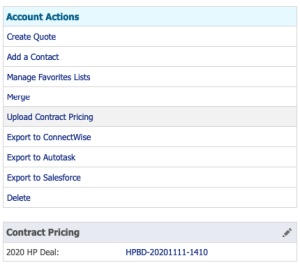
Uploading: Getting contract pricing at the account level can be initiated in two locations. A link labeled “Upload Contract Pricing” has been added to the Account Actions box on the account view under the Merge link (see image). Or, use the Upload button on the new account contract list page which is accessed through the edit icon on the account view Contract Pricing widget (new, bottom of image). Once Upload has been selected, a lightbox will open on the screen. Complete the necessary information; Contract/Deal Number, Description, Manufacturer, and upload a contract pricing file, then save. File fields: Product ID, Mfr Name (required), Mfr Part # (required), Price (required), MSRP, and Cost.
Managing: Two tools have been provided to assist in managing these contracts, the Account View widget and Contact Pricing page. After a contract has been added to an account, the Contract Pricing widget will appear on that customer’s account view page. To access the Contract Pricing page, click the edit icon on the account view Contract Pricing widget. Contract Pricing page includes a list of contracts that can be searched, edited, or deleted. Edit allows users to update an existing contract and override existing data. To see a list of items with pricing, select the number in the “# of Products”, and the search results page will display a list all the items associated with the uploaded pricing.
Apply Contract Price on a Document
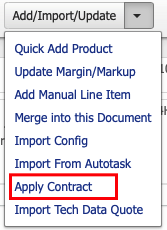
After contract files have been added to an account, the pricing in those files can then be applied to items on a document. They do not add the items to the document, but apply the contract pricing (price, MSRP, and cost) to those items that have been added to the document. Users create new quotes as normal by adding items from a catalog. Once you are in an active quote, users can also view a list of items with pricing in a contract by returning to the Contract Pricing page and selecting on the number of items in that contract. After the needed items are on the quote:
- Go to the Add/Import/Update dropdown button at the top of the product table and select “Apply Contract”. End dates will auto disable a contract so it will not appear in the Apply Contract window.
- In the Apply Contract window, select the radio button next to the desired contract description and select Apply
- The document will then be updated with the pricing that matches the items on the document. You don’t need all the contract items on the quote for the pricing to apply, and you can have other items on the quote that don’t apply for contract pricing.
- Items not identified as part of that contract will get the price profile rules applied to it.

- Contract price fields for upload via xlsx, xls, and csv, in order from the left column are: Product ID, Mfr Name, Mfr Part #, Price, MSRP, Cost.
ITEMS & CATALOG ADMIN
This section has been updated to ease the migration from the old two level categorization structure to our new three level structure. If you are interested in switching over to use three level categorization for catalogs and pricing, please contact support (the process is reversible if needed).
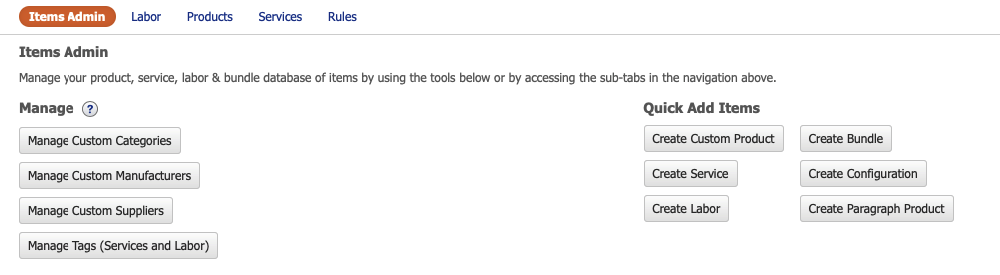
Page changes that can be seen on Items Admin.
- Updated Items Admin page now includes Quick Add buttons for part number lookup, and to create product, service, labor items as well as bundles, configurations and paragraphs.
- Updates to Custom Manufacturers management page. Arriving on the Custom Manufacturer page provides a list of custom manufacturers to view. To create a new manufacturer, select the Create Manufacture button at the top left of the list. If you want to see if the manufacturer already exists, you can switch the filter on the upper right side of the table to Supported Manufacturers or go to the Products Tab on while on full catalog. After selecting the create button, a lightbox will appear with three fields in it: Manufacturer Name (required), Description, and website. To edit existing custom manufacturers, just select the edit icon to the left of the manufacturer name of the one to edit.
- Create Custom Item starts from the Items Admin page and opens up a new lighbox window to begin the creation process by adding the manufacturer and part number. Once the user selects ‘create’, they are taken to a new lightbox where they will complete the three stages needed to complete creation: Item Information, Supplier Information, and Optional Attributes.
- Improved Product Edit by using an edit lightbox and separating into three distinct sections: main item Information, Suppliers, and Optional Attributes.
- Custom Items have more available fields for editing. Ability to add three images to a custom item: Thumbnail for use in search results, Standard Image for the main product view, and additional images.
- Utilizes search boxes, not dropdown, to assign categories and manufacturers.
- Updated Product View page with an actions component box (similar to the account page) that contains these functions: Add to Favorites, Add to Catalog(s), Add to Global Price, and Edit
- Clicking Supplier Edit in the supplier section of the page will now take you to the supplier edit window of product edit (second window).
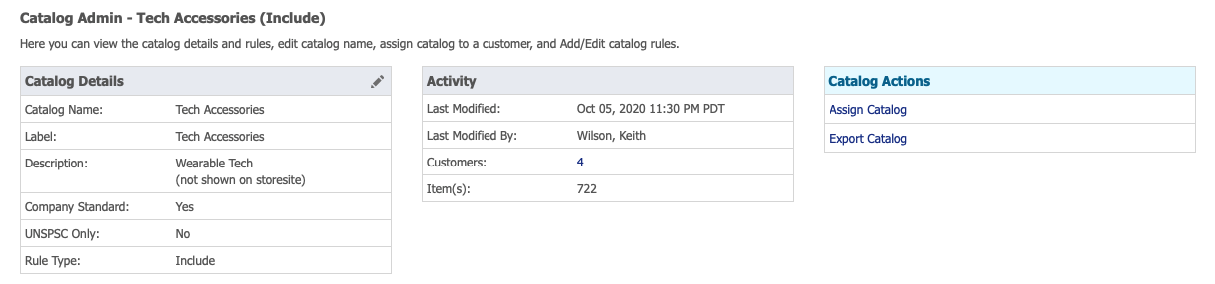
- We made minor modifications the Catalog Admin page and added columns to display the number of rules being used, and we corrected the old customer column to accurately reflect the number of contacts assigned to a catalog. The create catalog page has been migrated into a lightbox for familiar workflow. The catalog view page has also been modified to match the updated UI elements in the header for a cleaner look. Adding new rules utilized the add/create lightbox window used throughout the application with all the same create selections. For those using three level categories, the manufacturer and category selection is now performed with search boxes and not dropdowns.
- Price profiles Add New Rules has also been upgraded from a popup window to use the updated lightbox display. From within the window, users can add multiple rules while switching from category/manufacturer to part number rules and back as needed. Searching for categories when in three level category mode now uses a search box and not dropdown lists.
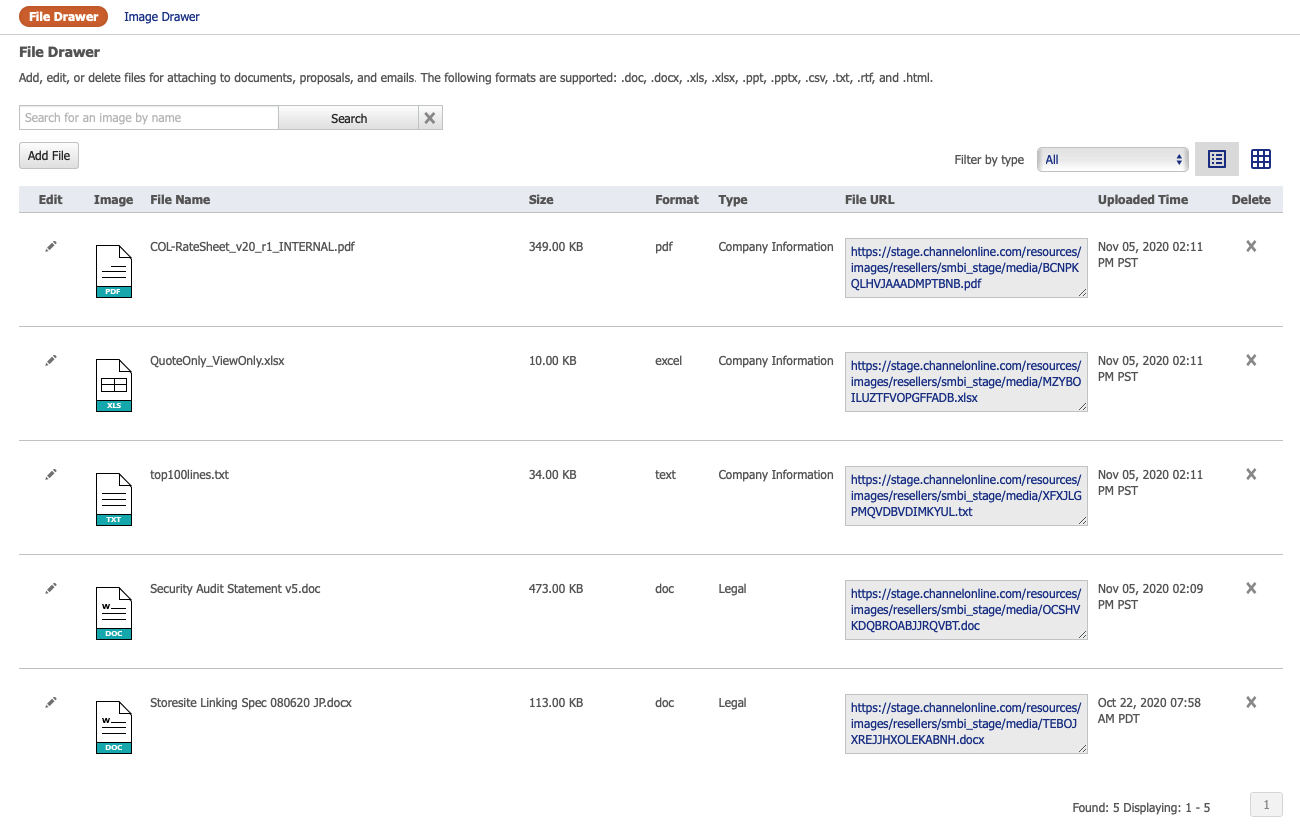
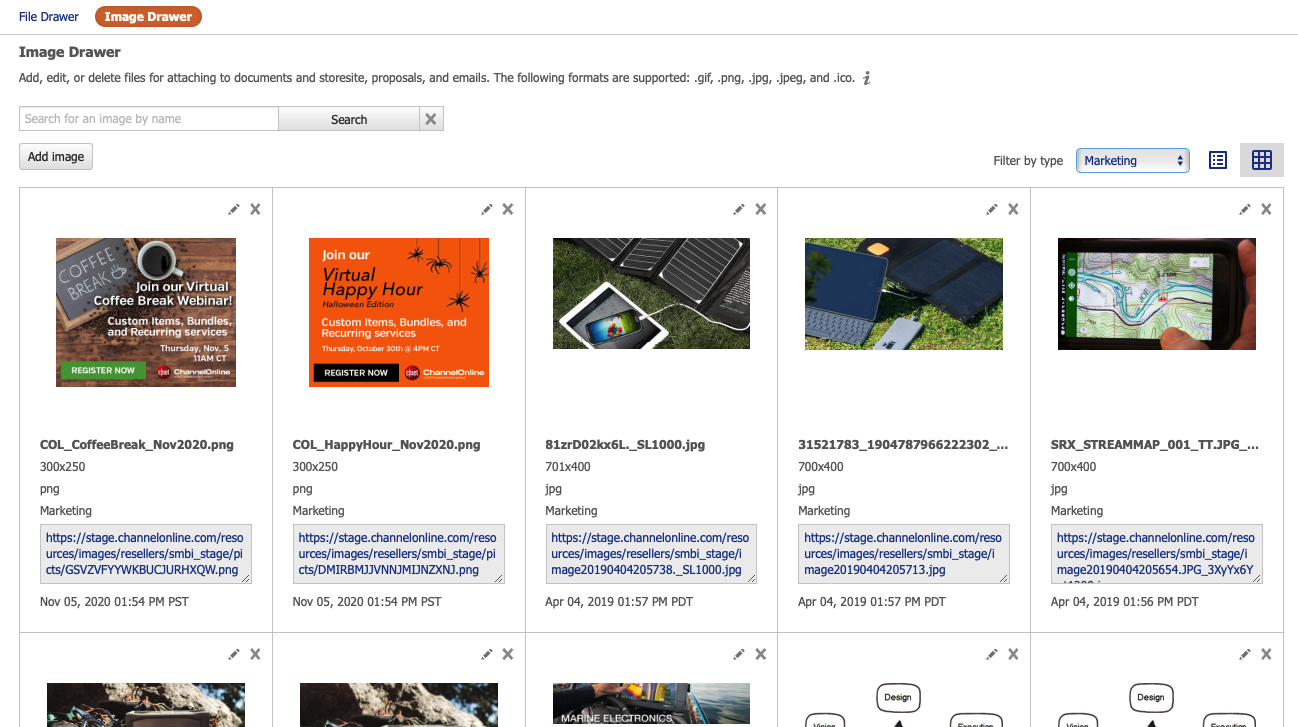
FILE CABINET (FORMERLY IMAGE GALLERY)
Our image gallery has been upgraded to a File Cabinet. It is now more than just images. The File Cabinet still contains all your uploaded images in the Image Drawer (what used to be the image gallery) but also has a new File Drawer for documents. Users can switch between the two by selecting the from the desired sub-tab at the top of the page. Here are the highlights of the File Cabinet changes:
- Added files with multiple file types for storage and retrieval for use on documents and emails in ChannelOnline.
- Switch between list and grid view for easy viewing, or use the search box to search on a file name.
- Upload up to 5 images or files at one time to the File Cabinet.
- Edit uploaded file names and filter type
PERSONNEL
- Improved the Personnel landing page (or list page), and added a filter search function on the upper right of the list table.
- Updated the user profile page view to match the account UI. Notice the use of the content widgets. Moved the user edit functionality into lightbox windows with two pages (similar to account view): User Info and Settings. Things to pay attention to: second authentication will be sent to your email for access to editing, user contact formation is on one page and settings are on another, plus a new action widget was added to show last login, access page views, and activity history.
- New access right. Place the ability to restrict access to who can change tax settings on a document. Within an Access Rights Profile, under the Documents sections, there is this new setting: “Ability to uncheck/check taxable flag in documents”. By default, this access right will be enabled. Deselect it to restrict access.
STORESITE
| Microsoft Partners – Implement web campaigns using Microsoft’s Digital Commerce and Campaign Network (DCCN). DCCN web campaigns help partners build awareness, generate demand, and increase sales of Microsoft products, services, and devices that run Windows.You can publish rich interactive content onto your website at no cost – helping you save time and money and assisting you with generating leads and closing more sales. |
- Go to the Components section in your store admin, select edit, and scroll down to the Campaign Banners section then select Edit again.
- Select the Microsoft Campaigns you want to display on your store (captions are optional), and click save when done.
- Go to the Layout edit page and move the corresponding Microsoft Ad components into the column you want them to be displayed, and save.
To see an example, visit: https://usmb.channelonline.com/smbi/visitorhop/sDashboard/main
SUPPLIER UPDATES
| BlueStar | ||
 |
BlueStar has been upgraded to support electronic ordering from ChannelOnline. Create purchase orders from items to be fulfilled by BlueStar and click Submit PO. After it’s sent the confirmation, tracking and shipping details will be updated automatically from BlueStar. Not a Bluestar customer? Become a reseller partner athttps://www.bluestarinc.com/us-en/about-bluestar/become-a-reseller.html. | |
| Climb Channel Solutions | ||
| Lifeboat Distribution has rebranded to Climb Channel Solutions and has been added as a new supplier! Enable them and broaden your selection of items and sources today. To learn more about Climb Solutions and what they have to offer, go to: https://www.climbcs.com/site/content/about. To sign up, go to: https://www.climbcs.com/resellerapp. | ||
| B2X Global | ||
| Brand new to ChannelOnline, B2X Global is now supported with catalog and pricing data. B2X Global is the Strategic IT Distributor for resellers that value customer experience, gross margins, and efficiency. Solution providers that work with B2X Global find they gain the ultimate complement to their channel strategy. Holding a unique position within HPE’s supply chain, B2X is best known for its ability to speed up delivery times and clear hurdles that traditionally hold back Partners from executing. For more information, please visit: www.b2xglobal.com. | ||
Dell
Dell Premier Partners taking advantage of the current Dell Punchout connection can now create and submit PO’s to Dell. Once fulfilled from Dell, the PO will update with ASN data. (No catalog feed support.) (Please contact support to see if you qualify to enable this feature).
Tech Data
Added the manual PO update button for autofulfill POs sent to Tech Data. Now you can manually request and update on a specific PO by selecting the update button in the footer to get current shipping and tracking details.
XML/Import/Export Updates
Updated XML schema can be reached at: https://usm.channelonline.com/schema/7.9/schema.zip
- Customer Import no longer drops Custom Field Data.
- Export Customer Response XML Validation was repaired.
- Ability to create 3 line addresses through xml request.
- New XML request added to validate if a user already exists in ChannelOnline. The “validate_usercredentials_request” will validate if a username and password is valid and the user is “active”.
Some fields have been added to two of the Import/Export files.
- Account Import now has these fields available:
- Ability to modify contact specific payment methods setting.
- Can Include ‘timezone.set’ for assigned storesite.
- Add favorites list to company or contact.
- Updated Document Export to export list price in file two of the document details.
- Updated tax profile page and converted state/province level editing into light boxes versus the inline edit.
- Added the Service and Labor categories and sub-categories to the catalog item rules list.
- Ability to download a PDF version of a signed Proposal via E-Sign that includes the Proposal and the E-Sign information block.
- When copying a storesite; banner items, custom manufacturer lists and categories all get copied to the new store.
- Provide an export button in the footer of the Organizer main results view to download a list of notes and/or tasks to your local drive.
- Print selected options from the organizer by selecting the checkbox to the left of the items you want printed, and then clicking Print Selected in the bottom right footer of the page.
- Can now reassign catalogs through the Batch Update tool. Go to Batch Update, Accounts, select your filter criteria, and then make sure to select Catalogs for the update field.
- Ability to have PunchOut Order Message exclude items within bundles and have only the headers for them has been added it the punchout setup.
BUG FIXES
- Made cursive e-signature font bigger and bolder on e-sign (can vary slightly by browser).
- Including activity logs with all new suppliers and instated any missing activity logs.
- Import Config now allows semi-colons in file name without erring in import.
- Issue resolved for when a storesite link for document did not work if the shortcut name was not completely lowercase.
- Corrected a condition where automatic shipped notification emails were not sent if the PO is converted from Autofulfill to Manual.
- When a document was sent Out for E-sign it was losing the saved Stage and Probability selection.
- CPAS approver can now add required PO number when approving the order.
- System error that would allow the deletion of a cart document from Account Activity on the storesite has been resolve.
- Corrected an issue where Declined E-sign documents were switching to Open on viewing the document. Now it will remain in declined status until opened with the edit button.
- Resolved misplaced cost data on Tech Data quote import that resulted in incorrect costs.
- Corrected pay status issue on invoices when a payment was made on a partial paid due invoice and the status did not update to paid.
- Fixed a Favorites copy and assign problem. When going into a user’s created favorites list and making a copy, that list couldn’t be viewed on the storesite even though it had been assigned to the new accounts.
- Resolved situation where a storesite user gets an email with a link to the document and the user was not logged in. Clicking the link resulted in the login page, and after they logged in they were not getting directed to the document. Now after log in, they will be properly directed to the document in the link.
- Issue with Integration Item type field not retaining the selected value on save was resolved.
- System will properly apply or ignore (when disabled) contact information when sending or printing out product specifications.
- Merge fields used in site links (internal custom URLs) were not being populated correctly for <customer_number> and <customer_id>, but has been corrected.