Content Solutions DocumentationPublished Date: September 25, 2023 Downloaded: March 20, 2026, 8:46 am |
 |
Content Solutions Documentation |
Release 8.6.0
September 25, 2023
ChannelOnline 8.6.0 Release Notes
Released, October 6, 2023
This release, version 8.6, focuses on minor Document improvements, updates to Electronic Signatures, Price Profiles, StoreSite 508/ADA compliance, minor supplier and integration tweaks, plus fine-tuning core application functions and operational improvements.
View the release training video: 8.6.0 Release Training
| SYSTEM STATUS NOTICE: For up to date system status information, bookmark this page: https://help.1worldsync.com/channelonline/notify/channelonline-system-status/ |
Documents
Various minor improvements around document management were added.
-
Continued refinements for Electronic Signature usage.
-
Made attached files accessible to users via e-sign. By using the External File Links document component on the default quote template, users will see the file names and have active links (it must be added if it isn’t already on the layout like External document links below). Once the quote gets sent for e-sign the attachment links to be accessible on to e-sign signing page. Important: be sure to have the “Allow Store users the ability to view and add document attachments.” enabled in Company Settings > Documents > Misc section to use this feature.
-
Assign internal approvers at the account level. It is now possible to designate an internal approver(s) for electronic signature at the account level in the Assigned Personnel section on account settings edit. Designated signers will pre-populate the “To” signer(s) field when the user selects Send for Electronic Signature. This implementation includes the introduction of the “Internal Signer” field to the account settings. Available signers are users with the existing access right for SO Approval, “Ability to approve for Credit Hold or Review All Orders”. Not all users with account access will be able to adjust this setting.

-
Signer form fields displayed at the bottom of the document have been translated into Spanish, French and Portuguese for stores that are using that language by default.
-
- External document links in the quote PDF. Add the External File Links component to the users default quote template if it isn’t already on the layout. Go to a quote and add files in the Attach Files section of the document (not the External Files section). To test, send a sample quote and verify files can be downloaded by clicking the link in the pdf.
-
Import Generic Config. This is now a new separate option in “Add/Import/Update dropdown on quotes. Use the new import generic configuration or quote lists of items by selecting Import Generic Config option to download a sample copy document with all the supported fields. Please notice that the Notes information has been moved to a 2nd tab called Notes on the sample document will provide instructions.
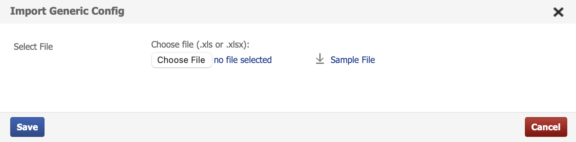
- Additional clean up was done to remove outdated manufacturer import formats from the file import selection under the old Config Import.
-
Account Custom Field component can be used on document templates. If there is account data that needs to be displayed on every document for that customer, and is static, use the Account Custom Field component in your document template. Once on the template those custom fields will display if you select the either “Custom Doc/Account Fields (int.) *” or “Custom Doc/Account Fields (public)” print setting. To make the account custom field component publicly visible to customers, be sure to enable that field with the newly available “Store View” checkbox option.
-
If selecting send for electronic signature only the “Custom Doc/Account Fields (public)” print setting will be available.
-
- Improved document activity tracking for invoicing. Invoice fields logged: Billing/Shipping selections, edits and additions; PO Number, Terms, SalesRep, Delivery Method, Tax, Description, Payments, Line item edits, send/email, and print.
- Quote Close Dates. A new field can be enabled for tracking document close dates to run reports for sales pipeline data. The field can be enabled by going to Company Settings Documents > Quotes; and scrolling to the bottom of that section. There you will see the “Enable Close Date;..” feature. Once enabled it will appear in the upper left hand side of the quote header under the Expiration date.
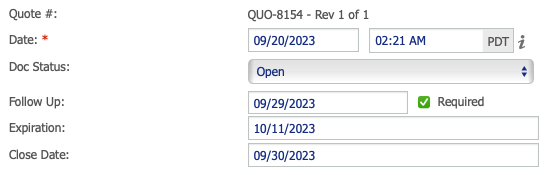
- Also included Close Date information within the Document Date Reference lightbox on sales orders. This will appear if close date was set on a quote manually or automatically by the system. Quotes without a Close Date will not display that information row in the sales order reference lightbox.
- Close Date Reports. Access to Close Date data is done via the date type field in sales reports. Just select the Close Date option from the Date Type dropdown and select your other filters. This data is to be used primarily for quote and prospect forecasting but will remain available for sales orders.

- Automatically update the Stage and Probability selections when sending a quote to the customer. This feature will update the quote or proposal stage and probability after sending via email to the preselected values. To create custom stages, or deactivate some of the default stages, go to Company Settings > Documents > Quotes section and click on the pencil icon to the far right side of the row for this setting, “Set the Stage dropdown to default to this selection”.
- Activate for quotes by going to Company Settings > Documents > Quotes, and make selections to the right of “Update the quote stage and probability after sending via email to the following values”.
- Activate for proposals by going to Company Settings > Documents > Proposals, and make selections to the right of “Update the proposal stage and probability after sending via email to the following values”.
Pricing
Price Profile edit pages received a new look in this release. Viewing and editing Price Profiles and Tiers now use the standard UI page layout and features similar to what is in catalog admin and account view. Key areas modified contain the header information widgets for details, settings, activity, and profile actions. Use the edit icon to reach the editable window for each setting section as is common with most view pages. Other changes:
- Inserted a new filter on the Pricing Page to switch from All, Price Profile, or Tiers. This filter was added to the top right side of the Price Profiles & Tiers list page and is also visible in the recycle bin.
- Part number pricing rule description on profiles will display two lines of information about product for better clarity of item selection.
- New export action and import quantity discounts and now available on Price Profile view page. See Profile Actions widget for links.
- On Account view, the Price Tier name is displayed as an active link. The link will take users to the Price Tier view just like it works for the Price Profile.
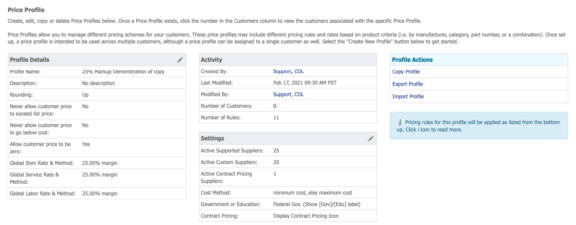
- In Access Rights Profiles the Create and Edit rights have been split apart from the ability to assign them in accounts for Price Profiles and Price Tiers. New separated settings for profiles/tiers are as follows:
- Create Price Profiles
- Edit Price Profiles
- Assign Price Profiles to Customers
- CreatePrice Tier
- Edit Price Tier
- Assign Price Tiers to Customers
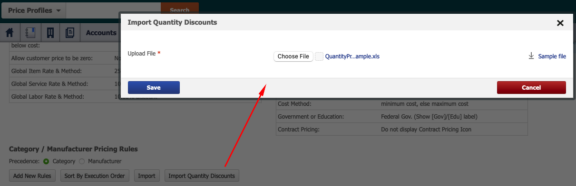
- Import Quantity Break Pricing. Item quantity breaks were into introduced during release 8.5 for setup through the Price Profile interface for categories and items. In 8.6 the ability to import multiple quantity break rules from an excel file has been added in this release. From a Price Profile view page, select the ‘Import Quantity Discounts’ button at the top of the rule sections next to the price profile import. The popup window include a download of the sample file format to be used to import quantity breaks. Users can create rows that correspond to the category ID and/or product ID rule (now shown in the price profile) where they want to apply quantity breaks. In each row with the rule ID provide: the min/max range, rate and method to be applied. Instructions are located on tab two of the sample file.
StoreSites
Store improvements for better administration and a more engaging e-commerce experience.
-
Copy Store function improvements. Instead of having to copy everything when copying store settings, you can now copy specific sections. To do this a new copy function was installed in a store’s settings section called “Copy Content to Other Stores” to allow certain sections to be copied from one store to another. When selecting this option it allows the store administrator the ability to select the store to copy to, and from a list of sections that are able to be copied. Not all ares of a store are copiable, capable sections include: Layout, Look and Feel, Messaging, Featured Products, Spotlite Products, Navigation and Browse Menu, Custom HTML, Banners, Tabs, Pages, and Contact Us.
-
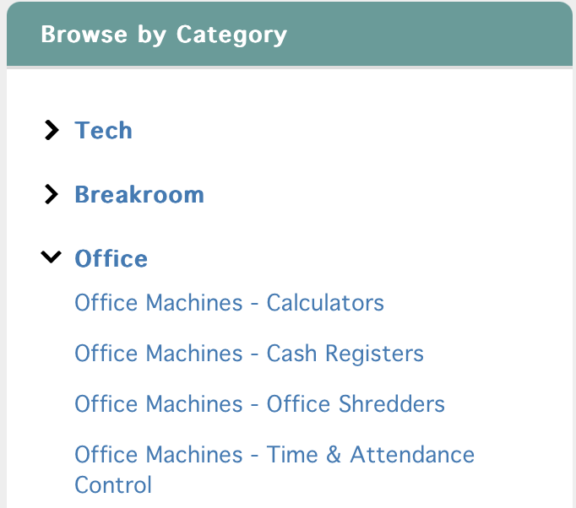
Reorganize Browse by Category. This navigation solution allow admins to ‘group’ categories together under ‘labels’ that they create for a more custom navigation experience. This is different than the category list built off the available catalog. The system allows 2nd tier categories to be added to these groups (in the three tier mode). As they are added they will be removed from the available categories list. An update was made to the Components section under Navigation > “Browse Category Menu” to facilitate this feature. The Manage Browse Menu opens a modal to edit the labels and assigned categories. Again, multiple categories can be included under a single label, like “Networking”, including ones that might be under cables for example. When added to the store they will display as a collapsed list with the labels being the header of the accordions.
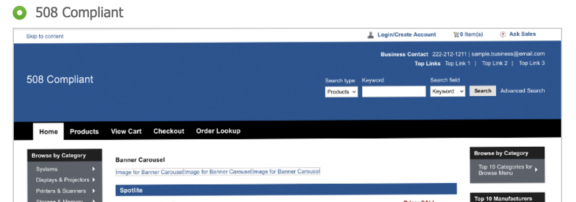
- NEW – Store 508 / ADA Theme. A new store theme was added that can be used in two ways.
- 1) Select the store theme, “Theme: 508 Compliant”, and a color palette for a specific store site. The theme is selected on the Layout page, the available five color schemes are on the Appearance page. The ability to perform advanced changes and certain features are not available with this layout. Key compliant changes include form field highlighting, color control, font size and color, and some tab navigation. We recommend turning off any extra pages or marketing components for best adoption.
- 2) Use your store as is, and users that need to see it as 508 can be switched to that themed view in contact settings. Enable the new contact level setting, “Use 508 Compliant skin on the assigned storesite”, to apply it to a specific contact. This 508 theme controls aspects of the layout for compliance, such as; login page, home page, search results, product page and the cart. (layout page image)
– Some agencies and customers may have additional requirements that are beyond the current scope of this offer. Contact support if you have any questions.
– If interested in trying this theme, you can test this out on your Preview store. That way your live store is not affected.
- Continue Shopping (add and remain) window now includes the item thumbnail image, both lines of a description, and manufacturer part number for improved usability. To enable Continue Shopping go to Store Admin > Settings, edit the cart section and select the checkbox next to, “Enable Add and Remain lightbox to allow users to either continue shopping or …”.
- HTML/XML site map is optional for better search engine accuracy and user navigation. Enabled in the store settings web master section by going to StoreSite Admin, select store to edit, in Settings’ General section, scroll down to Web Master Tools area. There, select the checkbox for “Enable Sitemap in footer”.
- Login for Price option. This store setting that can be used to only show ‘Login for Price’ in search results and product pages for public stores. Users must log then in or register to see actual item pricing. Setting activation is located in a store Settings sub-tab under the Products section. Click on the checkbox next to the label “Show only “Login for Price” on the public store access, logged in users will see prices.”.
- Favorites List View modifications were made to have dedicated Add to Cart and Compare buttons on Favorites List view in a store. These removed the need for users to have to select the drop arrow to perform a function by showing all options at once in the header.
- Contact change password notifications. System will send a notification email when users change their passwords. Activate and edit the Password Update Notification in the System Emails > User Accounts section to begin using this feature.
- Return to top button. Available on all stores, it appears as an up arrow in the bottom right hand corner when you scroll all the way down to the bottom of a page.
CRM
Improvements for managing accounts and access.
-
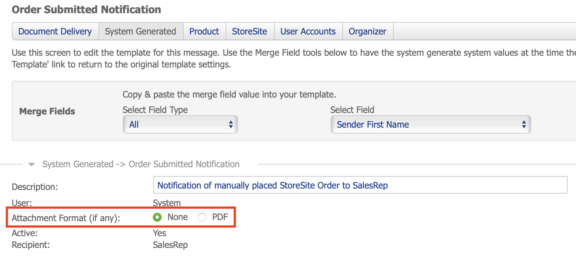
Ability to add PDF attachments to Order Submitted Notification emails. To add a PDF copy of an Order to the order submitted notification emails is easy. Users with access to System Emails can go into System Generated, Order Submitted Notification and hit the edit icon on the left. In edit select the Attachment Format as PDF radio button (set to off by default) and hit save at the button of the page. This attachment can be added in addition to the document link that is already there on the template or in place of it.
-
Active Leads/Prospects Reports. Account stage and account progress are available for column selection for Account reports. These two fields have stage (supported and custom) values and progress % in the report only for leads and prospects. For other account types, it will be blank because there are no values to display. When running the account report just select the filters from the options on the page in the Account section and click Run Report. To customize your stage values go to Company Settings > Settings > scroll down to the Accounts section click on the pencil icon to the right in the value column.
- Account Import. New action options for the account import file through the import wizard include: ‘create’, ‘create_contact’, ‘delete_contact’,’delete_account’,and use of the ‘update’ command. Download the new sample document for all fields and check the help center for instructions (Accounts Import/Export).
-
NEW – Custom field dependency rules. Management to allow administrators to create dependency custom field settings and mappings. Feature allows the use of a predefined combination of a reseller’s created global custom fields at the document and line level. For the purpose of generating dependent rules, all rules must be made before you can create a parent child like dependency. Dependencies work with dropdown and text fields, for a single document type only at this time. Therefore no multiple document types, no checkboxes, dates, or currency selections. These rules are predefined triggers to have one field(s) cause another field to be available.
-
Example, if field B is required, it is only required after field A is populated. If the user selects that the order is a configuration (field A), then make certain configuration fields required (field B, C, etc.).
If the parent is a dropdown selection, then users may assign response values from the parent to the child. Use the dependent mapping, dependent options and value to set predetermined responses based on the initial parent selection. Keep in mind that other options from the child dropdown can still be selected and you can make selecting a child option required. The dependency will let you make a child required or select a value, but will not hide the child or disable it any way. The child is still available for selection without the parent selection being made first.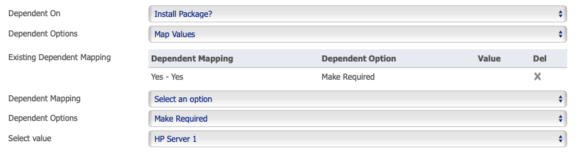
Example: Parent option A has a value of “Small”, the predefined child value could be “1 cubic ft.”.
-
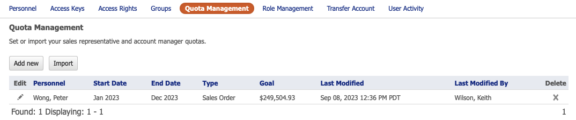
- NEW – Quota Management. In Admin there is a new Personnel page called Quota Management that will list all users with a quota and the annual goal for each year or selected months. Quote, Sales Orders and Invoices are available document types for individual quotas. To create quotas, go to Admin > Personnel > Quota Management (NEW list page) > Edit (goes to the goal setting page). Users with the Personnel Access right: Sales Team > Create / Edit / Assign Groups (update text to ‘Create / Edit / Assign Groups & Quotas’) can create and edit quotas. By clicking the Add New button the Edit Quota lightbox will appear.
Quota Management Page
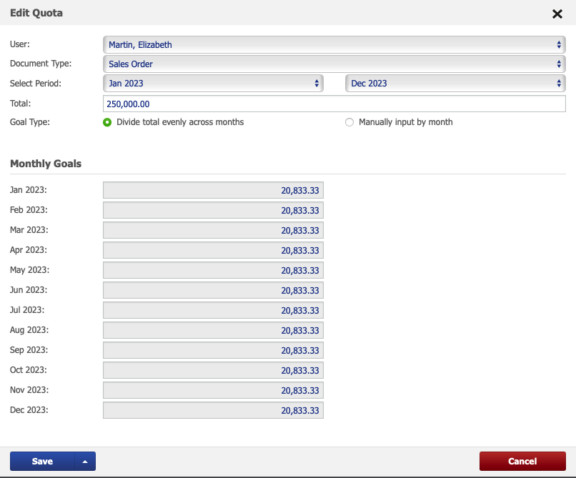
In the Edit Window a user can select the months for which they want to assign a quota. Both the current year and the upcoming year are available to be selected. Administrators can divide an amount evenly or select to manually enter it by month.
Create / Edit Window
For companies with multiple users and document types they want to track, it may be easier to use the import. Importing only requires five fields: Email, Month, Year, Type, and Goal. To make it quicker, use 0 for the month, enter the year and the system will dived the goal evenly across all twelve months. The import button is located next to the Add New button at the top of the Quota list page. In the upload lightbox you can download the template to be used. To add the Quota reports to your dashboard, navigate to My Preferences in the person icon at the top right of the page and select edit in the General section. Go to the dashboard you want to add it to, add or find a row with an open widget location and click on the plus button. In the lightbox scroll down and select the Quota document type report you want to add.
Dashboard View (Quote)

A separate results table shows the goal and actual amounts captured for quotes, sale orders, and what was invoiced (paid) for each month. To support this feature six new dashboard reports have been introduced: My Quote Quota , My Order Quota, My Invoice Quota, Quote Quota (All Users), Order Quota (All Users), Invoice Quota (All Users).- The dashboard report will reflect all prior months of the year up to the current month (no future months).
Reports
Report improvements for more sales and account data access.
-
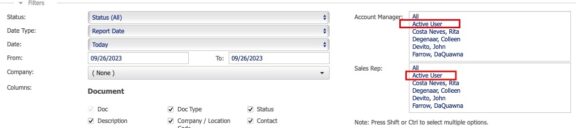
Active user can get assigned to a public report. User goes to reports, creates a report or opens a saved report, on the Account Manager and Sales Rep filters they select “Active User” from the dropdown. Run the report and save it as public so other users can add it to their reports and dashboards. When another user goes to saved reports they will see that saved report, run it, or add it to a dashboard to see their own data.
-
E-waste fees in reports. You can run a Sales Item # report to view the category captured with the e-waste fee that was used on a sales order. This allows resellers the ability to align the number of items and amount of e-waste fees collected for each state/province and category. When running the report you can see the category, manufacturer of the item the fee was for, and the fee amount. To get the captured category make sure you select the ‘Category” option in the Document report filters. These reports can be downloaded to excel by using the right up arrow on the Export button in the footer. Note: the e-waste line is still not be a searchable item, this is for reporting only.
- NEW – Conversion ratio sales report for the Dashboard. Created a report that helps track the conversion of quotes to orders. With this report users will be able to see the conversion rate of quotes to orders for a given 90 day period. This is shown as a percent based on the dollar amount numbers for both quotes and orders. Percent equation used for calculation is: All Orders / All Quotes + All Orders.
Example: 20 (orders) / 80 (quotes) + 20 (orders) = 0.20 or 20% conversion

- Other Sales Report additions:
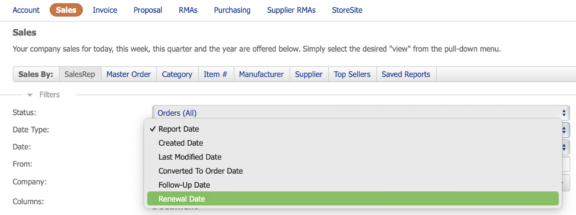
- Added a Renewal Date selection to date type so that it can be used for Sales Order document reports. This date is used to run reports ahead of renewals for customers to be contacted and notified (done separately). When running sales reports for orders the new “Renewal Date” date type make sure it is selected and the proper filters are chosen before clicking on Run Report.
- Renewal Dates Auto/Manual flag on sales reports. Created a way to filter out sales reports for “renewal dates” only entered manually, or set automatically. When pulling reports for orders with renewal dates you can now determine which have auto-filled renewal and which were inputted manually by a user. Select the column option “Renewal Type” to add it to the report.
- Item # report now has supplier Cost and Discount Off List amounts. Inserted column options to Item # reports for selecting supplier “Cost” from the amounts sections and “Discount off MSRP” as a document column option.
- Included “Shipped On” date to the report options. Reporting uses the shipped date at the line item level and is available on the Sales > Item # reports. It is one of the the column checkbox selections called “Shipped Date”. Multiple unique ship dates for the same line are separated by commas.
- Active Lead and Prospect status for reports. Account stage and account progress are available as column selections for accounts report (Reports > Account > Company in sub-tab). These two fields will have values in the report for only leads and prospects, all other account types it will be blank.
- Store View custom fields. Allowing for StoreSite enabled custom fields (viewable and editable) to be viewable and selectable for running reports on the storesite.
Integrations & XML
- ConnectWise updates:
- Designate a default value for opportunity type dropdown for ConnectWise syncs. The new setting is under Connectwise->Settings->Opportunity Export Options and StagesThere a user can enable export Opportunity Type there and set the setting.
- Map account Payment terms between applications. A new page, “Payment Terms Mapping“, was introduced in the settings section to allow the mapping of Payment Terms. On this page a list of available ChannelOnline terms is displayed. Across from these terms is a dropdown oof the available terms used in ConnectWise. Just select one from the dropdown to map; mapping needs to be one to one. Remember to save the page before you exit.
- Mapped Ordered Date in Channel Online to Close Date in ConnectWise Opportunity after a quote gets converted to an order in COL. This can be enabled in the settings page called “Opportunity Export Options and Stages”.
- Error notifications. The system will immediately display a popup message if an error occurs during a manual export. This message will be displayed for quotes, purchase orders, and customers.
- Export taxes. A new setting in the integration is under Settings > Map Product Info (select link to edit). Select the checkbox to enable ‘Export Tax Breakdown to ConnectWise (when available).’; it will be disabled by default. In Connectwise, the tax breakdown is visible ONLY on the Invoice for print. There is no ConnectWise setting to see tax breakdown on the Opportunity (COL Quote).
- Sync / Export POs to ConnectWise. Syncing can be done on the PO by selecting the “Export to ConnectWise” button in the footer. Or, they can be sent over in scheduled synchronization jobs. To send POs a new settings need to be completed.
- In the Connection section fill in the “Reseller Company identifier (required for exporting Purchase Orders)”. This is identifier of the CW company that is used as the reseller company.
- In the Settings section, on the ‘Map Product Info’ there are two new settings that need a product id in CW that will be used for exporting Supplier Fees and PO Tax.
- Supplier Handling Fee Mapping
- Purchase Order Tax Mapping
- In the Settings section: there is a new page for mapping PO statuses; ‘Purchase Order Statuses’. It is possible to map the same CW status to multiple COL statuses if needed.
- Synchronization Jobs can accommodate batch jobs or scheduled jobs with date ranges and time to run.

XML/ Import/ Export Updates
No new XML updates were added in 8.6, the current schema can be reached at: https://xml.channelonline.com/schema/8.5/schema.zip
Contact support if you need assistance.
Suppliers
Mostly backend improvements have been made to optimize supplier file uploads, warehouse changes, and statuses.
-
D&H – “Invoiced” status to trigger Delivered on POs.
-
Dell – Dell Quote Import API enhancement for approved partners. Improved Dell 200 error response and message for POs (for approved partners).
-
Ingram Micro UK – implemented real-time P&A and electronic purchasing.
-
Synnex – Updating file service to newer SFTP method (cutover required by Oct. 15).
Additional Improvements
-
New look to ChannelOnline updated to match 1WS Brand update release. Includes logo, application wrapper and dashboard headers. For more on 1WorldSync’s product suite updates visit www.1worldsync.com.
-
Document revisions are able to support international time format (24 hr), for the European and Brazilian markets.
-
Include the ability to add category to config item import on documents. Helps assign items that are manually created when not recognized by the system as a supported product.
-
Improved date custom field to handle a default setting of ‘# number of days’ in advanced. For example a close date is 15 (days) from the creation date of the field on the document.
-
At the bottom of the favorites list, there is now a Return to top button, and an Add to cart button.
-
Implemented a store help icon for “In Stock Only” button to assist users in understanding how it functions.
-
Display contact custom fields in the Contact view widget for better visibility on contact view page.
-
Overall advancement of RMA / sRMA activity log tracking: item adds, deletes, pricing and address changes.
-
RMA Emails send “From” field has been updated to utilize the Sales Rep email or the standard ChannelOnline support default email. Works on all three system generated emails: Customer RMA Finalized Response, Customer RMA Declined Response, and Customer RMA Submitted Confirmation.
- USPS Address Validation process updates. Made it simpler to employ and manage.
- Enable USPS address validation check on convert to order and checkout for billing addresses on all orders (US only). Enabling this feature will prompt the user to correct the address. They will be able to continue with anything they have entered, it is just a prompt.
- Force the use of the USPS Address validation check on convert to order and store checkout. The order will not proceed until the billing address meets the USPS standard and validation criteria. Users will be forced to update the address to comply with the standard.
- Enable billing address auto-population of Zip +4. Requires the USPS standard valid address with a nine digit zip code (i.e. 11111-9999)
User will now get alert box only when there is something wrong, they need to update, or when the system updates something automatically. A green checkmark is displayed on the document header when addresses meet the USPS validation. When enabled this will also be applied to addresses created on an account’s billing and shipping address page.
-
UNSPSC Code cleanup. There will be three settings for UNSPSC profile options moving forward.
-
One, override the UNSPSC versions with your own default code: do not select a version, enter your own default code it will become the code for ALL items. Select the “Always…” radio button to apply this rule.
-
Second, to override UNSPSC with default code or rules called even when a UNSPSC code is available, select “Always use default code or rules below“ and enter a default code.
-
Third, to supplement with rules when we do not have UNSPSC. This settings is called “Use UNSPSC when available, then default code and rules below“. This can be used with or without a default code setting.
-

-
Moved a users Follow-up document settings from the My Account settings page to My Preferences for easier access. The activation display is still on the My Account settings view widget.
-
New service options to facilitate Azure SSO end customer logins to a store. Ask sales how to activate this end customer option.
General Fixes
- Eliminated the ability for users to see line item custom or global fields that are not store site view/editable from showing on end contact store site item reports.
- ConnectWise Customer import no longer results in assigning the Central timezone for contacts not in that time zone.
- Order Type was corrected on System Emails templates to reflect true order type.
- Added a description about having attachment on the E-sign Accepted Notification template.
- Fixed issues where a user was unable to copy price profile when they had the access right “Create Price Profiles & Tiers”.
- Wrong state/country was importing from ConnectWise because of state/province abbreviation conflict into Channel Online was resolved.
- Corrected a problem causing the email Order Submitted Notification being sent to Sales Rep was not being received when guest checkout was using the HTML email type setting.
- Changed Follow Up Date field to Expiration Date field for email template merge field mapping.
- Storesite redirect not working with some custom domains issue was resolved.
- Search was reverting TB to GB in the breadcrumbs, they now stay as entered.
- Line Item Custom/Global Fields that are not storesite view/editable are showing on storesite item reports
- Romanian city states do not display special characters; special characters now accepted.
- Fixed a dashboard title that was appearing as a database field and not a structured title.
- Resolved an issue where a user could not create sRMA (supplier) for a manual line item. Manual line items are now available to be used on sRMAs.
- Manufacturer filtering using group by Supplier was not working in some instances.
- Tax calculator not displaying correctly when tax profile for Colorado was not collecting taxes.
- Document Template Rounded Style wouldn’t save properly, it is now saving and being applied to the template.
- System Emails fields have been reordered to appear in alphabetical order.
- Import config date type field issue on line item custom fields was updated to handle the excel date format field setting.
- Some issues on copy Storesite were rectified in the copy improvements.
- Internal attachment files-show ‘Confidential Internal’ warning label on the print preview in the delivery window.
- Canada e-waste fee update, increased the cost for e-waste fees on all Canada provinces.
- Change “Custom Doc Fields (public)” to “Custom Doc/Account Fields (public)” in the delivery window options.
- Removed old vendor formats from Import Config; those no longer supported by those manufacturers.
- Fixed Classic Dashboard bug that directed users to old non-supported report pages.
- Store order reports would not list results when users selected non-default column checkbox selection. This issue was resolved so that any combination of checkboxes can be selected by the contact in store reports.
- Corrected a problem with the automatic follow up date setting in My Account settings. The dates were not populating on quotes converted to sales orders. Now this setting is applying the proper follow up date when the feature is enabled. Additionally this setting was moved from My Accounts to My Preferences for easier access and usability.
- Carrier Account Numbers on POs. For Ingram Micro different shipping costs for customers with the carrier account # was not making it to the Ingram Micro PO. Now when the account number is set up with delivery method it is taken from delivery methods properly.
- Resolved an issue where the document template colors were not displaying correctly on the PDF. For example set colors for Title background and Appearance background (when available) would not render correctly on the document.
- Removed tax change pop-up warning alert on guest, or logged in user, checkout when there are no tax rate changes on addresses.
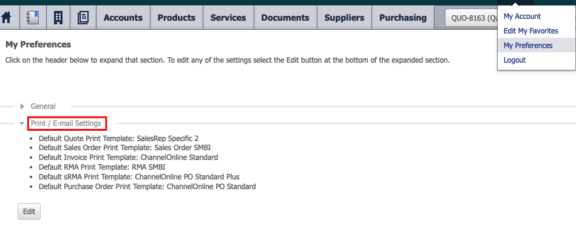
Fun Tip
Set your default document template and print settings!
You can set your default document template preferences in the My Preferences section. To navigate there, hover over the user silhouette at the top, click My Preferences, then click Edit in the Print / Email settings section. This setting only applies to the account you are logged into and will not affect any other users.