
Content Solutions DocumentationPublished Date: 2019-09-26 Downloaded: April 9, 2026, 9:27 am |
 |
Content Solutions Documentation |
WordPress Integration (OLD)
2019-09-26
DisclaimerDue to the large number of third party applications and Content Management Systems (CMS), 1Worldsync Content Solutions, does not provide support for third party applications or CMS. This guide is provided as an aide for guidance and suggestions for integration. 1WorldSync is not liable for any actions, damage or loss. If you require support for your third party application or CMS, please contact the owner or company that produced the application for assistance. |
Getting Started with WordPress Integration
When adding content and saving, there are various elements that WordPress will autoformat or remove from your content by default as a security precaution. There are some steps required in order to integrate ContentCast or DataSource Cloud.
For more information, please see http://codex.wordpress.org/Using_Javascript
There are a variety of solutions:
- Switch your editor to HTML or TEXT view in the editor before pasting the JavaScript code. If you do not see HTML or TEXT tab, you may need to install other editor plugins.
- Install a different WYSIWYG Editor.
- Install HTML and JS Plugins
-
WP Coder: https://wordpress.org/plugins/wp-coder/
-
Simple Custom CSS and JS: https://wordpress.org/plugins/custom-css-js/
-
Code Embed: https://wordpress.org/plugins/simple-embed-code/
-
Integrate Product Page content for WordPress
Due to a large number of e-Commerce add-ons for WordPress, we are unable to provide support. We suggest referring to the documentation of your preferred e-commerce package to determine how to:
- Add a Product Page Script and HTML div containers to your Product page template
- Pass the manufacturer name, part number, UPC and locale dynamically.
Integrate Showcase for WordPress
- Login to your WordPress Admin section
- In the left menu, select Page -> Add New
- Enter the Title: “Sample Showcase” (example)
- Click the HTML or Text tab to properly add HTML and JavaScript.
- In Article Text area, Paste your showcase code such as:
Showcase Code Example
<div id="ccs-brand-showcase"></div>
   <script type='text/javascript'>
   var ccs_cc_args = ccs_cc_args || [];
   // My HP Brand Showcase
   ccs_cc_args.push(['mf', 'HP']);
   ccs_cc_args.push(['lang', 'en']);
   ccs_cc_args.push(['market', 'US']);
   (function () {
  var o = ccs_cc_args; o.push(['_SKey', 'ABC1234']); o.push(['_ZoneId', 'ABC1234asdasd']);
  var sc = document.createElement('script'); sc.type = 'text/javascript'; sc.async = true;
  sc.src = ('https:' == document.location.protocol ? 'https://' : 'http://') + 'cdn.cs.1worldsync.com/jsc/h1ws.js';
var n = document.getElementsByTagName('script')[0]; n.parentNode.insertBefore(sc, n); })();
</script>
You will need to replace the above example with your own unique code available in the portal. - Click Save
- Preview the page.
If the showcase still does not appear on your page, check to see if ” <p></p>” are appearing within the code. If you still see paragraph <p> tags in the JavaScript code, following the steps below:
- Edit the Showcase page
- Switch to the Text tab
- Remove paragraph line breaks by placing your cursor right after the semicolon
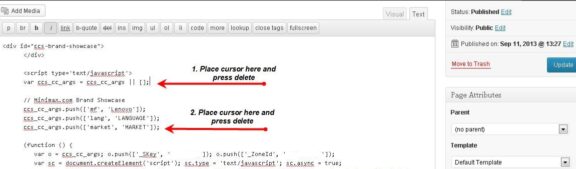
- Hit the Delete key in order to get rid of the extra line spaces. Do this for all semi-colons.
- Update and preview your page.
How to add Showcase to WordPress using Ultimate TinyMCE
If you have the Ultimate TinyMCE plugin installed, following the steps below:
- Following Steps 1-3 above in the previous section.
- Click on the HTML button within the TinyMCE toolbar:
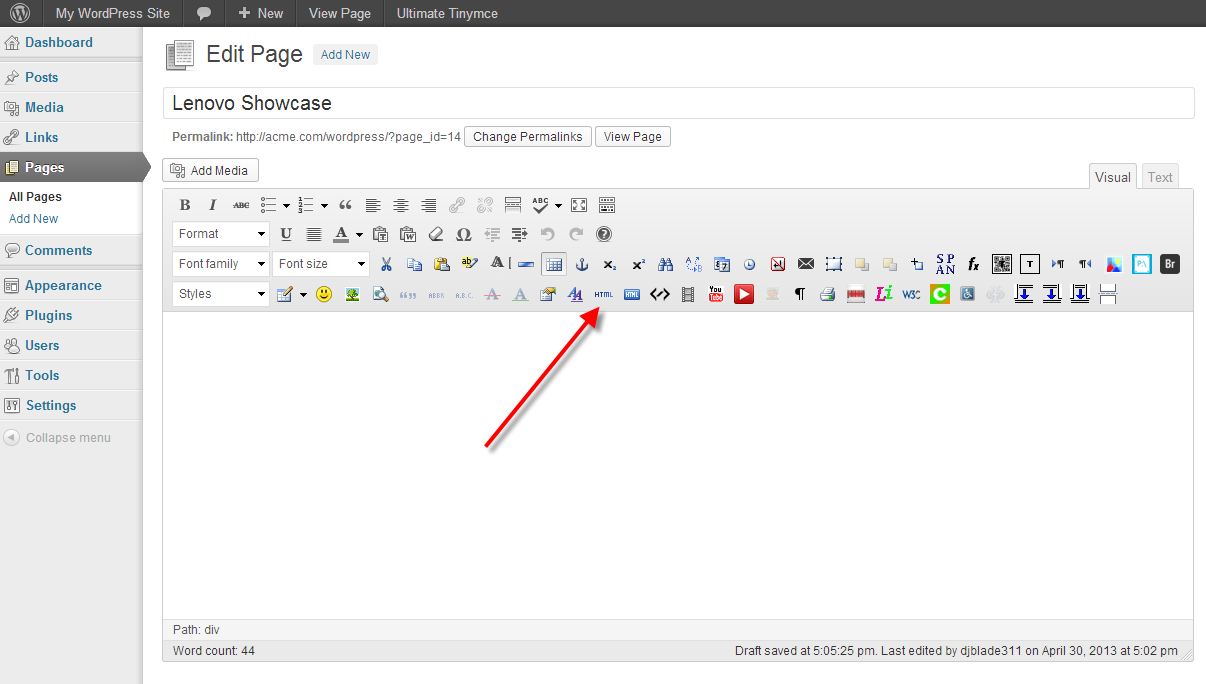
- Paste your showcase code in the HTML text area:
- Click on Update in the lightbox editor window to close
- Click on Save or Update
- Preview your Showcase page.
Integrate Campaign Banners to WordPress
Using ContentCast Campaigns Plugin for WordPress
The easiest way to integrate campaign banner scripts is to install our easy-to-use ContentCast Campaigns Plugin for WordPress.
Requires WordPress 3.0 and newer
Installation
- Download the ContentCast WP Plugin ZIP file.
- Login to the WordPress Admin area
- Go to Admin → Plugins → Add New
- Click Upload Plugin
- Choose the WordPress-ContentCast-Campaigns.zip
- Activate the Plugin
Usage
- Go to Admin → Settings → ContentCast Campaigns
- Copy and paste each Campaign Script into each of the available slots.
- If you don’t have the Campaign Scripts yet:
- Must be registered within the manufacturer’s branded portal such as:
- In the portal, set up a new Campaigns script
- Click Get Code and paste the code below.
- Copy and paste the shortcodes where you want the banners to appear:
- Articles
- Blocks
- Widgets
- Etc
Manually add campaigns to WordPress templates
- Login to the WordPress Admin area
- Go to Admin -> Appearance -> Editor
- Open the template file that corresponds with your preferred placement and add the DCCN Campaign code:
- footer.php
- header.php
- In the DCCN portal, choose your topic and banner size. Click Generate and copy the code.
- Paste the DCCN Campaign Code
- Save the template file
- Refresh your WordPress website page to preview
Suggested WordPress Plugins
How to add the campaign banners with HTML JavaScript Adder plugin
The HTML JavaScript Adder allows you to add HTML or JavaScript to your WordPress sidebars only.
-
- Download the HTML JavaScript Adder plugin and install it according to the installation instructions
- In the DCCN portal, choose your topic and banner size. Click Generate and copy the code.
- In WordPress admin -> click Appearance -> Widget
- Drag and drop the HTML JavaScript Adder to your sidebar
- Make sure “Automatically add paragraphs” is unchecked.
- Paste the DCCN Campaign Code copied from Step 2
- Save and preview your page in WordPress