
Content Solutions DocumentationPublished Date: August 24, 2021 Downloaded: March 18, 2026, 8:46 am |
 |
Content Solutions Documentation |
FAQs
PrintGeneral
What are Ledger Codes?
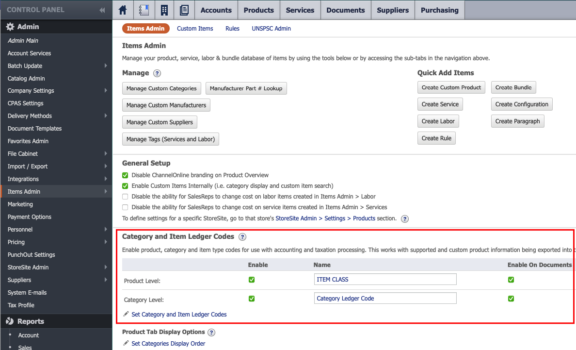
Ledger Codes offer support for accounting. This allows resellers to take internal accounting ledger codes for product categories, services and labor and map them to supported categories in ChannelOnline. When mapped it allows for these values to be passed between ChannelOnline and a third party application. To enable Ledger Codes, go to Admin > Items Admin > Category and Item Ledger Codes section. Select either or both depending on the level of granularity that is needed. Add a name that reflects how they are called in the third party application.
- Product Level - this is product type in ChannelOnline (product, service, or labor).
- Category Level - this is by category and sub-category in ChannelOnline (two tier structure). Click on the "Set Category and Item Ledger Codes" link to manually map supported and custom categories to the corresponding third party (accounting) code required.
-
Use case. Mapping Ledger codes to Product Family in Salesforce. This mapping allows Salesforce “product family” to be included as part of the synchronized item information. Once enabled, administrators can go into Items Admin and set up the proper product family name at a per category level. For example items could be identified as “MRR” or “Services” or whatever values have been established in Salesforce. (All ledger codes in COL will need to match the picklist values exactly to successfully import to Salesforce. Mapping requires Salesforce field label: Product Family, field name: Family, data type: Picklist.)
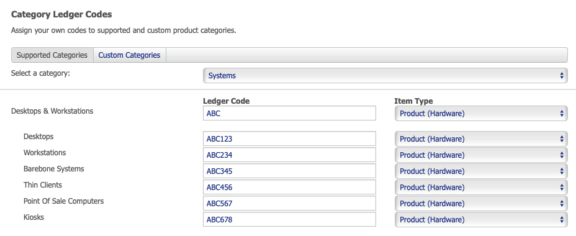
 Adding Ledger Codes to categories in "Set Category and Item Ledger Codes".
- Product Level - this is product type in ChannelOnline (product, service, or labor).
- Category Level - this is by category and sub-category in ChannelOnline (two tier structure). Click on the "Set Category and Item Ledger Codes" link to manually map supported and custom categories to the corresponding third party (accounting) code required.
-
Use case. Mapping Ledger codes to Product Family in Salesforce. This mapping allows Salesforce “product family” to be included as part of the synchronized item information. Once enabled, administrators can go into Items Admin and set up the proper product family name at a per category level. For example items could be identified as “MRR” or “Services” or whatever values have been established in Salesforce. (All ledger codes in COL will need to match the picklist values exactly to successfully import to Salesforce. Mapping requires Salesforce field label: Product Family, field name: Family, data type: Picklist.)
Adding Ledger Codes to categories in "Set Category and Item Ledger Codes".
Store Accessibility and Section 508 Compliance
ChannelOnline has one theme approved for our hosted storesites, so that individuals with disabilities can access relevant information regarding your company and its products and services. While the majority of storesite end customers are businesses, we seek to help you meet obligations under the Americans with Disabilities Act and other accessibility laws (to the extent they are applicable), and we are continually working toward meeting the Web Content Accessibility Guidelines standards. We understand that individuals with varying disabilities may seek information on your hosted website, and it is our goal to assist ChannelOnline resellers to provide all individuals access to the content, features and functionality available on the website. While we are making progress, we recognize that some content, features or functions may not be available for these individuals. In many of these cases that feature can be disabled to simplify the experience. Things you can do in Store Admin:
- Use the 508 / ADA theme available on the layout page. This covers color, font and navigation elements for those with eyesight disabilities.
- Limit the number of components you use on your store
- Make pages as clean as possible, reduce the amount of text, limit images and banners
- Use the 508 / ADA theme available on the layout page. This covers color, font and navigation elements for those with eyesight disabilities.
- Limit the number of components you use on your store
- Make pages as clean as possible, reduce the amount of text, limit images and banners
What do the Supplier Download messages mean?
ChannelOnline shows various messages pertaining to supplier downloads. Here is a brief overview of the common download messages.
- “Last Download” column: this displays the date/time stamp for the last time our system retrieved a price file from that supplier.
- "Last Import" column: this displays the date/time stamp for the last time our system imported a downloaded price file from that supplier.
- “Import Queue”: this means we have dowloaded the file but it has not completed the import.
- "Download Queue": this means we are waiting to dowloaded the file from the hosted location. Could indicate a missing location of file.
- "Invalid Username or Password.": this means we could not access the location of the file, please check with the vendor to make sure you have the correct credentials.
- "Expected data not found in compressed file. Contact channel support.": this means that the filename did not match what the system was expecting to find.
- Time to import; all files get queued in the system and are processed on a first come first served bases. If we are processing many files at once, which we typically do, that could create a period of 6 hours to process a file. This is not unusual at the beginning of a week.
- Price file frequency: the system automatically checks for a new reseller price file every 60- 90 minutes.
How do I make sure my company gets ChannelOnline Notifications?
All ChannelOnline users will receive product related emails for product updates, releases, maintenance outages, or support messages. For people needing to receive updates and communications regarding ChannelOnline that do not use the platform, please add them as Employees within ChannelOnline. Employees do not require a license but will receive maintenance and release updates. To add employees, please go to Admin > Personnel > Create New User and select Employee (Read Only) as the access right profile. Please also make sure your email client accepts emails from ChannelOnline.
How is MSRP / List Price determined in ChannelOnline?
Manufacturer Suggested Retail Price, or List Price, becomes available from the multiple supplier feeds integrated into ChannelOnline. MSRP does not come from 1WorldSync's DataSource service, the service we use for product data, or from any direct manufacturer feeds. If the values received from suppliers are different, we have an algorithm that determines which supplier value to apply in the system. If there is a change to the MSRP of an item it may take time for that update to propagate through the system. When those values are applied depends on when the suppliers send updated information in their product feed and when our update process runs. Once a supplier file with updated MSRP values is deployed to ChannelOnline, it may take up to 24 hours for those values to be aggregated and applied.
Note: You have the ability to enter a custom MSRP per item via the item edit page. Doing so will not only update the displayed MSRP if the system generated one is not accurate, but works when performing discount off MSRP pricing calculations.
Why does the supplier data in ChannelOnline not match the information on my supplier’s website?
The two most common reasons why supplier data in ChannelOnline does not match the information on the suppliers website are:
- The latest supplier feed was not able to be imported because the credentials entered for the supplier in ChannelOnline are no longer valid
- The supplier has updated their system but has not made an updated file available to import
- The latest supplier feed was not able to be imported because the credentials entered for the supplier in ChannelOnline are no longer valid
- The supplier has updated their system but has not made an updated file available to import
Why are products from the new supplier I just activated not showing up when I search?
You must add the new supplier to each of the price profiles you want those products to appear in before they will show up in search results.
Click here for more information on adding suppliers to price profiles
You must add the new supplier to each of the price profiles you want those products to appear in before they will show up in search results.
Click here for more information on adding suppliers to price profiles
Does ChannelOnline support the creation of bundles or configurations?
Yes. ChannelOnline supports the creation and management of bundles and configurations. Construction of a bundle or setup of items for configuration can be done through Items Admin. Item selection for a product configuration to be added to a quote is handled on the products page. One can also generate a bundle when building a quote/order.
Click here for more information on Bundles and Configurations
Can I have different shipping pricing apply to different customers?
Yes. Different shipping pricing rules can be assigned to different customers.
Click here for more information on creating and assigning shipping pricing rules
Yes. Different shipping pricing rules can be assigned to different customers.
Click here for more information on creating and assigning shipping pricing rules
Can I create different pricing schemes for different customers?
Yes. Users who have been assigned the rights can create, edit and assign price profiles to their customers. Rules are added by selecting a manufacturer, a category-subcategory, a manufacturer category combination, or a specific manufacturer part number. For all rule types, there are the following methods of calculating price: markup, margin, plus or minus a specific dollar amount, or discount off list. For rules involving a specific manufacturer part number, you can also specify a Sell At rate, which is a hardcoded price that doesn't take into account the cost from the supplier. Pricing can also be edited at the line level when placing a quote or an order. ChannelOnline displays the cost, margin, profit, taxable/non-taxable items and shipping charges as a quote is generated.
Click here for more information on Price Profiles
Can I add custom items into ChannelOnline?
Yes. You can create new custom items one at a time or by importing them through a spreadsheet or CSV file. In addition, you can also customize the product using a custom manufacturer, custom categorization, or custom images.
Click here for more information on creating and managing Custom Items
Yes. You can create new custom items one at a time or by importing them through a spreadsheet or CSV file. In addition, you can also customize the product using a custom manufacturer, custom categorization, or custom images.
Click here for more information on creating and managing Custom Items
Is there a way for customers to set up orders for approval?
Yes. ChannelOnline’s Company Purchase Approval System (CPAS) is a premium service which allows either the reseller or end customer to set up an approval hierarchy such that some employees at the end customer will need to have their orders approved by one or more employees at their company.
Yes. ChannelOnline’s Company Purchase Approval System (CPAS) is a premium service which allows either the reseller or end customer to set up an approval hierarchy such that some employees at the end customer will need to have their orders approved by one or more employees at their company.
Are tax rates included (determined) when shipping to my clients in another state?
Yes. The tax profile module in ChannelOnline includes the tax rates for all 50 states, The District of Columbia and Puerto Rico. Settings in the tax rate allow you to enable the tax rate for both bill to and ship to addresses.
Yes. The tax profile module in ChannelOnline includes the tax rates for all 50 states, The District of Columbia and Puerto Rico. Settings in the tax rate allow you to enable the tax rate for both bill to and ship to addresses.
Why is tax showing $0.00 or cannot be calculated?
Tax calculations for customers using Default Tax Rate are determined by the Shipping Address. Please confirm tax is being collected for that state in the Tax Profile and then make sure that the City, State, and ZIP code combination is correct. In addition, please ensure that the City and ZIP code values do not have unnecessary white space at the end or beginning of the value.
Tax calculations for customers using Default Tax Rate are determined by the Shipping Address. Please confirm tax is being collected for that state in the Tax Profile and then make sure that the City, State, and ZIP code combination is correct. In addition, please ensure that the City and ZIP code values do not have unnecessary white space at the end or beginning of the value.
Why is estimated shipping appearing as $0.00 or is lower than what is expected?
Estimated shipping is based on the weight of a product as it is provided in the feeds from the suppliers. ChannelOnline applies the following rules when handling item weights:
- System looks for a rate that is most common among suppliers. Example: Supplier A and Supplier B have 5 lbs., but Supplier C has 5.5 lbs. The system will use 5 lbs. from Supplier's A and B as it is the most common.
- If no common weight is found among the suppliers, we take the highest weight. Example: Supplier A has 4.75 lbs., Supplier B has 5 lbs., Supplier C has 5.5 lbs; then the system will use 5.5 lbs. from Supplier C as it is the highest.
Why does my customer’s price not match what I set up in the price rule?
There are two major reasons why an end customer’s price may not be what you expect based on the rule(s) you created. The Default Settings section of a Price Profile will have settings related to safeguards regarding the final customer price (i.e. Never allow customer price to exceed list price and Never allow customer price to go below cost). You can enable one, both, or neither of these rules. If the markup/margin rule would put the price above the list price, price will top out at the list price. If you have a discount rule that would put the price below the selected supplier’s cost, the price will bottom out at the cost so you do not potentially sell the item at a loss.
There are two major reasons why an end customer’s price may not be what you expect based on the rule(s) you created. The Default Settings section of a Price Profile will have settings related to safeguards regarding the final customer price (i.e. Never allow customer price to exceed list price and Never allow customer price to go below cost). You can enable one, both, or neither of these rules. If the markup/margin rule would put the price above the list price, price will top out at the list price. If you have a discount rule that would put the price below the selected supplier’s cost, the price will bottom out at the cost so you do not potentially sell the item at a loss.
Can I set print settings as defaults so I don’t have to select them every time?
Yes. Print setting defaults can be established for all document types.
Click here for more information on how to set default print settings
Yes. Print setting defaults can be established for all document types.
Click here for more information on how to set default print settings
Can the store site be customized to look different for each customer?
No. Each store site is created based on the selected template and everyone that accesses the site will experience the same look and feel. If a customized interface is required for a certain customer or segment of customers, additional store sites can be purchased.
No. Each store site is created based on the selected template and everyone that accesses the site will experience the same look and feel. If a customized interface is required for a certain customer or segment of customers, additional store sites can be purchased.
How-to
Understanding Advanced Search Functions
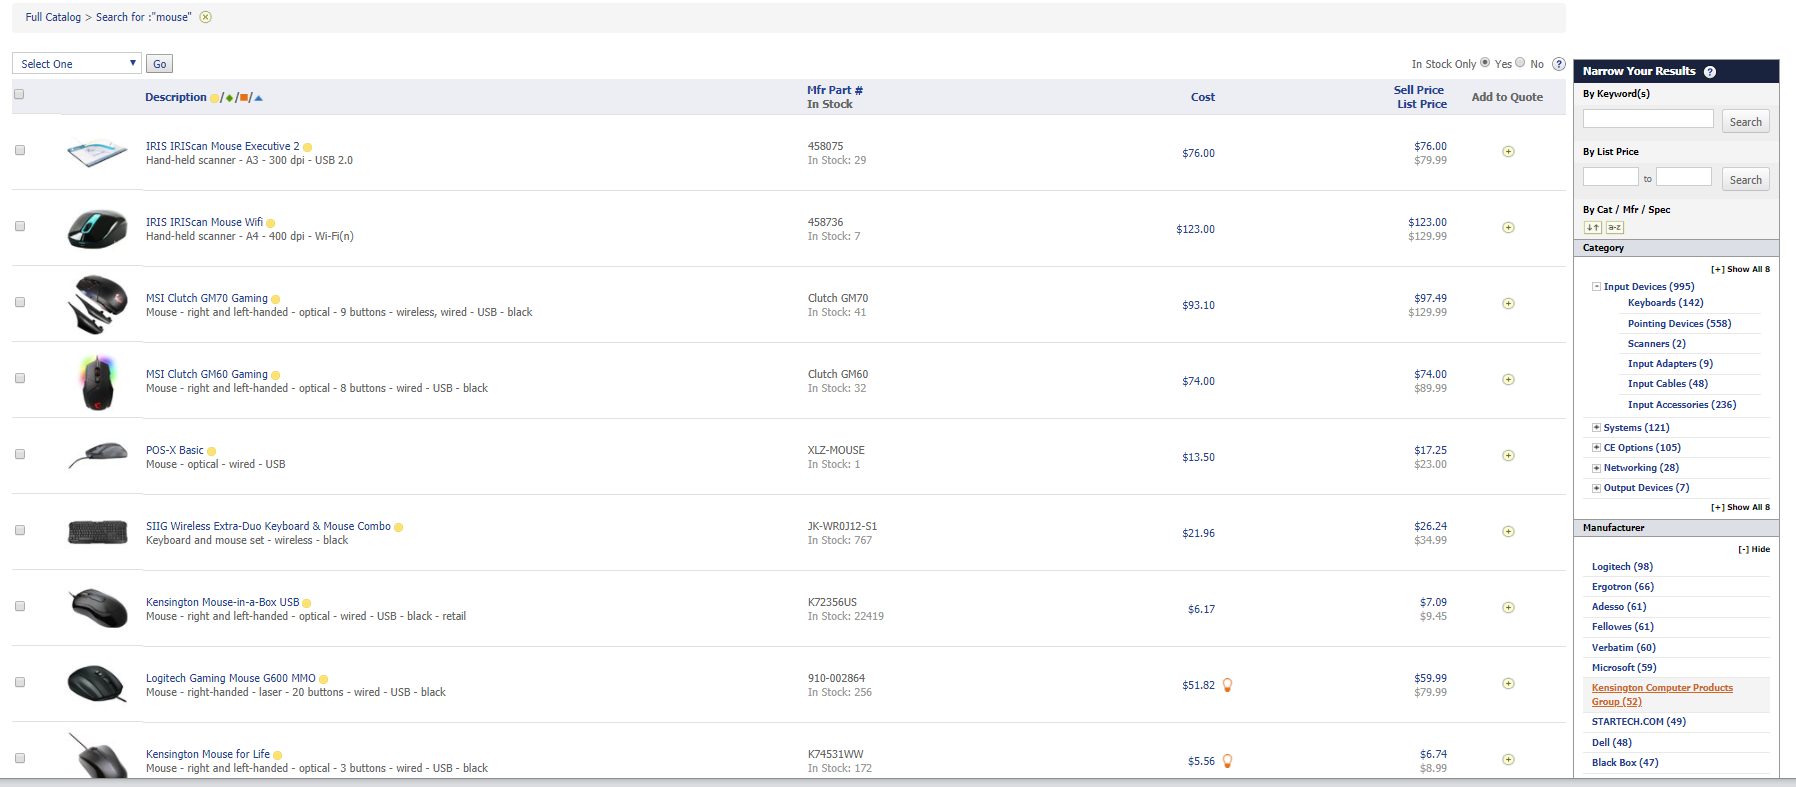
Keywords - entering keywords will result in a search that looks for a match found on ALL words anywhere in the following fields: Description, Product Class, Category and Part Number. Multiple words can be used in a single search term, such as "HP notebook", and the results will take into account if the words are in close proximity to one another. For example, a search on "HP notebook" provides results for "HP Compaq Business Notebook 2510p" before returning results for HP Elitebook 2530p" even though the term "notebook" is in the attributes of the product. Starts With - selecting this box enables you to search for terms that begin with what you typed. Example; if you typed "note" it will return results that contain the word "note" in them, such as "notebook". Description Only - selecting this box searches only for the exact terms used in the description fields only. For example a search for "right hand mouse" will look to match all those terms in the description, they may be in any order and not exactly as you typed them. List Price Range - narrow the results by entering a minimum and maximum list price range for the product results that you are looking for. Category and/or Manufacturer - these filters allow you to narrow your search query to certain categories and/or manufacturers with your keyword entry. You may choose multiples by using the "Shift" or "Ctrl" keys as you select additional categories or manufacturers. (This text also needs updating on the page itself...to add the Shift part) Part Number - On Advanced Search it will try to locate t he item for you and presnt results as you type. On a document; the search field at the bottom near the totals allows you to enter in more than one part# search at a time. The search engine will process these entries as "OR" type searches. For example if you type "CISCO861-K9" in the first box, "mouse" in the second box and "7733pau" in the third box, the search engine will look for "cisco861-k9 OR mouse OR 7733pau" and return all the relative results that match. In Stock Only - selecting this box limits the displayed results to only products that had a positive stock count within the last 24 hours.
How do I manage Contract Pricing?
There are four ways in ChannelOnline to manage contract pricing:
- Manually by editing/entering the contract (bid) #, adjusted cost, and price directly on the quote document.
- Supplier assigned contracts for usually a specific manufacturer. For more details read Supplier Contract Uploads.
- Account Level Contracts that can be assigned to a supplier but can be used with all suppliers at the quote level. For more details read Account Contract Management.
- Generic Imports on quotes. Used for many different types of manufacturer pricing imports directly to the quote document. For more details read Generic Config (Contracts) Imports.
Managing Personnel & Access Rights
Location: Admin -> Personnel Here you will be able to manage your ChannelOnline user accounts and permissions. The pages in this section needed to manage your sales team properly are:
- Personnel - From here you can create new user accounts if you have the licensing for it. You may also view, edit, and delete existing users if you have the permissions to perform those actions.
- Access Keys - Access Keys are based on the existing system permissions that get assigned to group users and other group users. The key difference is that these permissions can be applied to a single user (like one outside your group).
- Access Rights Profiles - These are your security groups. Each Access Rights Profile contains a list of actions that members of that profile can perform when using ChannelOnline.
- Groups - Groups are a way to combine multiple users into a team. For example, a west coast sales team and an east coast sales team could each have their own group. Each individual user account can control which customers, documents, and price profiles to be shared with the other members of the group, as well as what level of control others can have.
- Role Management - Use existing roles (job titles) or create new roles for personnel. Roles can be used to assign users to customer accounts.
- Transfer Account - This is a utility used to copy all of a users owned objects (customers, documents, price profiles) to another user. This utility is most commonly used when attempting to delete a user account. You may only delete a user account if that user no longer owns any objects.
- User Activity - Records user login history and any bulk change operations.
Managing Access Rights
(security permissions) ChannelOnline provides a list of built-in access rights profiles, which you can think of as roles within your organization. While the default access rights profiles might be sufficient for your needs, you can create new access rights profiles from scratch or by copying an existing profile.- Admin SalesRep - Buyer (Read Only) - All access
- Admin SalesRep (Read Only) - All except purchasing
- SalesRep - Buyer (Read Only) - Sales documents and access to group accounts, purchasing, but no administration
- SalesRep (Read Only) - Sales documents and access to group accounts
- Employee (Read Only) - these are non-users that can be assigned to an account, like credit manager or service technician
Dependencies
If an access right option is grayed out, and unable to be added to that profile - it's because there is a dependency that has not been met. Several of the access rights settings available have a parent setting which must first be turned on. For example: You cannot Create / Edit POs until you can first View All POs. If it is not immediately clear what a specific items parent is, try thinking about the actions that person would need to take in order to get to that option.Users and Groups
As mentioned above, each sales team member can be added to a single group of sales team members. Groups allow sales team members to easily share their customers, documents, and price profiles with one another. Each user has several options to control group permissions on the profile page. You can navigate to the sales team profile page from either of the following ways:- Click the My Account link in the top left hand corner of ChannelOnline. This will take you to your own profile page where you will see your assigned group and link to view members.
- Click the View icon from Admin -> Personnel -> "User Name"
- My Group - The group this rep is currently assigned to Other Groups - All other groups
- Both "My Group" as well as "Other Groups" can further be given the following access permissions to a user's customers, documents, and price profiles:
Access Keys
Access Keys are based on the existing system permissions that get assigned to group users and other group users. The key difference is that these permissions can be applied to a single user (like one outside your group). Use a combination of area permissions when creating a key. Keep in mind that a user will still need to have the Access Right permission to perform that action that gets assigned through the Access Key. For example: A user needs to have “Create / Edit Accounts” access right to edit an account they have access to through a Read + Modify setting on an Access Key. Without the Create / Edit Access right the Access Key permission will not work. Learn more at Access Keys. NOTE: For a better understanding on how all the rules apply, go to Personnel - Access Rights & Keys.Adding New Personnel Users
In order to create a sales rep, navigate to the Admin -> Sales Team page and click the "Create New SalesRep" link. Be sure to configure the correct access rights profile and group for that user's position within the organization. Other important options include: Login ID - This must be an email address. A user will log into ChannelOnline using this as their username. Account Active? - Allows you to create the account, but leave it disabled. You may also disable an existing sale rep account using this feature if you have the proper access to do so. Send e-mail notification - Will generate an email to the new user with a link to setup a password.- Personnel - From here you can create new user accounts if you have the licensing for it. You may also view, edit, and delete existing users if you have the permissions to perform those actions.
- Access Keys - Access Keys are based on the existing system permissions that get assigned to group users and other group users. The key difference is that these permissions can be applied to a single user (like one outside your group).
- Access Rights Profiles - These are your security groups. Each Access Rights Profile contains a list of actions that members of that profile can perform when using ChannelOnline.
- Groups - Groups are a way to combine multiple users into a team. For example, a west coast sales team and an east coast sales team could each have their own group. Each individual user account can control which customers, documents, and price profiles to be shared with the other members of the group, as well as what level of control others can have.
- Role Management - Use existing roles (job titles) or create new roles for personnel. Roles can be used to assign users to customer accounts.
- Transfer Account - This is a utility used to copy all of a users owned objects (customers, documents, price profiles) to another user. This utility is most commonly used when attempting to delete a user account. You may only delete a user account if that user no longer owns any objects.
- User Activity - Records user login history and any bulk change operations.
Managing Access Rights
(security permissions) ChannelOnline provides a list of built-in access rights profiles, which you can think of as roles within your organization. While the default access rights profiles might be sufficient for your needs, you can create new access rights profiles from scratch or by copying an existing profile.- Admin SalesRep - Buyer (Read Only) - All access
- Admin SalesRep (Read Only) - All except purchasing
- SalesRep - Buyer (Read Only) - Sales documents and access to group accounts, purchasing, but no administration
- SalesRep (Read Only) - Sales documents and access to group accounts
- Employee (Read Only) - these are non-users that can be assigned to an account, like credit manager or service technician
Dependencies
If an access right option is grayed out, and unable to be added to that profile - it's because there is a dependency that has not been met. Several of the access rights settings available have a parent setting which must first be turned on. For example: You cannot Create / Edit POs until you can first View All POs. If it is not immediately clear what a specific items parent is, try thinking about the actions that person would need to take in order to get to that option.Users and Groups
As mentioned above, each sales team member can be added to a single group of sales team members. Groups allow sales team members to easily share their customers, documents, and price profiles with one another. Each user has several options to control group permissions on the profile page. You can navigate to the sales team profile page from either of the following ways:- Click the My Account link in the top left hand corner of ChannelOnline. This will take you to your own profile page where you will see your assigned group and link to view members.
- Click the View icon from Admin -> Personnel -> "User Name"
- My Group - The group this rep is currently assigned to Other Groups - All other groups
- Both "My Group" as well as "Other Groups" can further be given the following access permissions to a user's customers, documents, and price profiles:
Access Keys
Access Keys are based on the existing system permissions that get assigned to group users and other group users. The key difference is that these permissions can be applied to a single user (like one outside your group). Use a combination of area permissions when creating a key. Keep in mind that a user will still need to have the Access Right permission to perform that action that gets assigned through the Access Key. For example: A user needs to have “Create / Edit Accounts” access right to edit an account they have access to through a Read + Modify setting on an Access Key. Without the Create / Edit Access right the Access Key permission will not work. Learn more at Access Keys. NOTE: For a better understanding on how all the rules apply, go to Personnel - Access Rights & Keys.Adding New Personnel Users
In order to create a sales rep, navigate to the Admin -> Sales Team page and click the "Create New SalesRep" link. Be sure to configure the correct access rights profile and group for that user's position within the organization. Other important options include: Login ID - This must be an email address. A user will log into ChannelOnline using this as their username. Account Active? - Allows you to create the account, but leave it disabled. You may also disable an existing sale rep account using this feature if you have the proper access to do so. Send e-mail notification - Will generate an email to the new user with a link to setup a password.Abandoned Carts
- flag that cart as abandoned (it's now a Saved Cart w/ an ID)
- save the cart in the bd as "Saved Cart (Abandoned)"
- assign an ID to it for reporting; regular saved carts will show too
- the Abandoned Cart email will be triggered (if enabled)
- the cart should be available for the report (need to check on if there are any batch delays for this)
- Punchout should not create abandoned carts if they complete the round trip.
Catalog – Adding a list of items with Tags
Steps to add multiple items into a catalog:
- Use the Product Attribute Import file (located in Admin > Import / Export > Import / Export Wizard > under Imports)
- Include: Mfr name, part # and tag name(s)
- After successful import, go to Catalog Admin to add tags to a Catalog.
-
- Find the catalog and select Edit
- Click the 'Add New Rules' button
- Click 'Select Attribute / Tag Rules' radio button in the Add New Rules modal
- Search for the tag name uploaded in the Product Attribute Import file and select it
- Then Save
Site Links and their usage
Site Links can be used to link to external information or send data from ChannelOnline to an external system. To create site links go to Admin > Company Settings > Site Links located on the left navigation menu. For sending to external locations you will want to:
- Create an encryption key to decrypt the data sent from ChannelOnline.
- Enter Link Description and Link URL below.
- Optional, use merge fields to insert data from ChannelOnline into URL parameters.
- Customers - Make links that show up internally on the account view page within the Account Actions widget. An example would be a link to Dun & Bradstreet.
- Documents - Create links that can be visible on different document types internally or externally. Document types include: quotes, orders, proposals, invoices and RMAs. For example, a link to Return Policy on RMA documents.
- Internal - Create links for use by personnel and control which users have access. These are often used to submit information to an external ERP or accounting system.
- Use Access Rights to determine which links show up for users.
Personnel – Access Rights & Keys – How are rights and key permissions applied in the system?
DOCUMENT ACCESS CHECKS
Read Access The check is done in the following order:- If user is contact
- if document is not externally viewable (this should be the store site checkbox on document list page), return false
- If the user is same as document contact, return true
- If document is CPAS and if user is approver, return true
- If contact can read all quotes (Enable ALL documents on the StoreSite to be viewed by this contact. - found on edit contact page)
- If contact belongs to same company as document, return true
- if document company is a subsidiary that the contact has access to, return true
- If none of the above conditions matches for contact, return false
- If document is CPAS and VIEW_CPAS_ORDERS (View Company Purchase Approval System documents in Admin.) is not checked, return false
- If user is the salesperson of document, return true
- if user has VIEW_ALL_SOS access (View all Quotes, Proposals, Sales Orders, Invoices and RMA(s)), return true
- If user is owner of document, return true
- If user belongs to same group as document owner and has read access, return true
- If all this fails, check access keys to see if the document owner has granted read permission to user
- If document is deleted, locked, complete or cancelled, return false
- If user has VIEW_ONLY access (this can be found in system profile: View Only SalesRep (Read Only)), return false
- If user is a contact and can user read, user can edit quote
- If document is CPAS, return false
- If document is Proposal, return false
- If document is not sales document (proposal, cart, RMA, quote, order, invoice), return false
- If document is quote and user has EDIT_QUOTES access (Create / Edit Quotes and Proposals for all Customers), return true
- If document is order and user has EDIT_ALL_SOS access (Create / Edit Sales Orders for all Customers), return true
- If document is invoice and user has EDIT_ALL_INVOICES access (Create / Edit Invoices for all Customers), return true
- If user is owner of document, return true
- If user belongs to same group as document owner and has write access, return true
- If all this fails, check access keys to see if the document owner has granted write permission to user
- If user has VIEW_ONLY access (this can be found in system profile: View Only SalesRep (Read Only)), return false
- If user is a contact and can user read, user can edit quote
- If document is CPAS, return false
- If document is Proposal, return false
- If document is not sales document (proposal, cart, RMA, quote, order, invoice), return false
- If document is quote and user has EDIT_QUOTES access (Create / Edit Quotes and Proposals for all Customers), return true
- If document is order and user has EDIT_ALL_SOS access (Create / Edit Sales Orders for all Customers), return true
- If document is invoice and user has EDIT_ALL_INVOICES access (Create / Edit Invoices for all Customers), return true
- If user is owner of document, return true
- If user belongs to same group as document owner and has delete access, return true
- If all this fails, check access keys to see if the document owner has granted delete permission to user
ACCOUNT ACCESS CHECKS
PRICE PROFILE ACCESS CHECKS Read Access The check is done in the following order:- If user is sales rep and has access to MODIFY_PRICE_PROFILES (Edit All Price Profiles & Tiers), return true
- If user is owner of price profile, return true
- If user belongs to same group as price profile owner and has read access, return true
- If all this fails, check access keys to see if the price profile owner has granted read permission to user
- If user is sales rep and has access to MODIFY_PRICE_PROFILES (Edit All Price Profiles & Tiers), return true
- If user is owner of price profile, return true
- If user belongs to same group as price profile owner and has write access, return true
- If all this fails, check access keys to see if the price profile owner has granted write permission to user
- If user is sales rep and has access to MODIFY_PRICE_PROFILES (Edit All Price Profiles & Tiers), return true
- If user is owner of price profile, return true
- If user belongs to same group as price profile owner and has delete access, return true
- If all this fails, check access keys to see if the price profile owner has granted delete permission to user
Items Admin – Item Rules – How do I build Item Rules and use them?
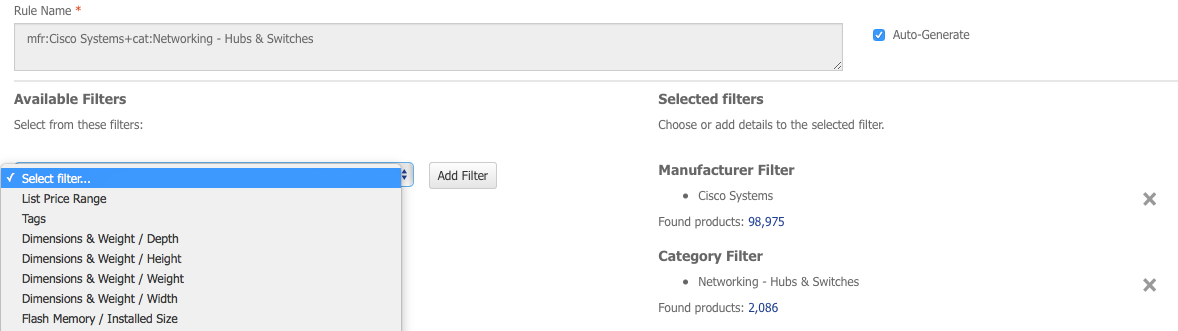
Item Rules allow a set of products to be defined by using multiple criteria for selection. These saved item filter rules are for use in catalogs and price profiles. To access this section go to Admin > Items Admin > Rules. Users build rules by selecting from the options in the Available Filters dropdown. Select from one of four options to begin the process. Multiple filters can be used but they must be added one at a time. Selected filters will appear in the right column titled "Selected Filters". Chose from the options that are contained within the filter results provide based on your selected filter (example: chose a category, like Audio, from the category filter). Some filters allow for multiple options to be selected. Once the options are chosen, click the Apply button. At this point another option from the Available Filters can be selected and added to the rule being created. Be sure to click Save to finish the creation process. Things to know about creating item rules.
- Creation takes place in Item Rules as described above OR you can save a search result string as an item rule. Example: User browses for notebooks and then filters by Dell. That string can be saved by clicking "+ Save As Rule" to the right side of the breadcrumb row.

- When multiple options are selected from multiple filters the system will generate an Item Rule for each of the options selected. Example: selecting the category filter and selecting more than one category option from the list will generate a rule for each selected category.
- As rules are created the name will autogenerate based on which options get selected. For simple selected filters with a single category of manufacturer you can edit the name during the creation process. For all others, multiple rule generating, the names can be edited from the Item Rules list page by clicking the edit icon. It is important to use names that reflect the purpose of the rule created.
- Item attributes / tags can be used for rule filtering (item, catalog and pricing). Tags can be created through Admin > Company Settings > Manage Tags. After tags get created they can be imported (assigned) to items using the "Product Attribute Import" file, or assign on the item edit page. To add attributes to the filter you can only have a single subcategory selected.
- When applying filters and tags to catalogs and pricing they can be added as either an include or exclude. For example, you can exclude a category from a manufacturer that you have loaded into your Include based catalog.
 To use Item Rules, new sections have been added for entry and display to both the following administrative areas. Those sections refer to them as Attribute / Tag Rules.

- Catalogs: When creating or editing a catalog, Item Rules can be added in the Item Attribute (Tag) Rules section by typing in the search box and selecting one of the returned rules. Once Add New Rule has been clicked, the new rule will appear in the Item Attribute (Tag) Rules list section at the bottom of the page.
- Price Profiles: When creating or editing price profiles, Item Rules can be added by clicking on the "Add New Rules" link within the Attribute / Tag Rules section of the page. In the Add New Attribute / Tag Rules lightbox, begin typing the rule you are looking for in the search field. Select the one you are looking for, pick the rate and method, and then click on the Add Rule button in the bottom left corner. This rule will be added to the price profile and displayed in the Attribute / Tag Rules section.
NOTE: The "Create New Rules" button will allow you to create a new one that will be instantly available to be added to the catalog or price profile.
- Creation takes place in Item Rules as described above OR you can save a search result string as an item rule. Example: User browses for notebooks and then filters by Dell. That string can be saved by clicking "+ Save As Rule" to the right side of the breadcrumb row.
- When multiple options are selected from multiple filters the system will generate an Item Rule for each of the options selected. Example: selecting the category filter and selecting more than one category option from the list will generate a rule for each selected category.
- As rules are created the name will autogenerate based on which options get selected. For simple selected filters with a single category of manufacturer you can edit the name during the creation process. For all others, multiple rule generating, the names can be edited from the Item Rules list page by clicking the edit icon. It is important to use names that reflect the purpose of the rule created.
- Item attributes / tags can be used for rule filtering (item, catalog and pricing). Tags can be created through Admin > Company Settings > Manage Tags. After tags get created they can be imported (assigned) to items using the "Product Attribute Import" file, or assign on the item edit page. To add attributes to the filter you can only have a single subcategory selected.
- When applying filters and tags to catalogs and pricing they can be added as either an include or exclude. For example, you can exclude a category from a manufacturer that you have loaded into your Include based catalog.
To use Item Rules, new sections have been added for entry and display to both the following administrative areas. Those sections refer to them as Attribute / Tag Rules.
- Catalogs: When creating or editing a catalog, Item Rules can be added in the Item Attribute (Tag) Rules section by typing in the search box and selecting one of the returned rules. Once Add New Rule has been clicked, the new rule will appear in the Item Attribute (Tag) Rules list section at the bottom of the page.
- Price Profiles: When creating or editing price profiles, Item Rules can be added by clicking on the "Add New Rules" link within the Attribute / Tag Rules section of the page. In the Add New Attribute / Tag Rules lightbox, begin typing the rule you are looking for in the search field. Select the one you are looking for, pick the rate and method, and then click on the Add Rule button in the bottom left corner. This rule will be added to the price profile and displayed in the Attribute / Tag Rules section.
NOTE: The "Create New Rules" button will allow you to create a new one that will be instantly available to be added to the catalog or price profile.
Documents – How to Create a Quote
In ChannelOnline, all sales orders begin as a sales quote.
To create a quote:
From the "Accounts" tab, select an account. At the Account page, create a quote from either the "Account Actions" module or from the "Create Quote" button at the bottom of the page
 Creating the quote from the account populates field information associated with that account. Changes can be made by filling in new data, selecting dropdown choices or clicking the "Edit" icons
 Add items to the quote from the search fields using manufacturer part number or keywords
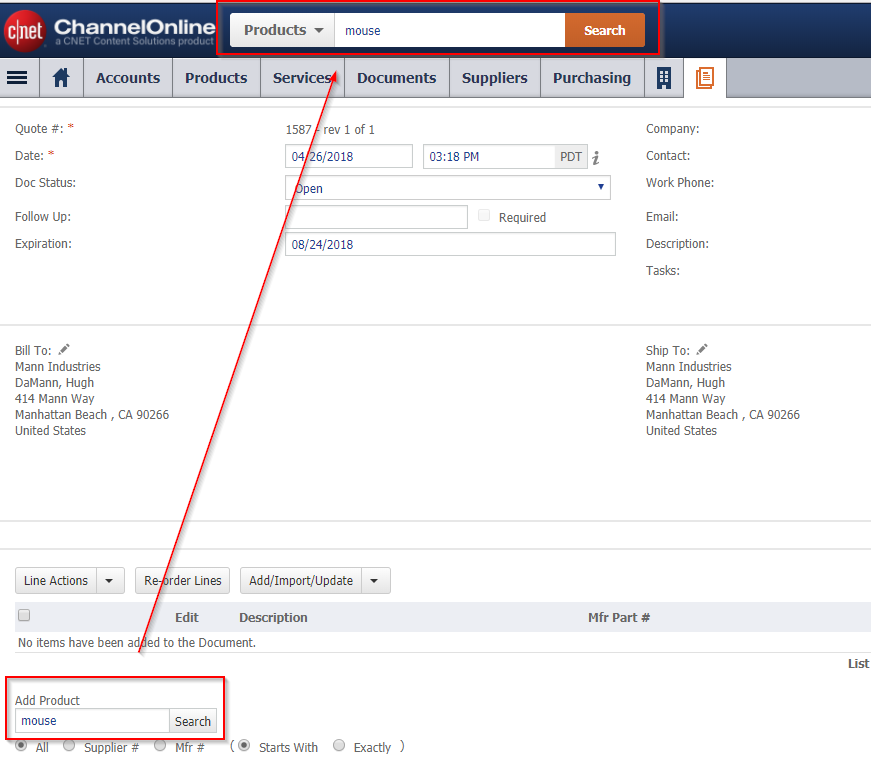
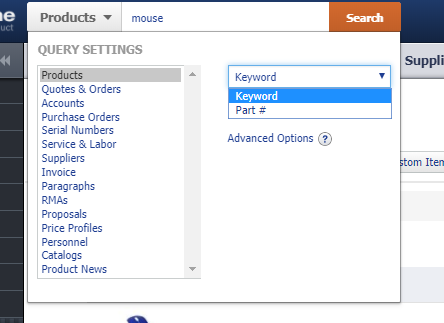 Items matching the selection will be displayed. Additional search filters can be used to narrow the desired product
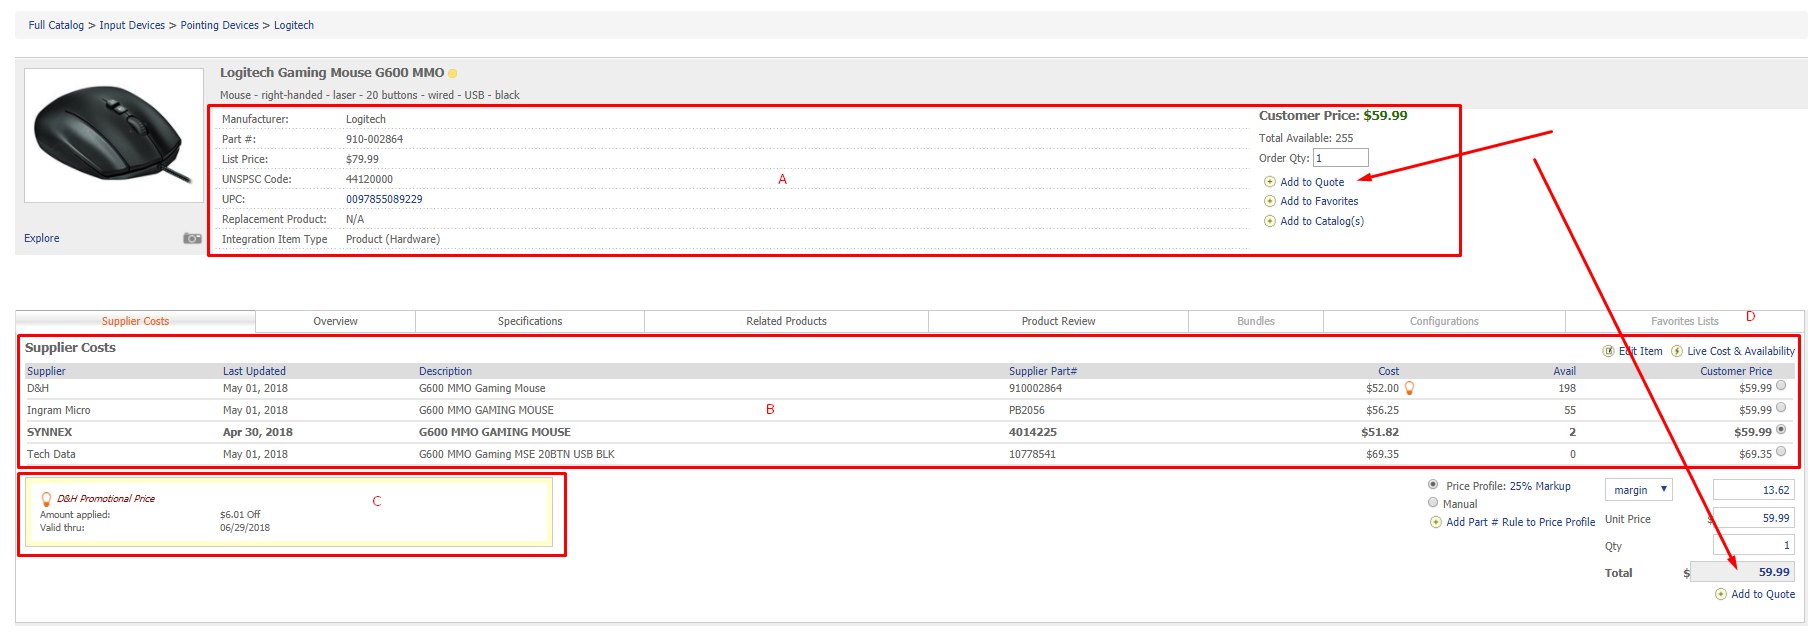
 Selecting the item provides additional information on the product
(A) Quick overview of item, manufacture #, price and total quantity
(B) Authorized suppliers of the product are shown with their cost of the item and the total number on hand from that specific supplier. Predetermined settings automatically selects the suplier with the lowest cost.
(C) When applicable, Promotional pricing will be highlighted. The user has the ability to choose which supplier to fulfill the order.
(D) Selecting the "Live Cost & Availability" icon refreshes the price and stock levels
Selecting the item provides additional information on the product
(A) Quick overview of item, manufacture #, price and total quantity
(B) Authorized suppliers of the product are shown with their cost of the item and the total number on hand from that specific supplier. Predetermined settings automatically selects the suplier with the lowest cost.
(C) When applicable, Promotional pricing will be highlighted. The user has the ability to choose which supplier to fulfill the order.
(D) Selecting the "Live Cost & Availability" icon refreshes the price and stock levels
 When selected, the item is added to the quote
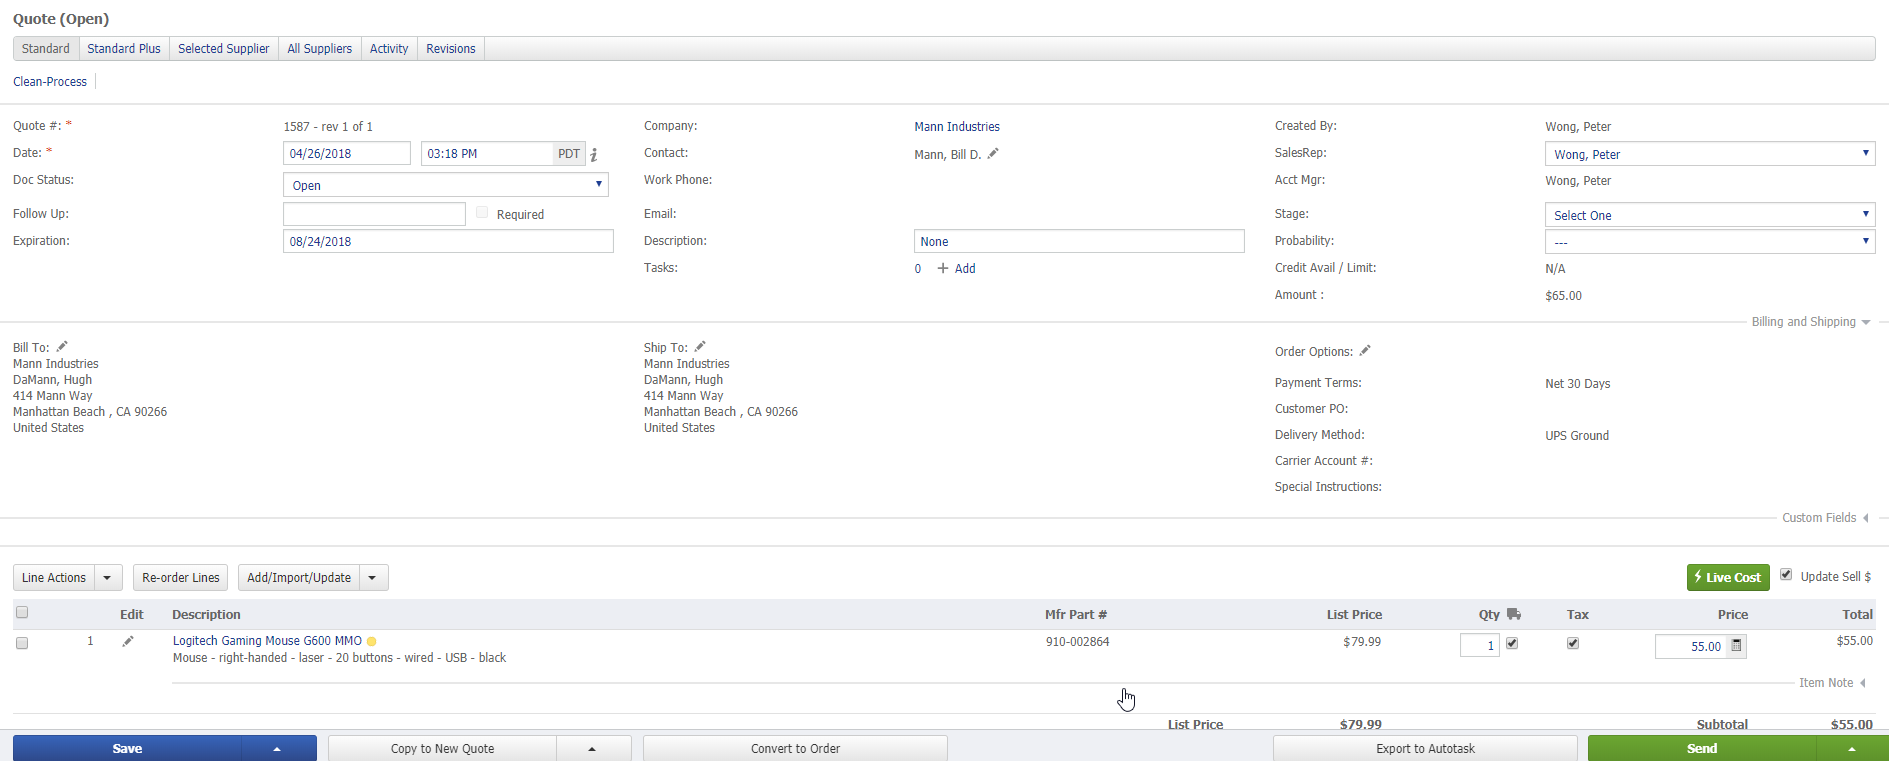 Select the "Live Cost" icon to refresh the various supplier costs and quantities from this view for all items on the quote.
Creating the quote from the account populates field information associated with that account. Changes can be made by filling in new data, selecting dropdown choices or clicking the "Edit" icons
Add items to the quote from the search fields using manufacturer part number or keywords
Items matching the selection will be displayed. Additional search filters can be used to narrow the desired product
Selecting the item provides additional information on the product
(A) Quick overview of item, manufacture #, price and total quantity
(B) Authorized suppliers of the product are shown with their cost of the item and the total number on hand from that specific supplier. Predetermined settings automatically selects the suplier with the lowest cost.
(C) When applicable, Promotional pricing will be highlighted. The user has the ability to choose which supplier to fulfill the order.
(D) Selecting the "Live Cost & Availability" icon refreshes the price and stock levels
When selected, the item is added to the quote
Select the "Live Cost" icon to refresh the various supplier costs and quantities from this view for all items on the quote. Documents – How to Add a File to a Document
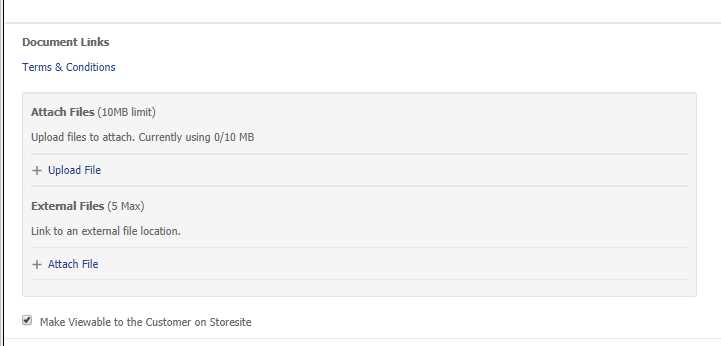
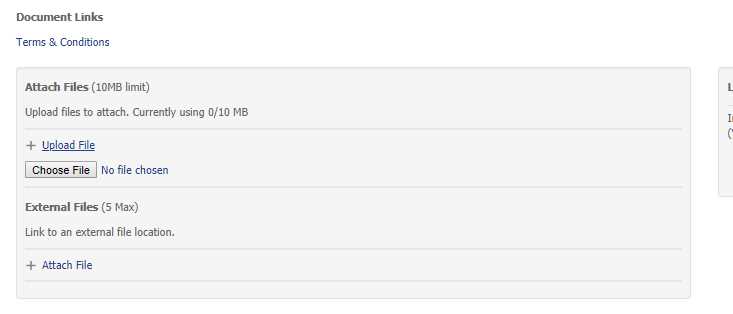
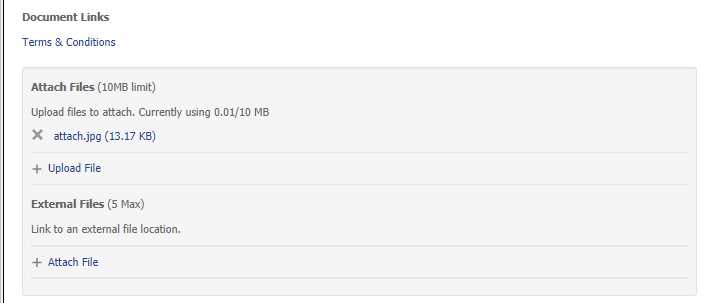
ChannelOnline allows the attachment of files to a document (Quote, Sales Order, Invoice, RMA) Each attached file is limited to 10MB or less and each document can have up to 10 files To attach a a file to a document: From the document, scroll down to the "Documents Link" section and click on the "Upload File" text
Suppliers – How to Add Suppliers
Adding authorized product suppliers increases the breath of products that the reseller provides their customer. To Add a New Supported Supplier:
- From the left Control Panel, go to Admin > Suppliers > Suppliers (sub-ab).
- Select the supplier from the list of 1WS Supported Suppliers by clicking on the “Account View” icon.
- From the Supplier View page of the selected supplier, click on the Integration Settings edit icon.
- After entering your details on the Integration Settings page, check the box for Enable Supplier and click Save.
- From the left Control Panel, go to Admin > Suppliers > Suppliers (sub-ab).
- Click Create New Supplier.
- Enter the details for this supplier in the respective fields across the few pages of supplier account setup.
- From Control Panel go to Admin > Suppliers > Contract Suppliers.
- Click Add Contract Pricing Supplier. The page will refresh and a new blank entry will be available at the bottom of the table.
- Enter your values for this new entry and click Save in the left column.
- Check the box for Enable for this new entry and click the blue Save.
- From the left Control Panel, go to Admin > Suppliers > Suppliers (sub-ab).
- Select the supplier from the list of 1WS Supported Suppliers by clicking on the “Account View” icon.
- From the Supplier View page of the selected supplier, click on the Integration Settings edit icon.
- After entering your details on the Integration Settings page, check the box for Enable Supplier and click Save.
- From the left Control Panel, go to Admin > Suppliers > Suppliers (sub-ab).
- Click Create New Supplier.
- Enter the details for this supplier in the respective fields across the few pages of supplier account setup.
- From Control Panel go to Admin > Suppliers > Contract Suppliers.
- Click Add Contract Pricing Supplier. The page will refresh and a new blank entry will be available at the bottom of the table.
- Enter your values for this new entry and click Save in the left column.
- Check the box for Enable for this new entry and click the blue Save.
Documents – How to create an Invoice
ChannelOnline supports the creation of invoices at either the order level or at the item line level. Users can choose which format to use from the document settings in the control panel.
-------------------------------------------------------------
Creating an invoice at the line level lets the reseller send an invoice for specific items or for partially shipped orders. All invoices are created from and tied directly to a sales order but are assign a unique invoice number
To create an invoice at the item line level:
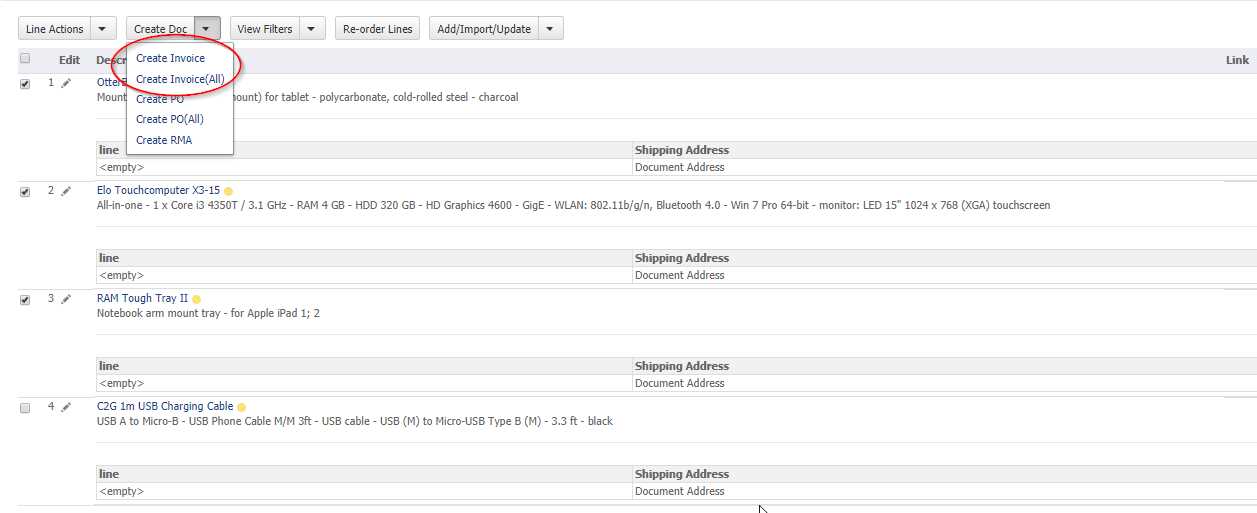
From the sales order with a status of Submitted or later (not Pending, Cancelled, or Completed), scroll down the page to the item(s) for invoicing and select the box next to the item.
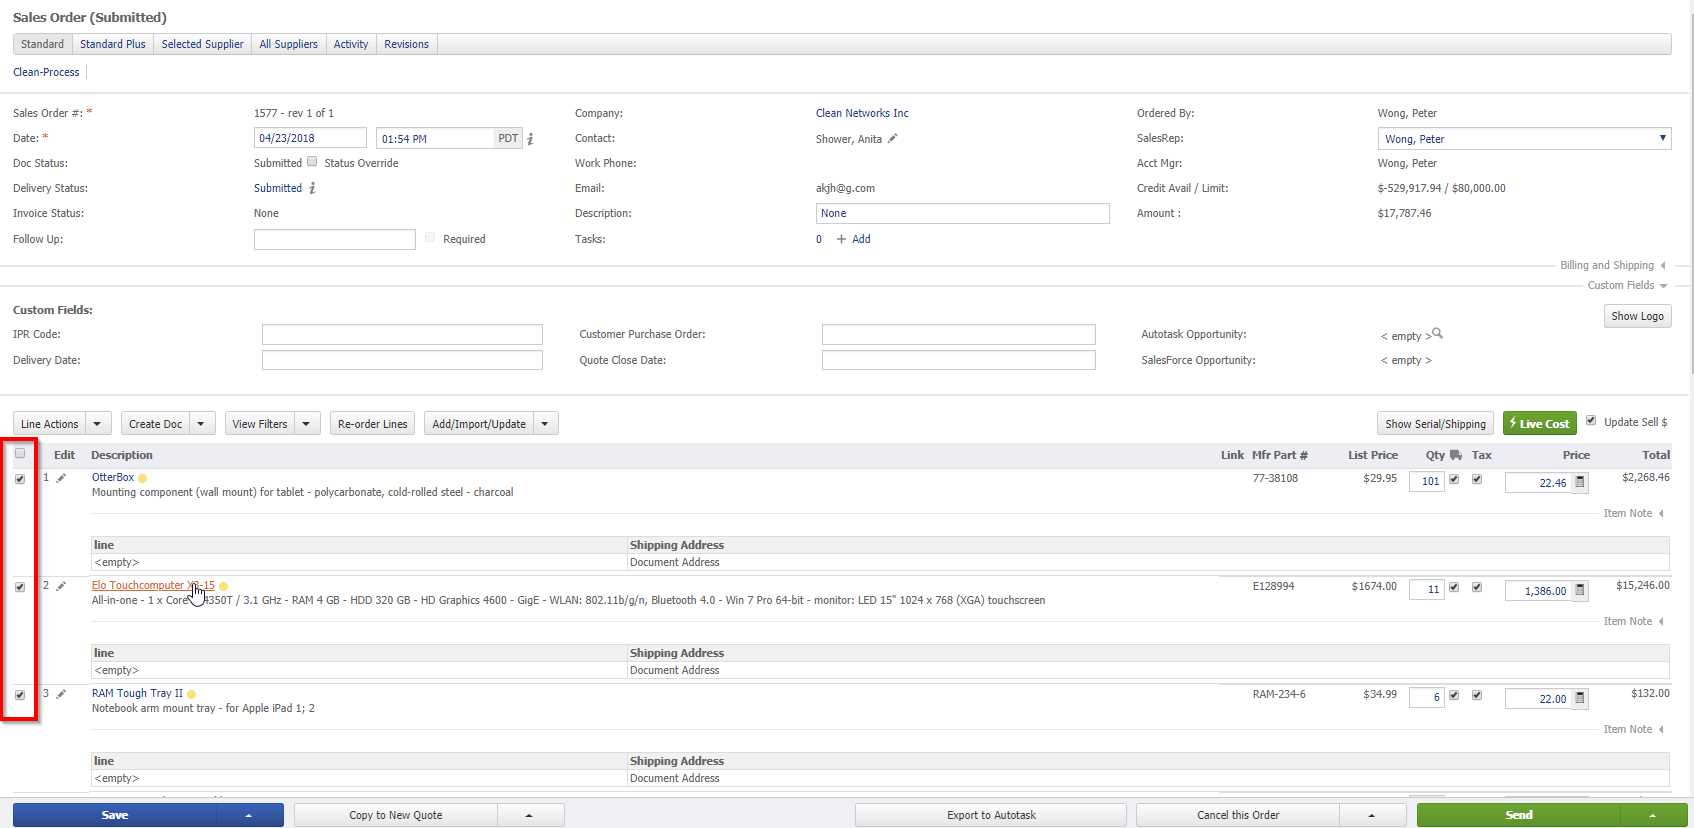 From the drop down tab "Create Doc" select the "Create Invoice" option.
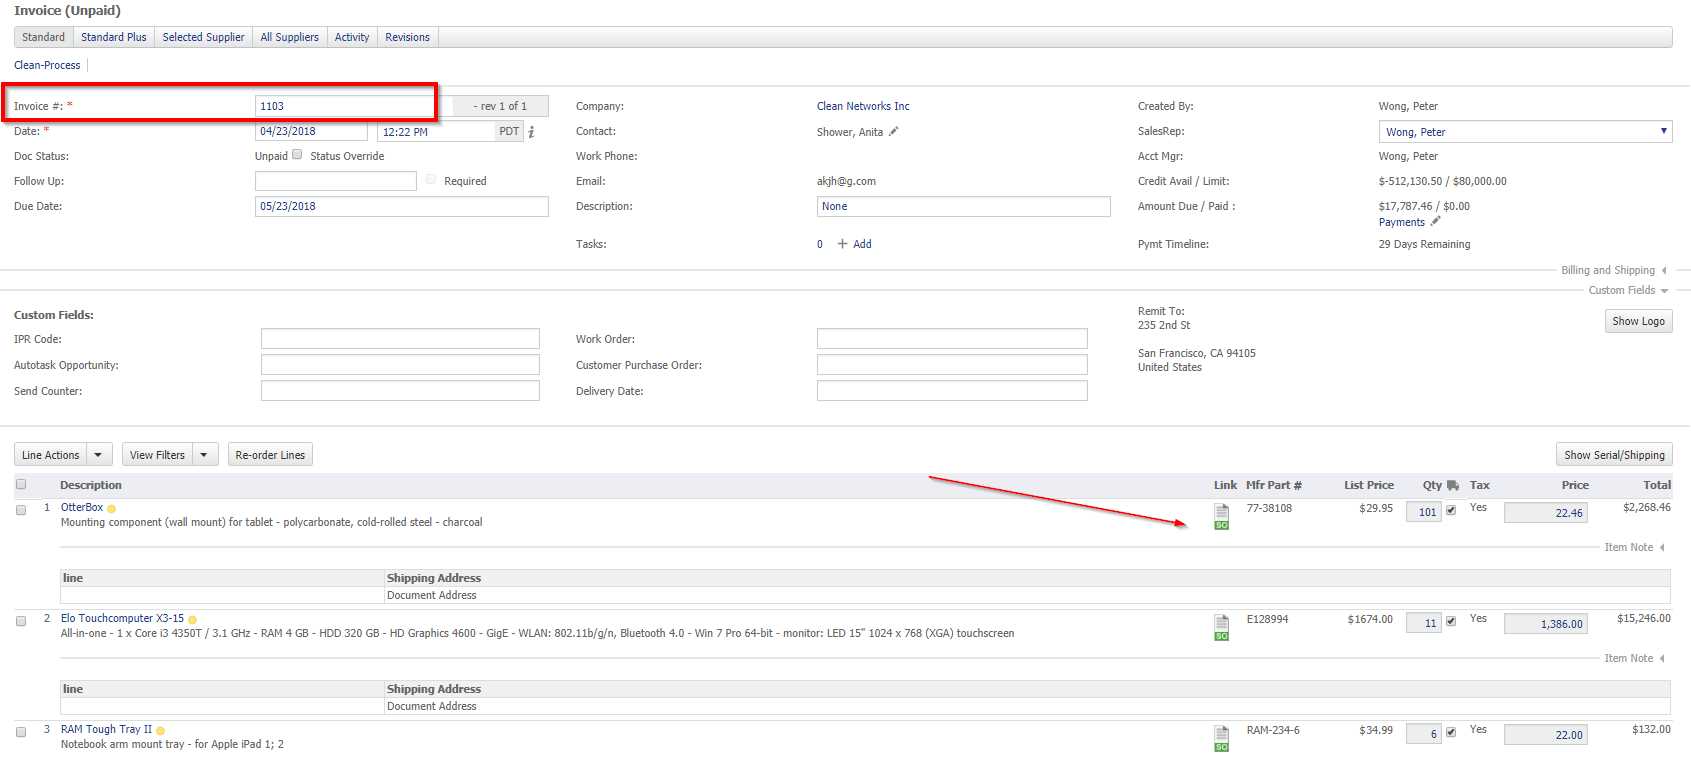
 A screen will display the items from the order to invoice. Verify/edit the items and number of products to invoice and click on the "Create Invoice" button.
 The newly created Invoice is assigned an Invoice Number. Clicking on the "SO" icon will switch back to the sales order.
 Note: The option for "Create Invoice (All)" will create an invoice that includes all line items in it. This option will save you the step of having to place a checkmark next to the items that you wish to invoice if your intention is to invoice all items from the SO.
-------------------------------------------------------------
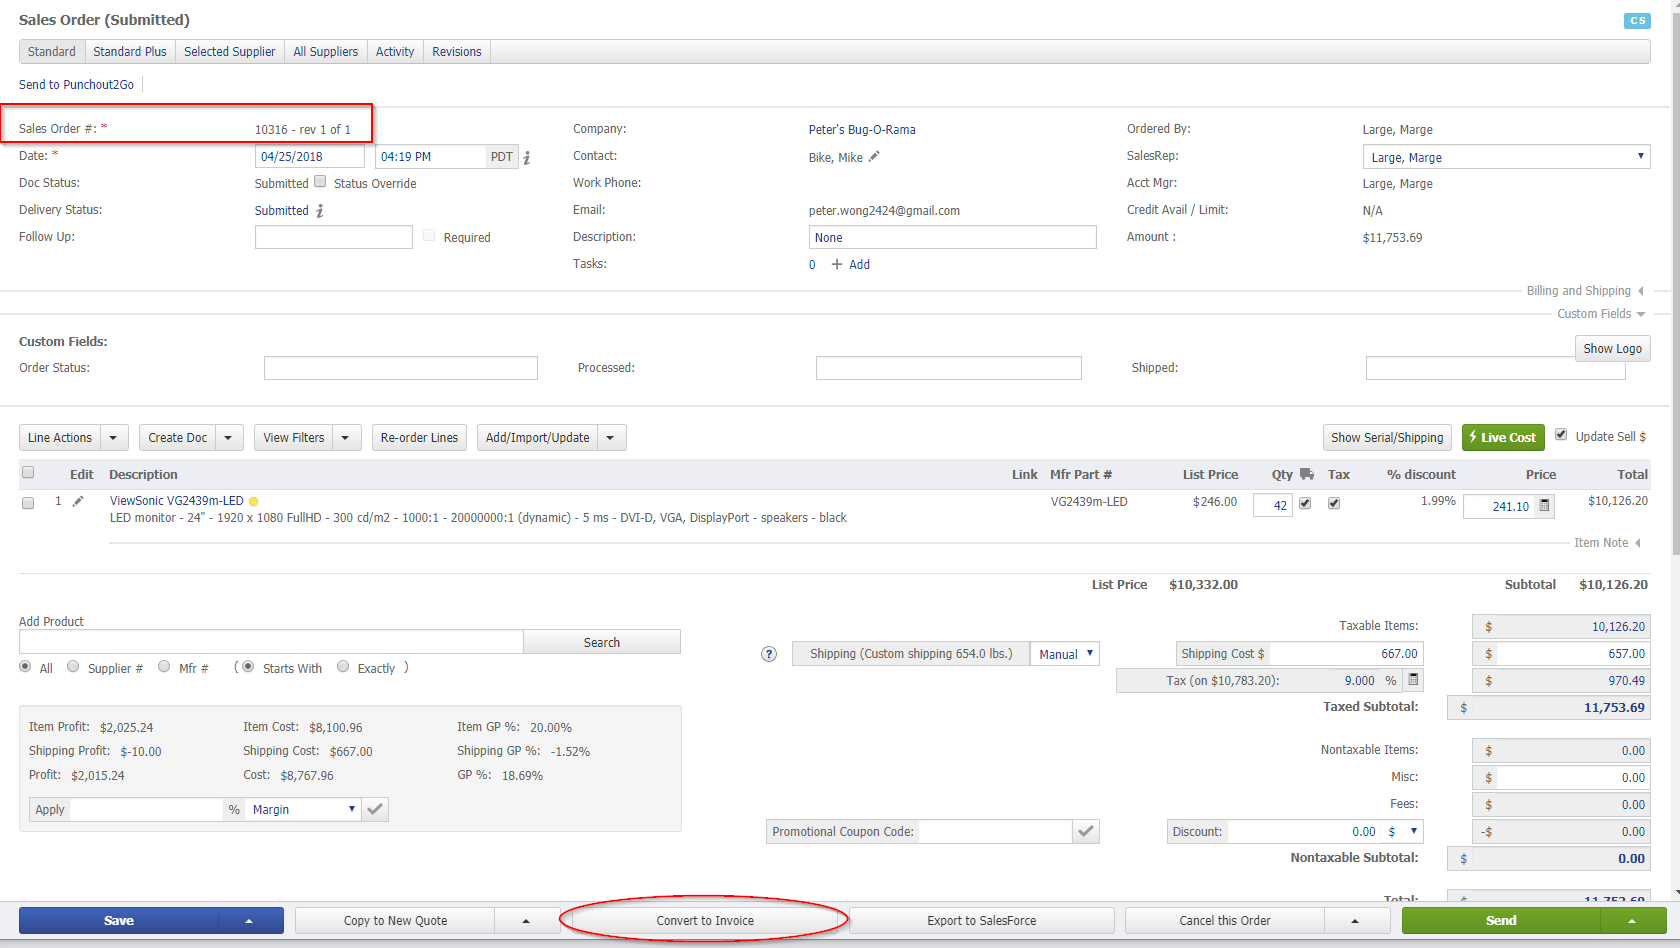
Creating an invoice at the order level lets the reseller generate the document with a single keystoke. With this option the sales order and invoice share the same identification number.
To create an invoice at the order level (legacy):
From the sales order with a status of Submitted or later (not Pending, Cancelled, or Completed), scroll down to the bottom of the page. Click on the "Convert to Invoice" button
Note: The option for "Create Invoice (All)" will create an invoice that includes all line items in it. This option will save you the step of having to place a checkmark next to the items that you wish to invoice if your intention is to invoice all items from the SO.
-------------------------------------------------------------
Creating an invoice at the order level lets the reseller generate the document with a single keystoke. With this option the sales order and invoice share the same identification number.
To create an invoice at the order level (legacy):
From the sales order with a status of Submitted or later (not Pending, Cancelled, or Completed), scroll down to the bottom of the page. Click on the "Convert to Invoice" button
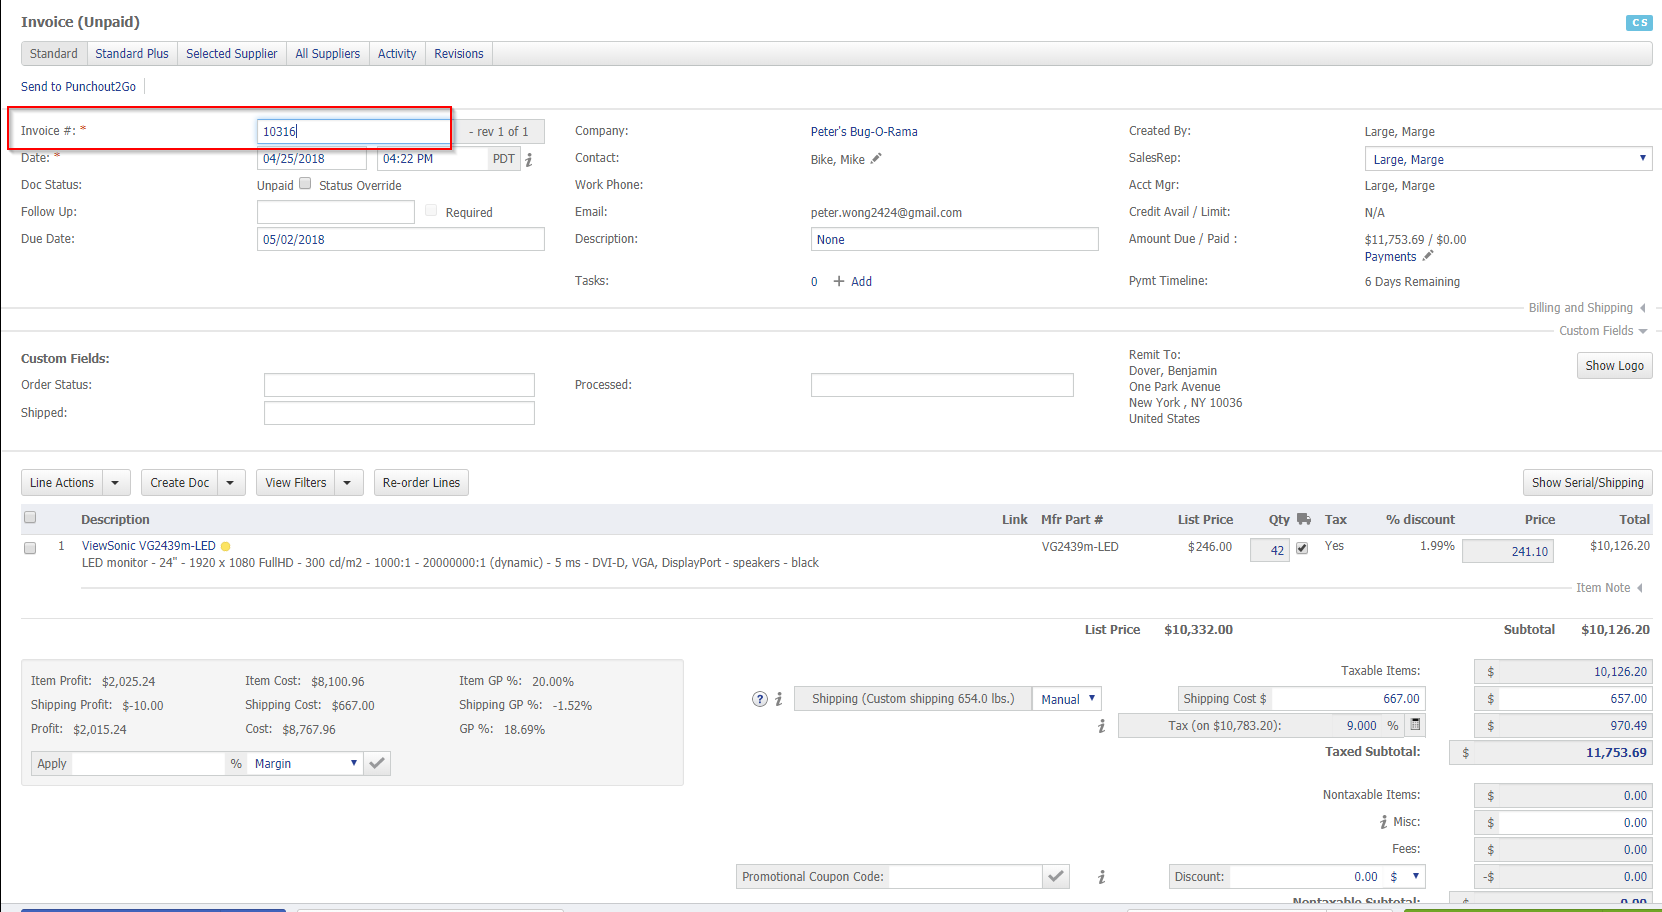
 An invoice has been created sharing the same document number
From the drop down tab "Create Doc" select the "Create Invoice" option.
A screen will display the items from the order to invoice. Verify/edit the items and number of products to invoice and click on the "Create Invoice" button.
The newly created Invoice is assigned an Invoice Number. Clicking on the "SO" icon will switch back to the sales order.
Note: The option for "Create Invoice (All)" will create an invoice that includes all line items in it. This option will save you the step of having to place a checkmark next to the items that you wish to invoice if your intention is to invoice all items from the SO.
-------------------------------------------------------------
Creating an invoice at the order level lets the reseller generate the document with a single keystoke. With this option the sales order and invoice share the same identification number.
To create an invoice at the order level (legacy):
From the sales order with a status of Submitted or later (not Pending, Cancelled, or Completed), scroll down to the bottom of the page. Click on the "Convert to Invoice" button
An invoice has been created sharing the same document number
Personnel – How to add a new user (salesrep, purchasing, administrator, etc)
ChannelOnline is a user based application and resellers can increase the number of account users by purchasing additional user licenses.
To add a new user to ChannelOnline:
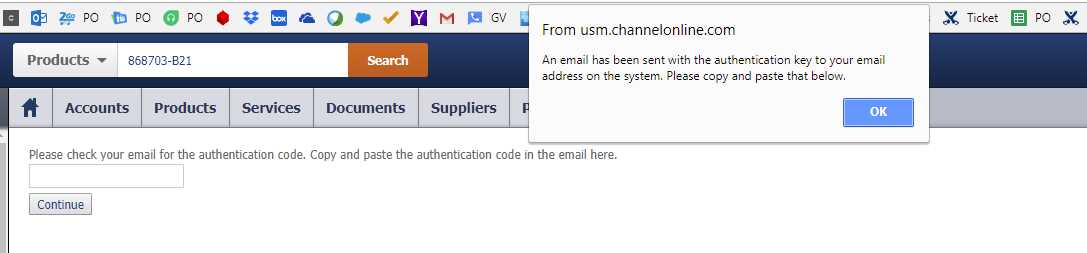
Control Panel > Personnel. From the Personnel page, click on the "Create New User" icon
The number of user licenses for the account are displayed on the Personnel page
 A message box informs the user that authorization will be necessary to add a new user
 Upon authorization, the reseller will be taken to the main personnel page to fill in the contact information
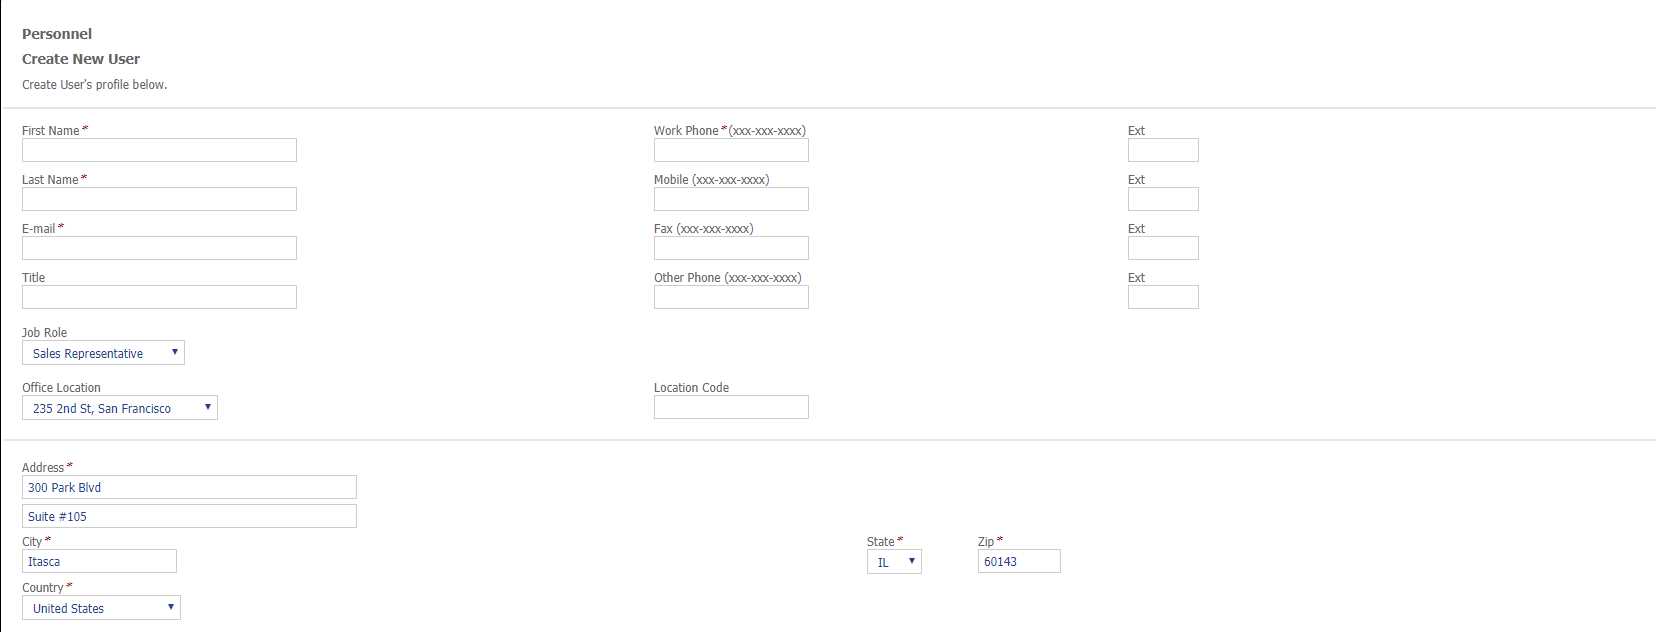 Creating a new user include the assignment of that users Access Rights, User Group(s), Price Profiles, Customers and Documents.

A message box informs the user that authorization will be necessary to add a new user
Upon authorization, the reseller will be taken to the main personnel page to fill in the contact information
Creating a new user include the assignment of that users Access Rights, User Group(s), Price Profiles, Customers and Documents.
Products – How to create and add items to my Favorites List
To add items to your favorites list, go to the product page of the item and click Add to Favorites:
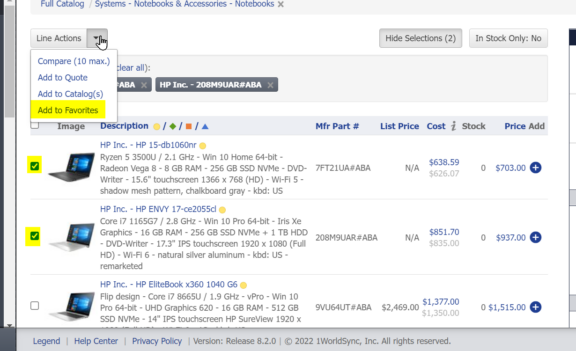
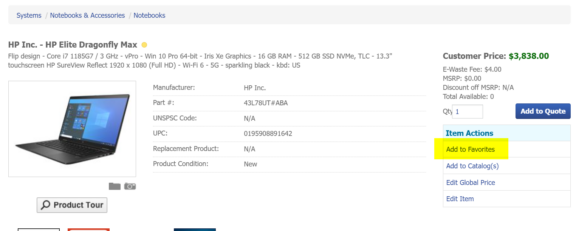 Alternatively, if you have one or more parts on a search results page that you wish to add to your Favorites list, you can do so by placing a checkmark next to those items and then selecting Add to Favorites from Line Actions.
Alternatively, if you have one or more parts on a search results page that you wish to add to your Favorites list, you can do so by placing a checkmark next to those items and then selecting Add to Favorites from Line Actions.
Products – How to mark a product item as discontinued and display its replacement
Items that are/or being discontinued from the manufacturer or supplier can be identified and its replacement sku displayed at the product level and on the quote.
How to enable this feature.
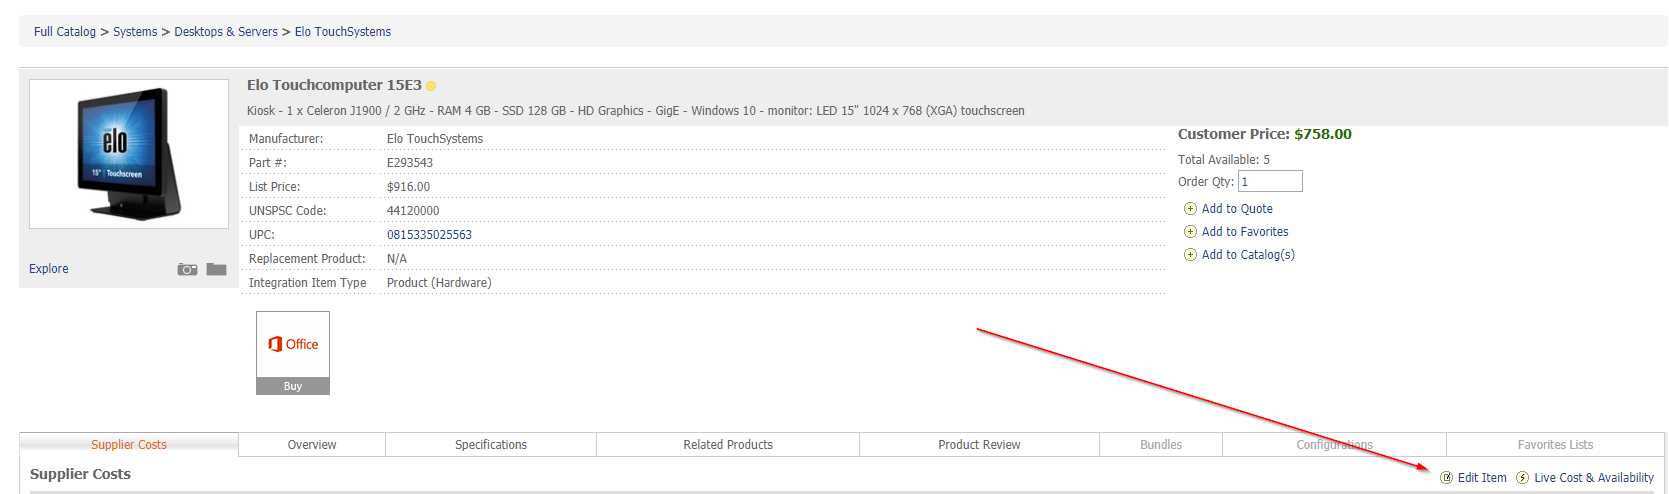
Go to the product on the product page. On the right above the customer price, click on the “Edit Item” icon to open the edit page.
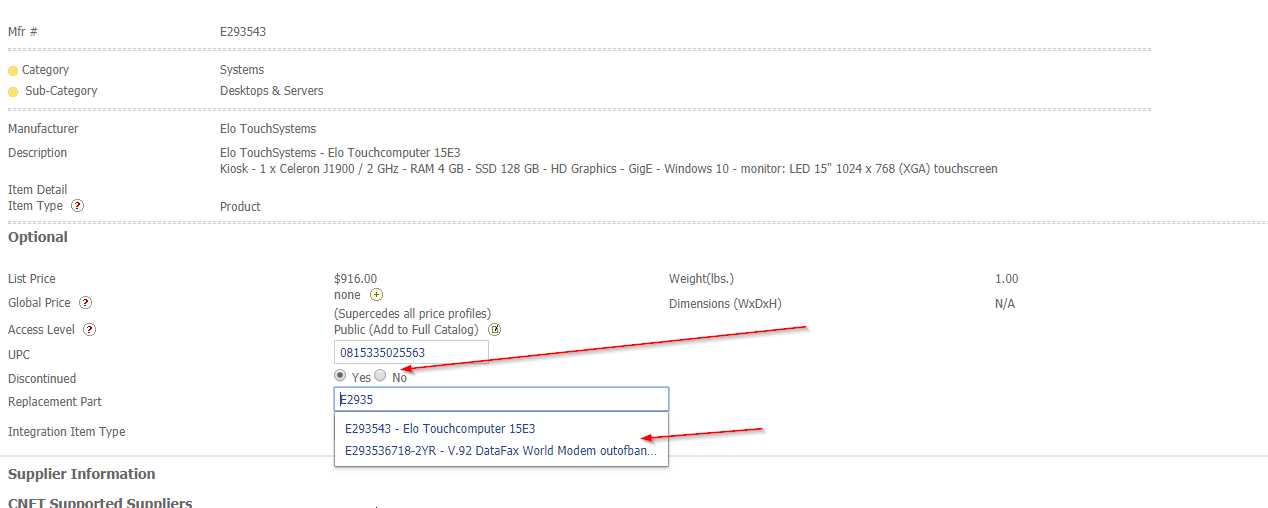
On the “Products: Edit Item” page, under the “Optional” field and from the “Discontinued” listing, click “Yes”
Type in the replacement (manufacture number) part. This will search for the replacement item from the product catalog. Select the item.
Search and select the "Item Type" from the list of options
Save the changes.
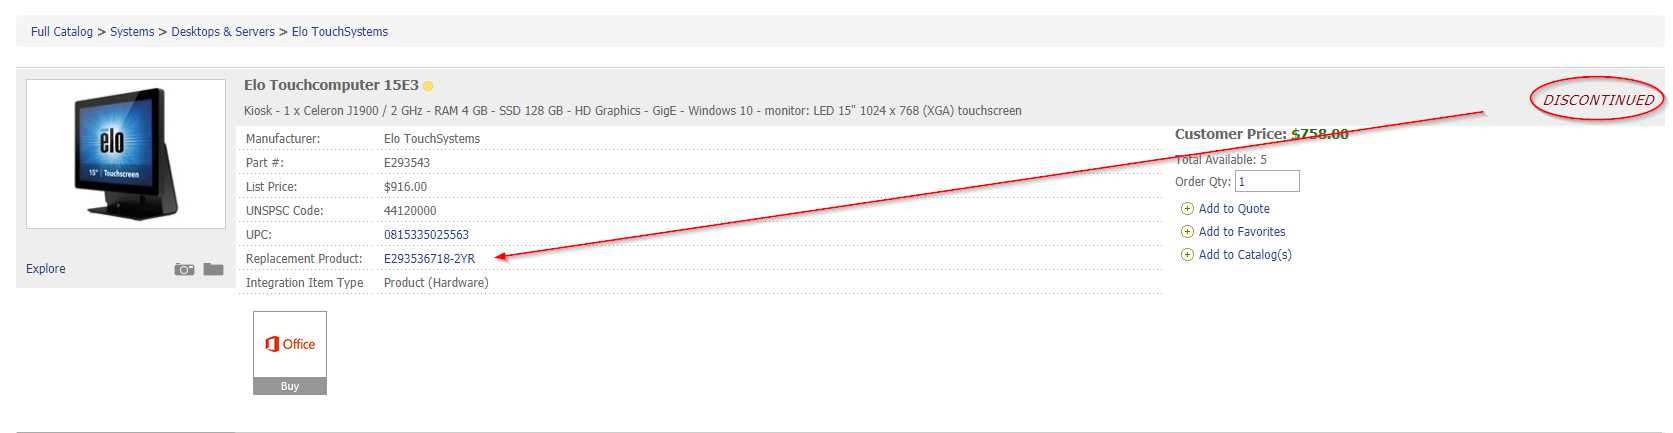
The old item is now marked as “Discontinued” and display the replacement sku
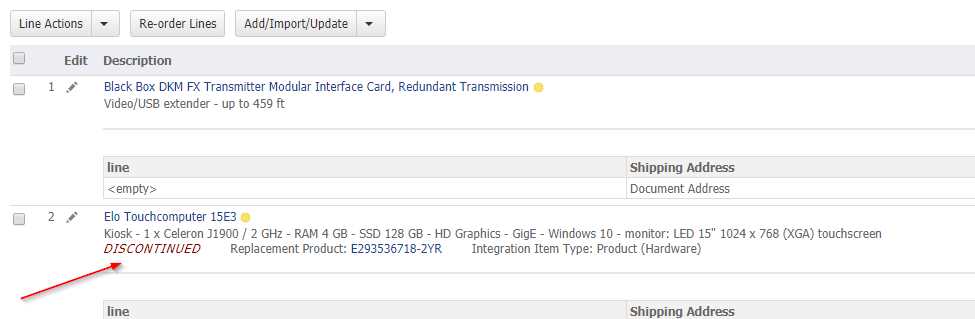
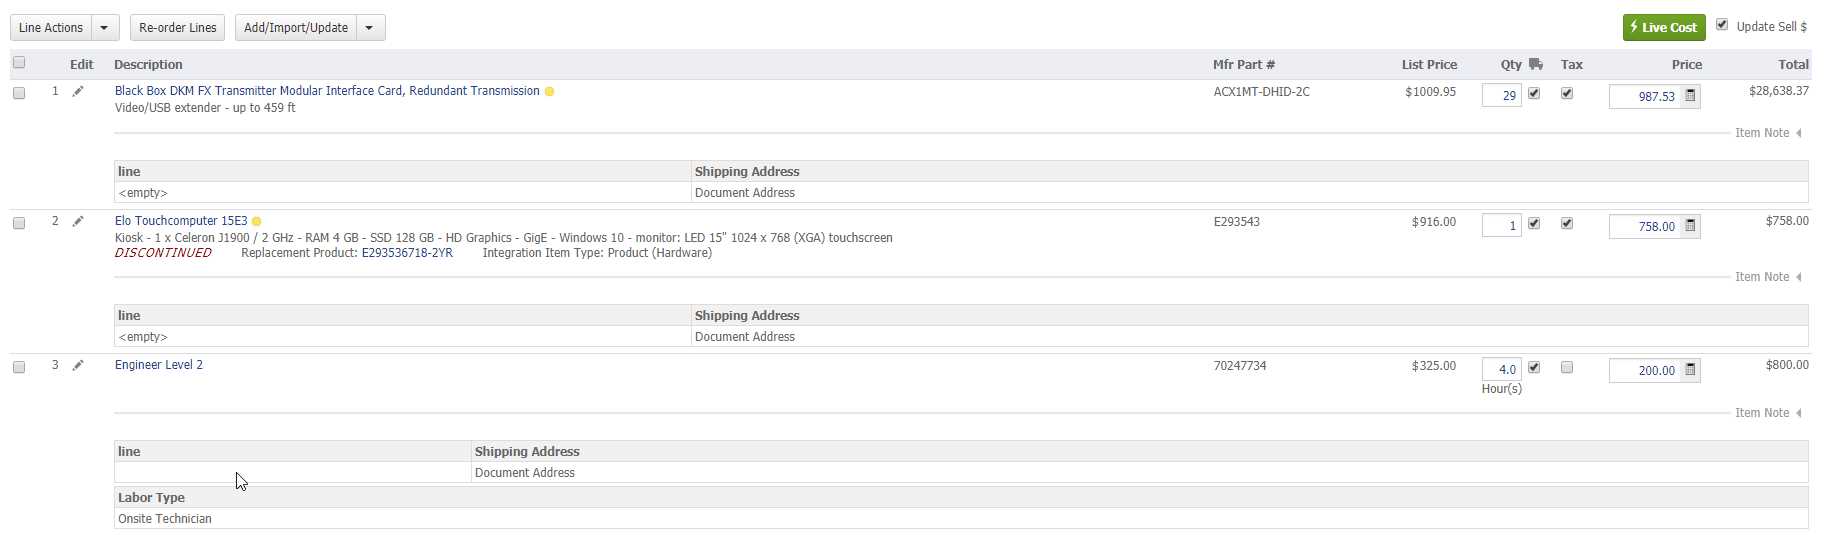
When placing a quote. The item will display the “DISCONTINUED” designation and the replacement part. Clicking on the replacement part number will bring up the replacement item.
Items that are/or being discontinued from the manufacturer or supplier can be identified and its replacement sku displayed at the product level and on the quote.
How to enable this feature.
Go to the product on the product page. On the right above the customer price, click on the “Edit Item” icon to open the edit page.
On the “Products: Edit Item” page, under the “Optional” field and from the “Discontinued” listing, click “Yes”
Type in the replacement (manufacture number) part. This will search for the replacement item from the product catalog. Select the item.
Search and select the "Item Type" from the list of options
Save the changes.
The old item is now marked as “Discontinued” and display the replacement sku
When placing a quote. The item will display the “DISCONTINUED” designation and the replacement part. Clicking on the replacement part number will bring up the replacement item.
Products – Services & Labor – How do I add Service and Labor to my quote?
Once created, Service and Labor support skus can be added to a quote.
From an active quote, from the top of the page
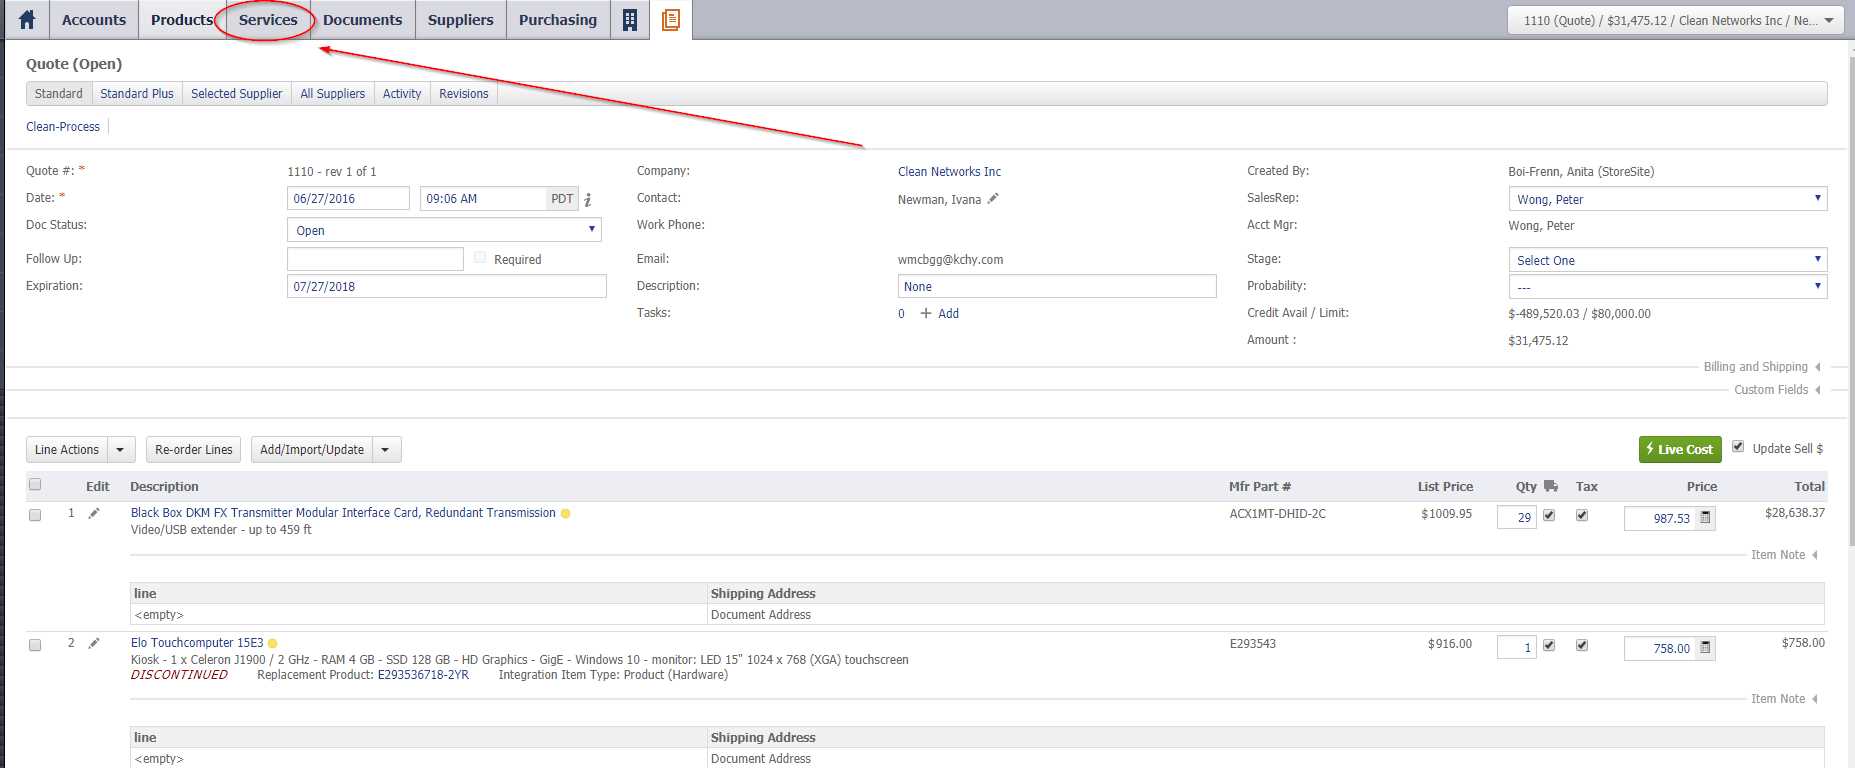
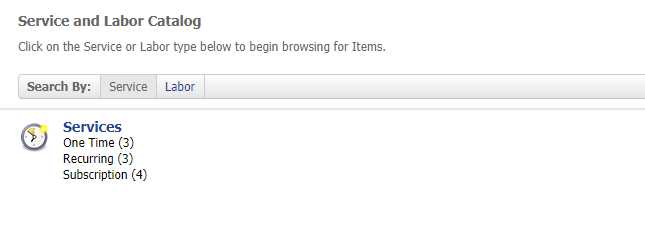
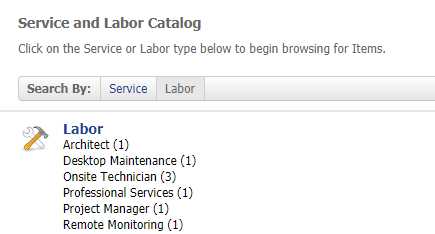
From the "Services" tab, choose either from the Service or Labor selections
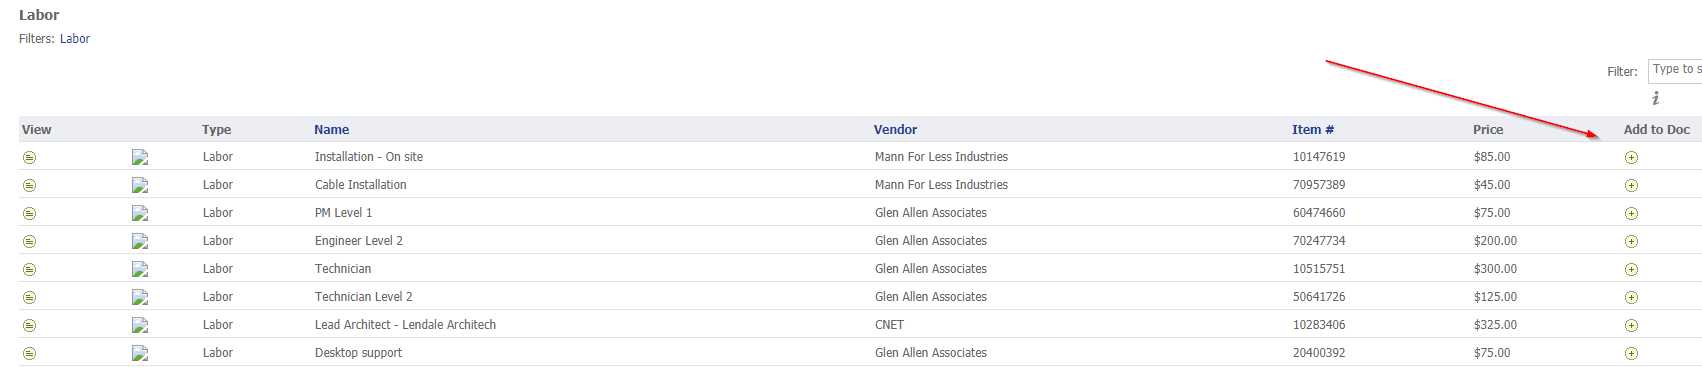
To add that selection to the quote
Or view the specifics of the selection
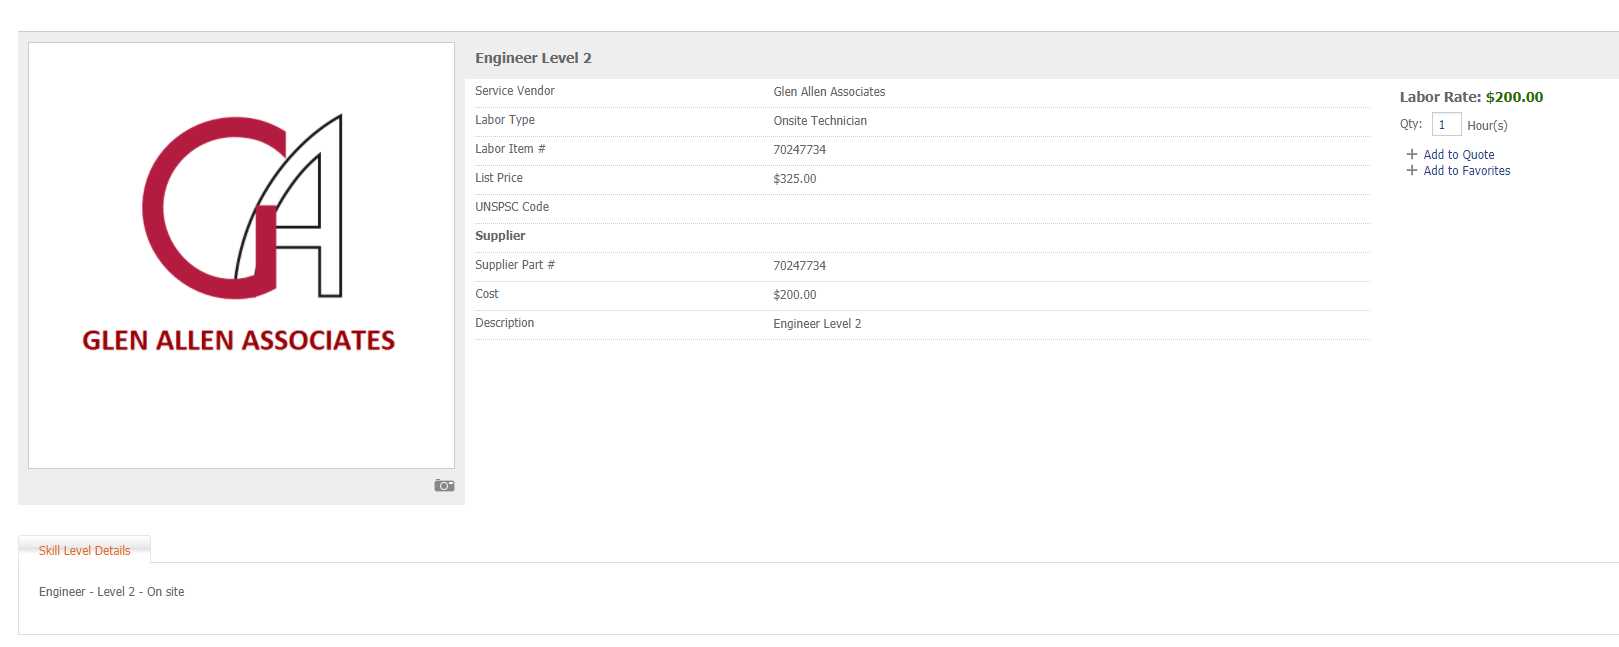
Labor added to the quote
Once created, Service and Labor support skus can be added to a quote.
From an active quote, from the top of the page
From the "Services" tab, choose either from the Service or Labor selections
To add that selection to the quote
Or view the specifics of the selection
Labor added to the quote
Products – Services & Labor – How do I set up Service Jobs?
ChannelOnline allows the creation of Service level jobs to add to a quote.
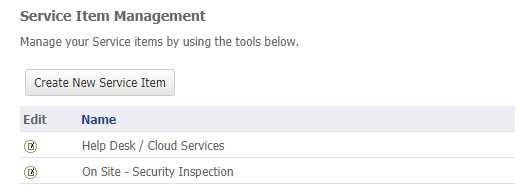
To create a new Service option:
Control Panel > Items Admin > Service, Select "Create New Service Item"
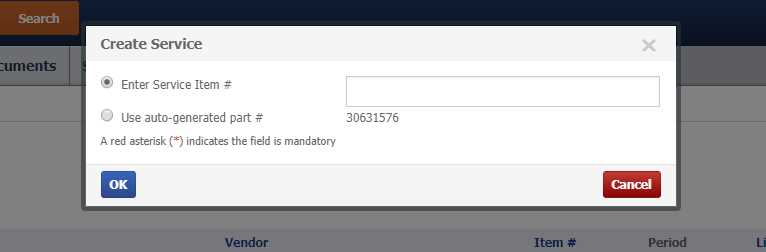
Enter a preselected number or have the system generate a new sku number for the service and select "OK"
From the Service Item page, fill in the following:
Job Information
- Type of service job - Single visit, recurring work, subscription, block hour support
- Frequency of performance - Single, hourly, daily, weekly etc.,
- Service Name - Name of the service job
Supplier
- Supplier of the job - Supplier providing this service
- Supplier number for the job - Supplier number
- Supplier description for the job - Description of the work
- Cost - Cost to the reseller for this job
Billing Rate(s)
- List price - List price for the service (per unit)
- Frequency - Monthly, Quarterly, Semi-Annual, Annually
- Billing code - If necessary
Active or Disabled - Displays the service job for assignment
Icon
- Icon Assignment - Associated to the job
Categories and Tags
- Category/Sub-Category assignment - From list of existing categories
- Tag assignment - From list of existing tags
Detail description - Additonal information on the service

Once saved, the service job is available to be added to a quote.
ChannelOnline allows the creation of Service level jobs to add to a quote.
To create a new Service option:
Control Panel > Items Admin > Service, Select "Create New Service Item"
Enter a preselected number or have the system generate a new sku number for the service and select "OK"
From the Service Item page, fill in the following:
Job Information
- Type of service job - Single visit, recurring work, subscription, block hour support
- Frequency of performance - Single, hourly, daily, weekly etc.,
- Service Name - Name of the service job
Supplier
- Supplier of the job - Supplier providing this service
- Supplier number for the job - Supplier number
- Supplier description for the job - Description of the work
- Cost - Cost to the reseller for this job
Billing Rate(s)
- List price - List price for the service (per unit)
- Frequency - Monthly, Quarterly, Semi-Annual, Annually
- Billing code - If necessary
Active or Disabled - Displays the service job for assignment
Icon
- Icon Assignment - Associated to the job
Categories and Tags
- Category/Sub-Category assignment - From list of existing categories
- Tag assignment - From list of existing tags
Detail description - Additonal information on the service
Once saved, the service job is available to be added to a quote.
Products – Services & Labor – How do I set up Labor Jobs?
ChannelOnline allows the creation of Labor type jobs to add to a quote.
To create a new Labor option:
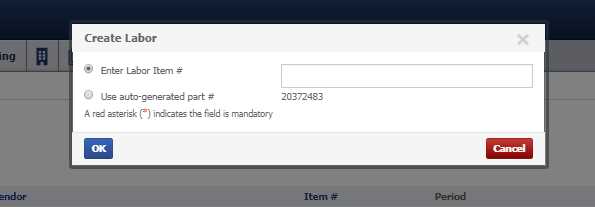
Control Panel > Items Admin > Labor, Select "Create New Labor Item"

Enter a preseleted number of have the system generate a new sku number for the labor and select "OK"
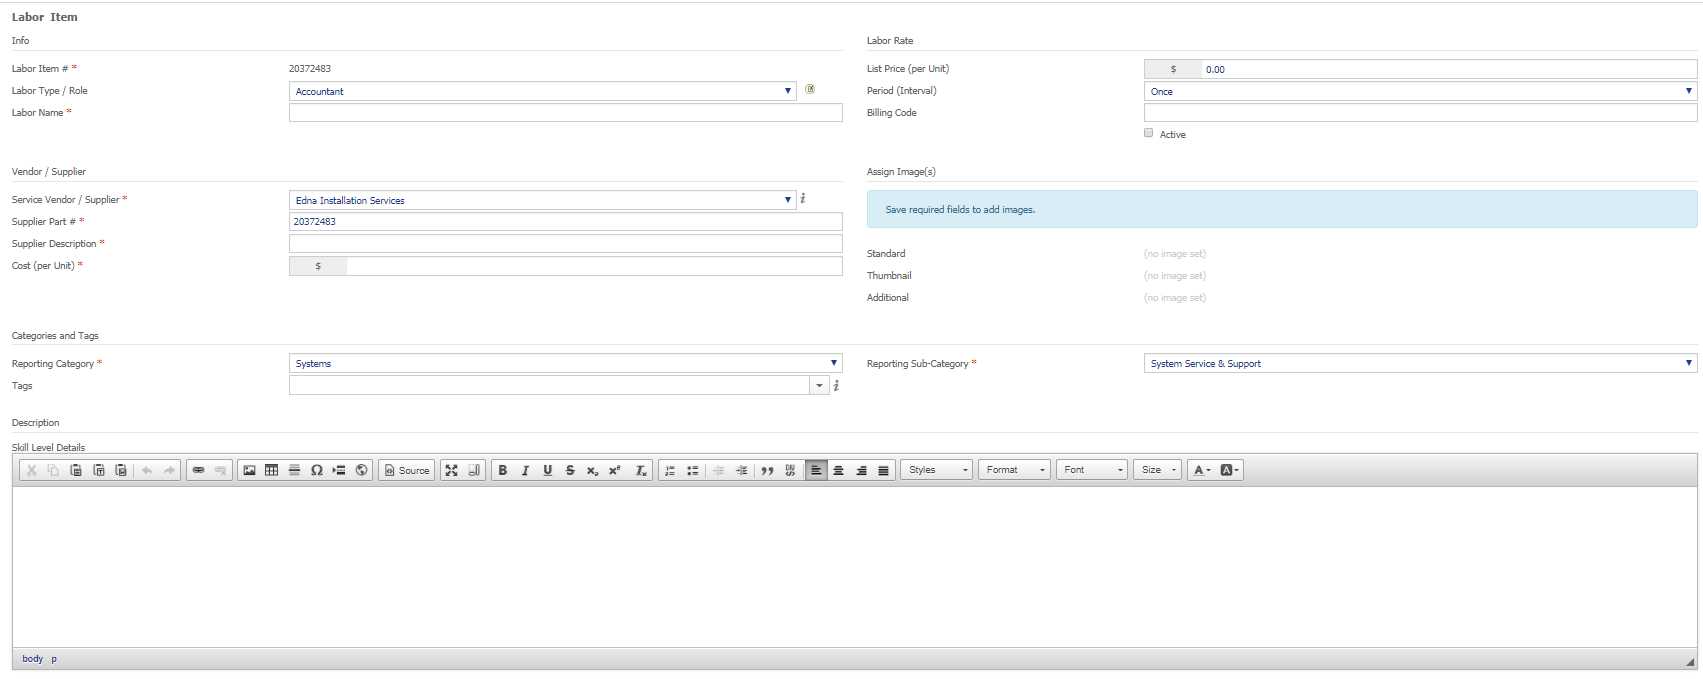
From the Labor Item page, fill in the following:
Job Information
- Labor job or role - Accountant, Developer, Program Manager etc.
- Labor Name - Name of the labor job
Supplier
- Supplier of the job - Supplier providing this labor
- Supplier number for the job - Supplier number
- Supplier description - Description of the work
- Cost - Cost to the reseller for this job
Billing Rate(s)
- List price - List price for the service (per unit)
- Frequency - Monthly, Quarterly, Semi-Annual, Annually
- Billing code - If necessary
Active or Disabled - Displays the labor job for assignment
Icon
- Icon Assignment - Associated to the job
Categories and Tags
- Category/Sub-Category assignment - From list of existing categories
- Tag assignment - From list of existing tags
Detail description - Additonal information on the service
Once saved, this labor job is available to be added to a quote.
ChannelOnline allows the creation of Labor type jobs to add to a quote.
To create a new Labor option:
Control Panel > Items Admin > Labor, Select "Create New Labor Item"
Enter a preseleted number of have the system generate a new sku number for the labor and select "OK"
From the Labor Item page, fill in the following:
Job Information
- Labor job or role - Accountant, Developer, Program Manager etc.
- Labor Name - Name of the labor job
Supplier
- Supplier of the job - Supplier providing this labor
- Supplier number for the job - Supplier number
- Supplier description - Description of the work
- Cost - Cost to the reseller for this job
Billing Rate(s)
- List price - List price for the service (per unit)
- Frequency - Monthly, Quarterly, Semi-Annual, Annually
- Billing code - If necessary
Active or Disabled - Displays the labor job for assignment
Icon
- Icon Assignment - Associated to the job
Categories and Tags
- Category/Sub-Category assignment - From list of existing categories
- Tag assignment - From list of existing tags
Detail description - Additonal information on the service
Once saved, this labor job is available to be added to a quote.
Personnel – How to set up a new User Group
User Groups allow the sharing of information/function/permissions among mulitiple users as a single entity.
To create a new user group:
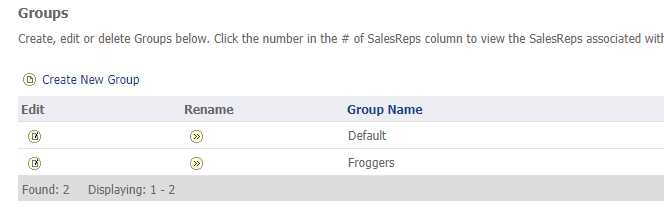
From Control Panel > Admin > Personnel > Groups
Create New Group
Create a new Group (Name)
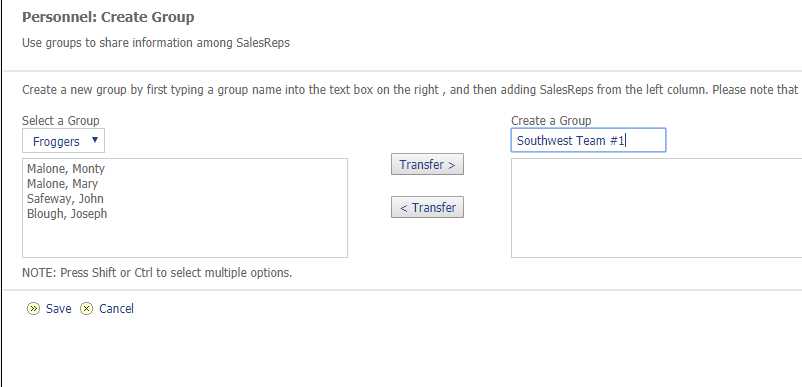
Move the members from the existing list of users and Save
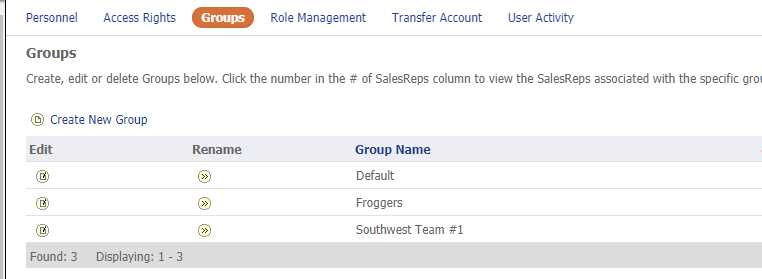
This new group is now active and available for assignment
User Groups allow the sharing of information/function/permissions among mulitiple users as a single entity.
To create a new user group:
From Control Panel > Admin > Personnel > Groups
Create New Group
Create a new Group (Name)
Move the members from the existing list of users and Save
This new group is now active and available for assignment
Accounts – How to Create a Lead
ChannelOnline supports the creation of Leads to help manage the customer database. Leads are potential but unqualified opportunities that have been gathered from a trade show, networking event etc., or from associates or customers and hold the potential to turn into a future customer.
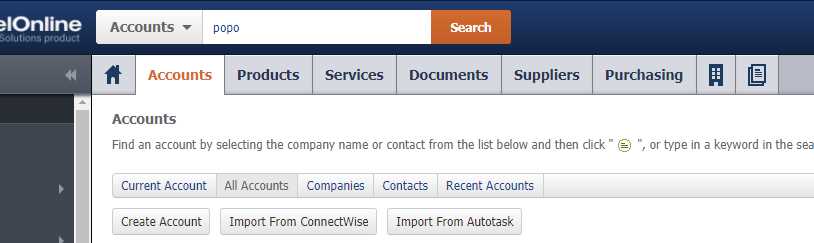
From the "Account" Tab on the main page, Select the "Create Account" button
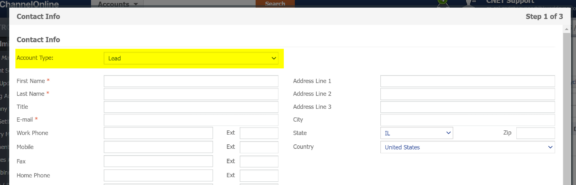
 A window will display with many fields to populate, one of which is Account Type. Choose "Lead".
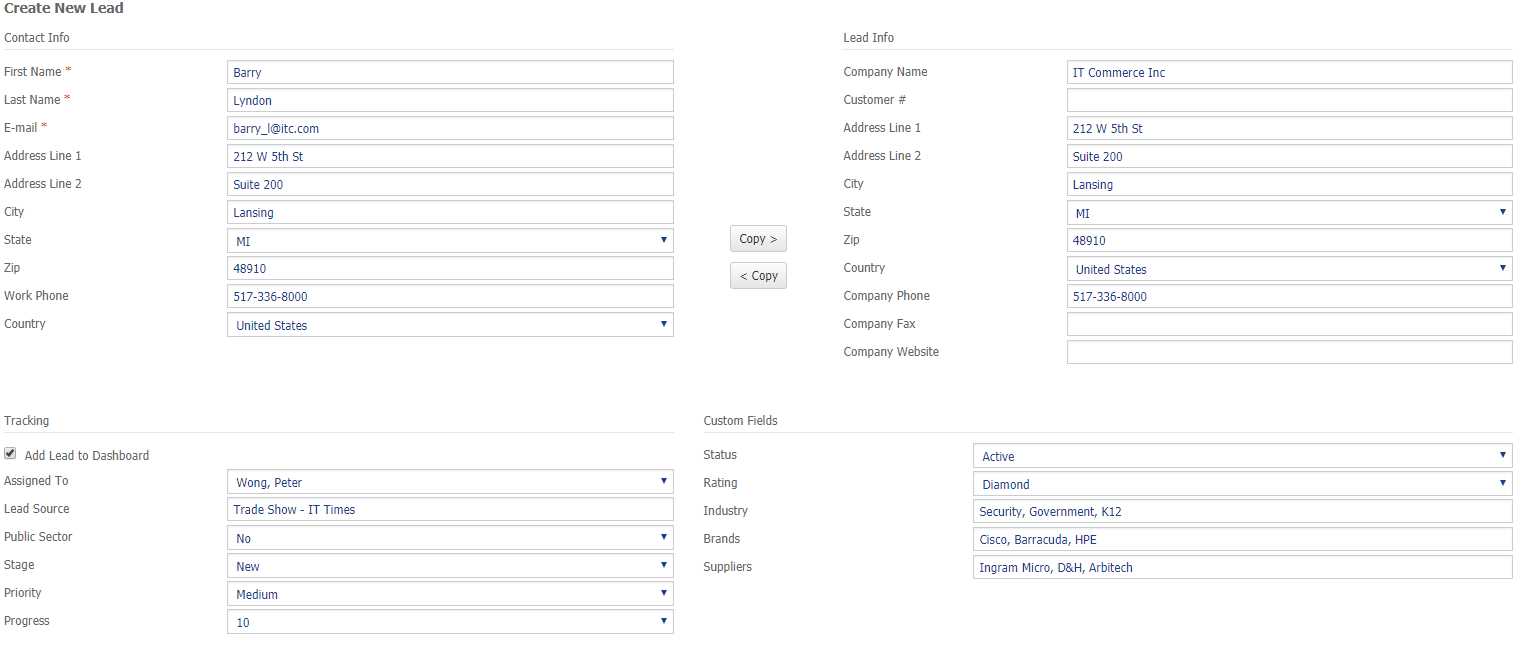
 From the Lead Creation page, fill in the minimum information indicated by an asterisk to create the lead.
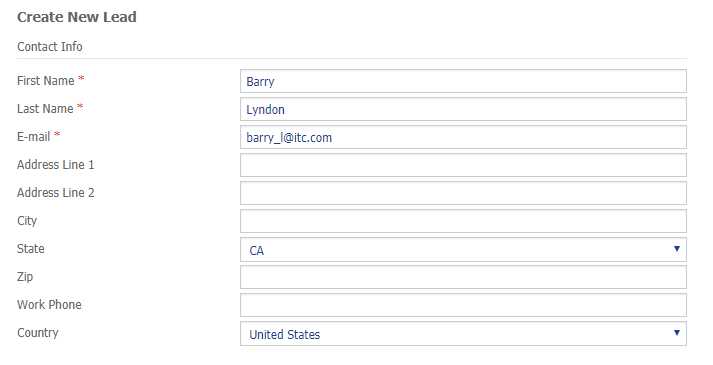 Additional information fields are available to populate but not required.
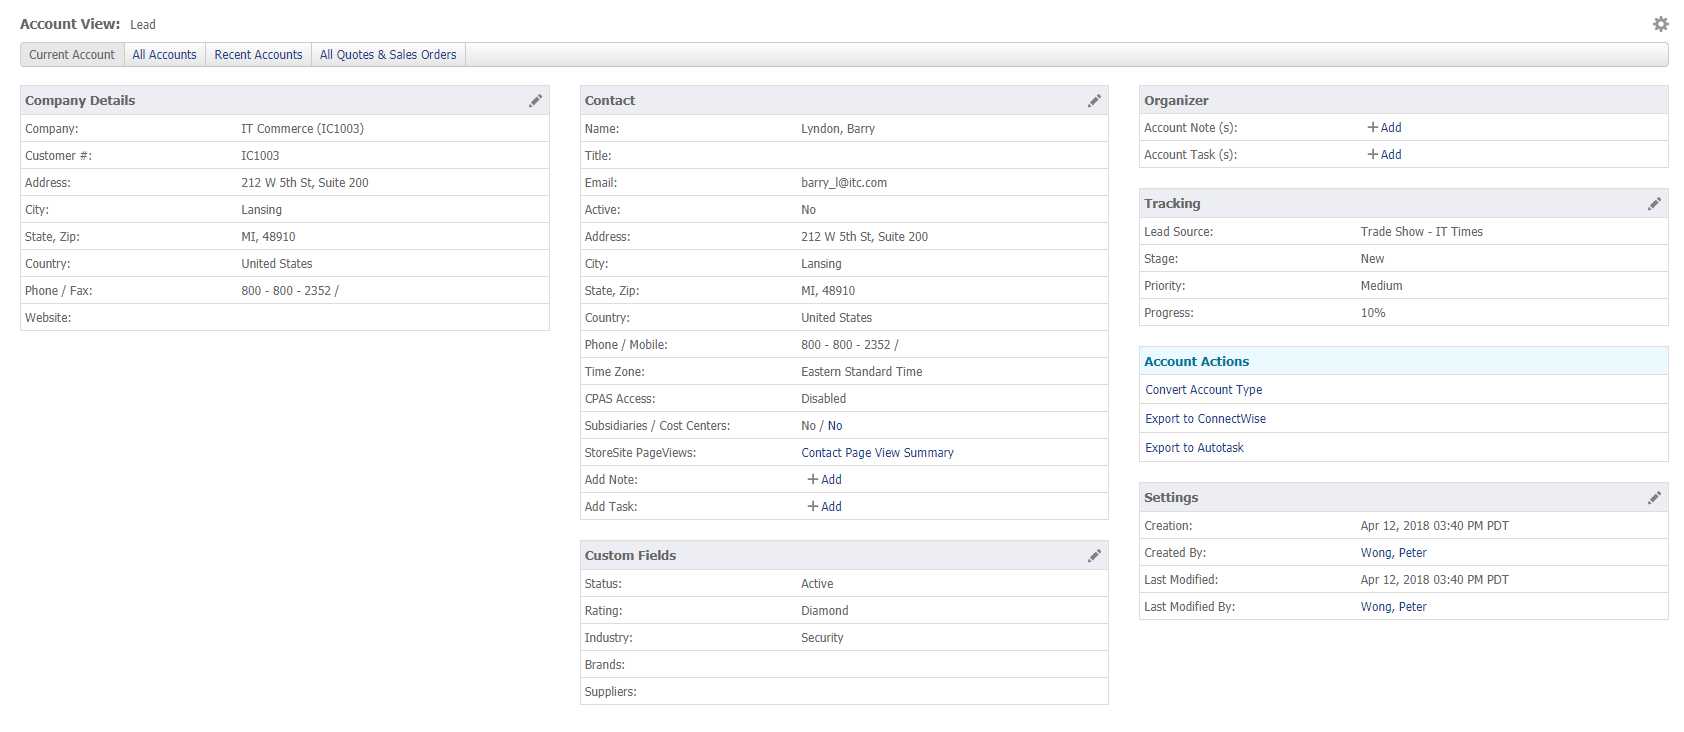
 Once saved, the lead will now be available for reference
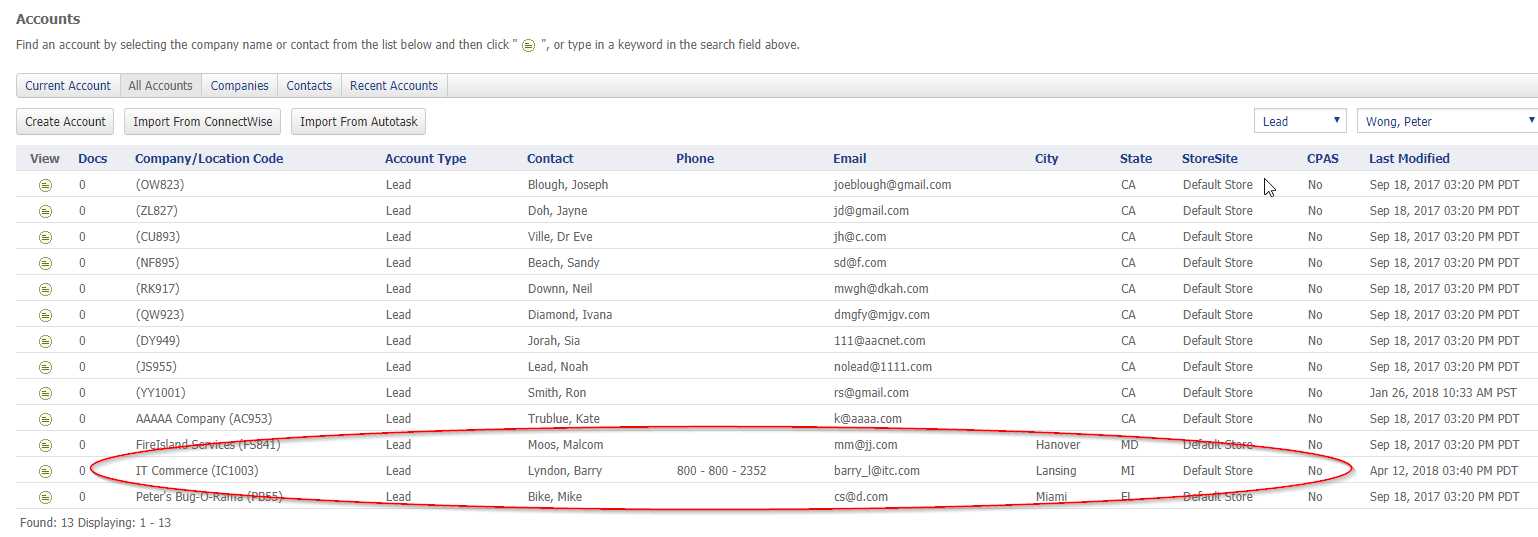
 Leads can be viewed as a group from the main "Accounts" tab and from the "Types" tab under "Leads"
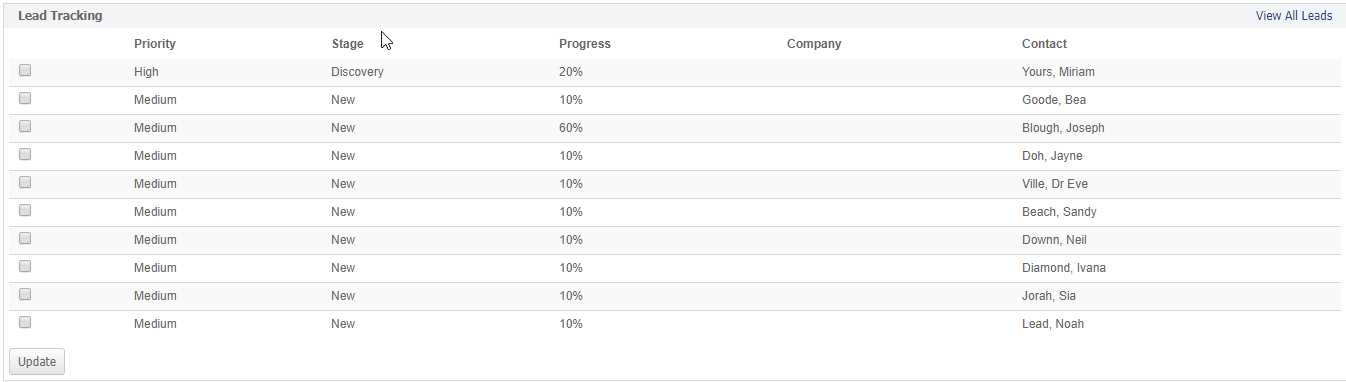
 ...or from the Dashboard under the "Lead Tracking" module
A window will display with many fields to populate, one of which is Account Type. Choose "Lead".
From the Lead Creation page, fill in the minimum information indicated by an asterisk to create the lead.
Additional information fields are available to populate but not required.
Once saved, the lead will now be available for reference
Leads can be viewed as a group from the main "Accounts" tab and from the "Types" tab under "Leads"
...or from the Dashboard under the "Lead Tracking" module
Accounts – How to convert a Lead to a Prospect, Partner, Vendor or Customer
Once a Lead passes from an unknown potential into a qualified business opportunity, it can be converted to either of the following categories within ChannelOnline: Prospect, Partner, Vendor, Customer or Other.
To convert a lead to another account type, go to the "Account View" screen for the lead and move to the "Account Actions" module.
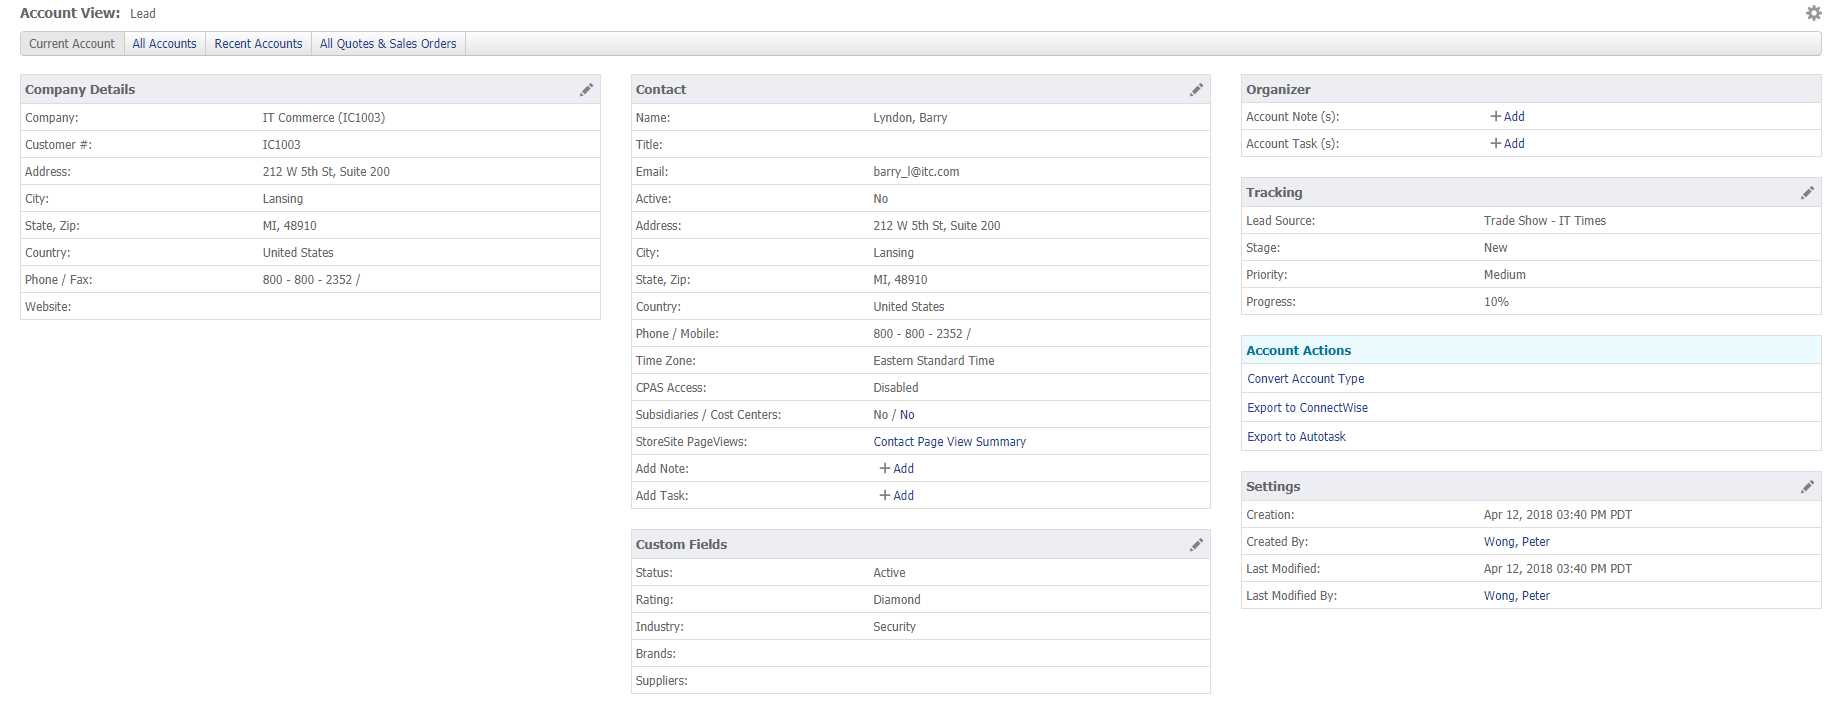 Click on "Convert Account Type"
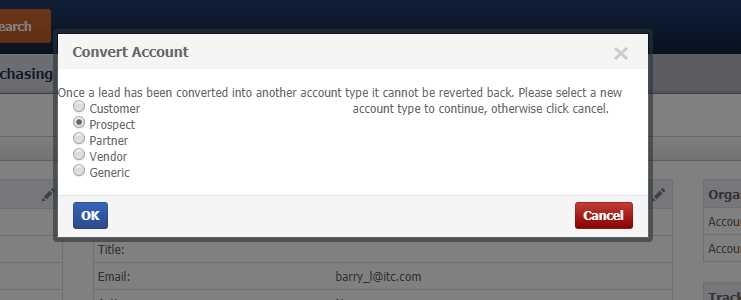 From the pop-up, choose the Account Type to convert the lead to and click "OK"
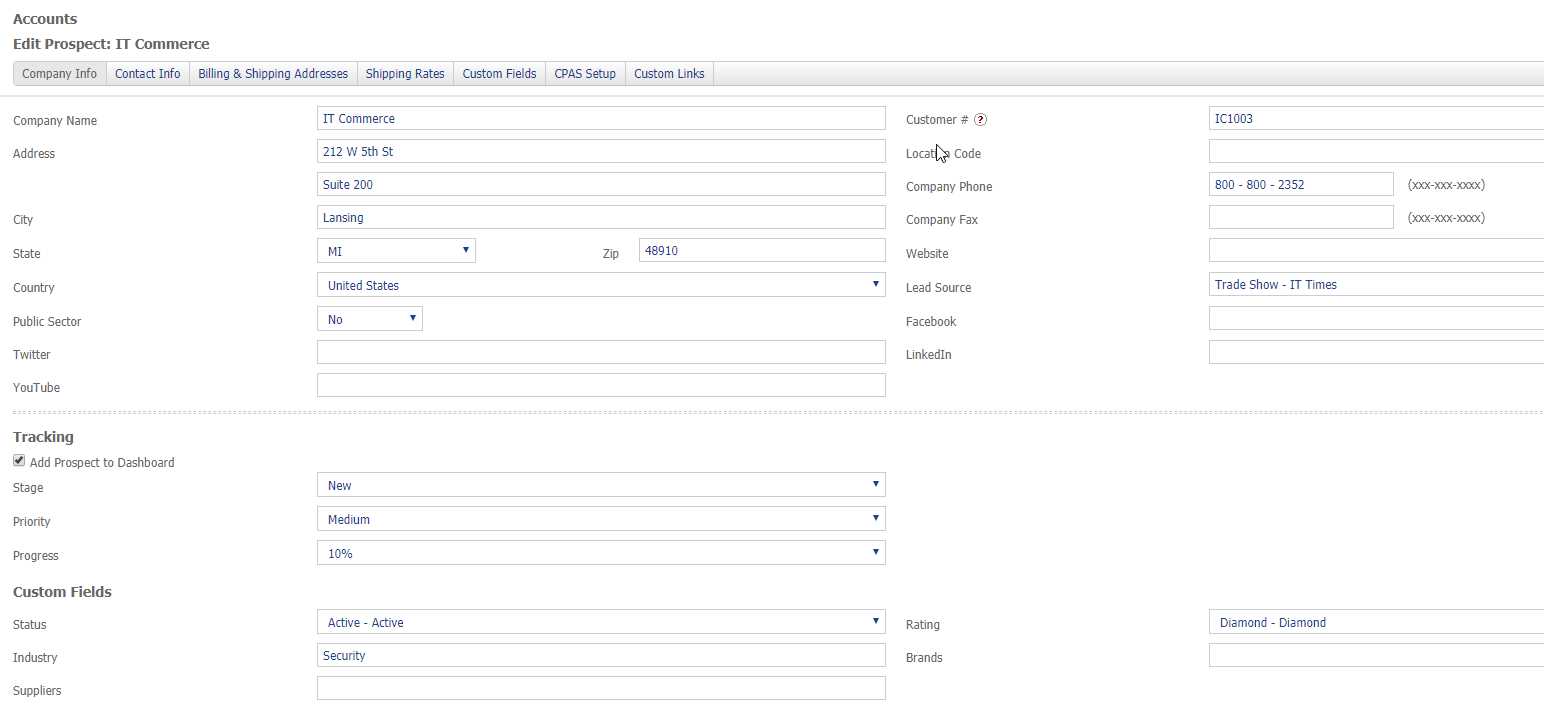 The lead has now been been converted to a "Prospect"
As a Prospect, Partner, Vendor or Customer, there will are additional field information that needs to be populated before completing the conversion.
The lead has now been been converted to a "Prospect"
As a Prospect, Partner, Vendor or Customer, there will are additional field information that needs to be populated before completing the conversion.
Click on "Convert Account Type"
From the pop-up, choose the Account Type to convert the lead to and click "OK"
The lead has now been been converted to a "Prospect"
As a Prospect, Partner, Vendor or Customer, there will are additional field information that needs to be populated before completing the conversion. Documents – How to Convert a Quote to a Sales Order
To convert a Quote to a Sales Order: From the Footer of the Quote, click on the "Convert to Order" button.
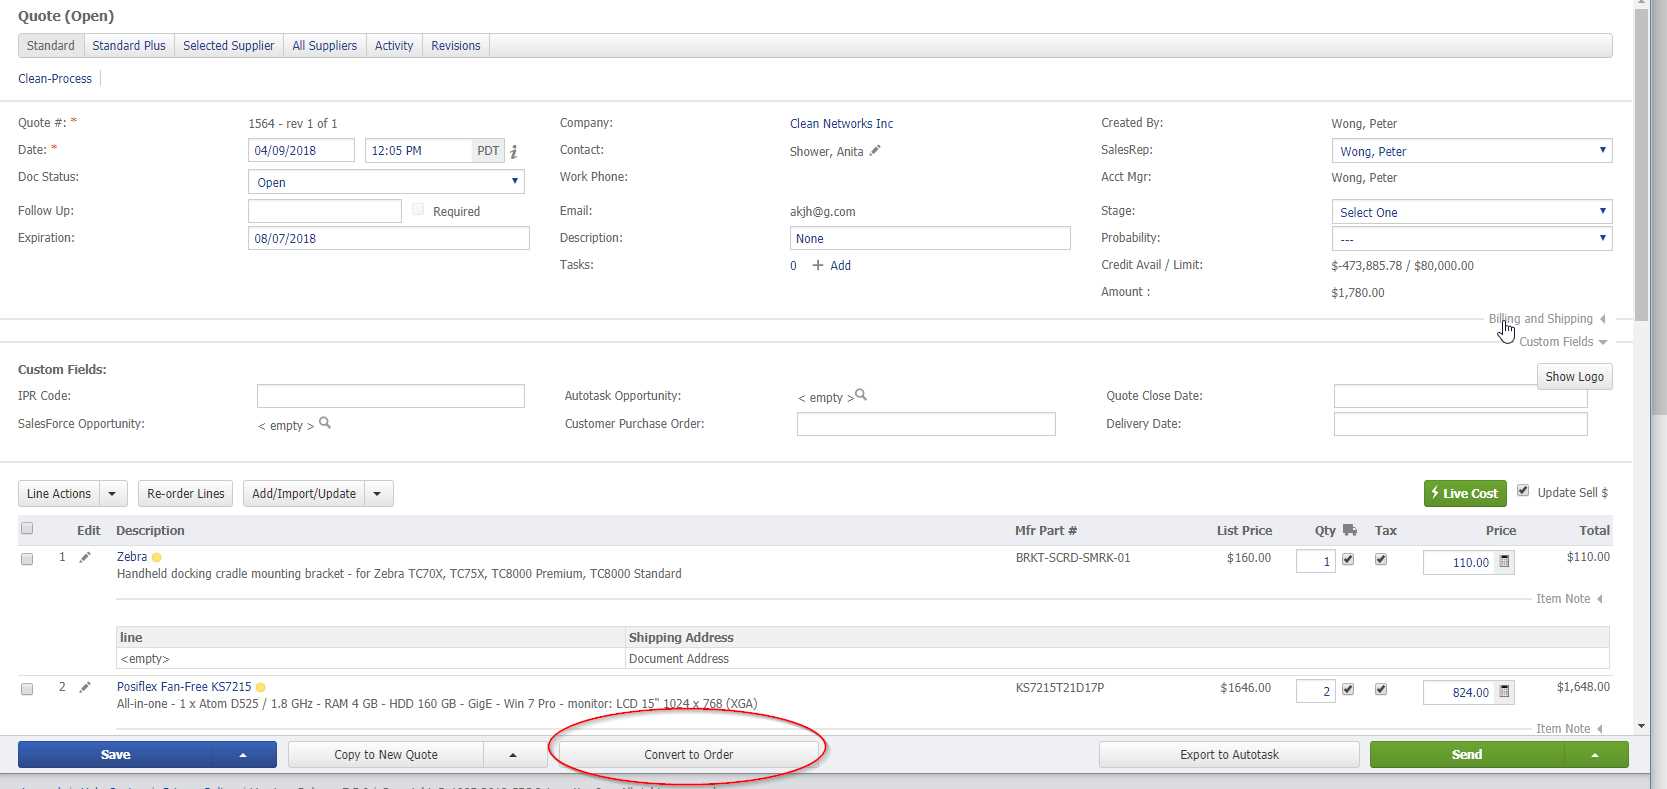 This will take one to the next screen where the
- PO Number
- Terms of Order
- Deliver Method
- Special Instructions are added to the order.
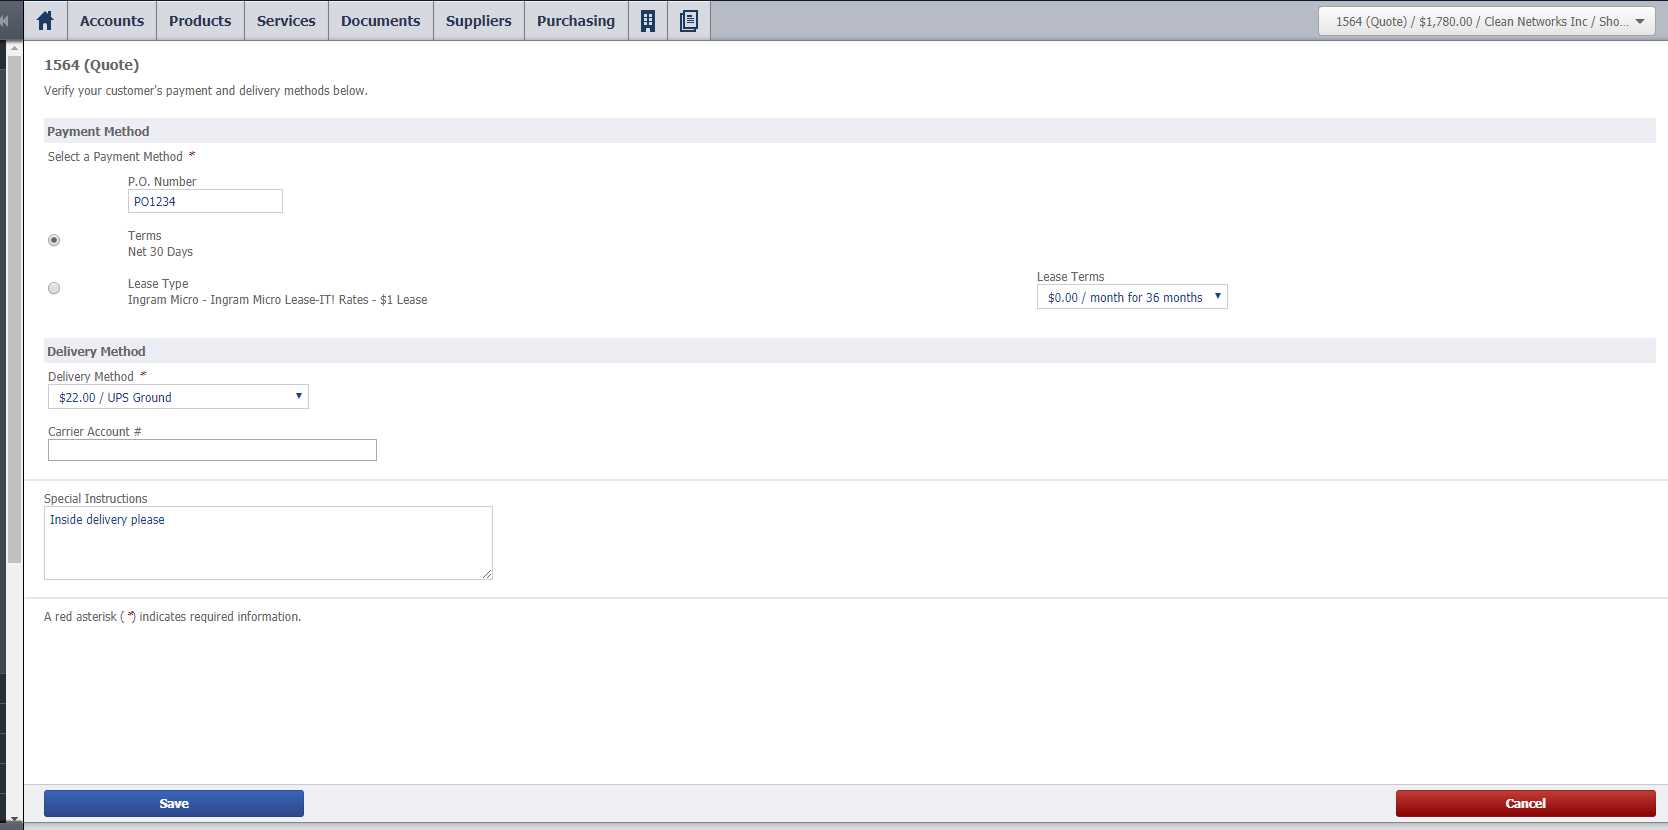 Select "Save" to complete the order process
This will take one to the next screen where the
Select "Save" to complete the order process
This will take one to the next screen where the
- PO Number
- Terms of Order
- Deliver Method
- Special Instructions are added to the order.
Select "Save" to complete the order process Passwords
Overview
Passwords are needed for all users that access ChannelOnline, internal or external. Create a password that meets industry standard complexity requirements:
- Your password must be at least 8 characters (and no greater than 20).
- Your password must have at least one upper-case letter.
- Your password must have at least one lower-case letter.
- Your password must have at least one number.
Internal Users
If you have forgotten your password or simply wish to change it, navigate to your ChannelOnline log in page and click the "Forgot Password" link.
External Users
Storesite users can retireve their password by going to the storesite log in page and click the "Forgot Password" link.
Customer specific shipping charges
To customize customer shipping charges the radio button in the Delivery Methods > Global Rates section, is selected for "Allow special shipping rates to be assigned per customer...". Once selected, this option will add a fourth step to the "Create New Customer" wizard, if this customer specific setting is ignored, shipping is based on the global settings. For existing accounts, click on the Settings widget edit icon, when the window opens click on the dropdown in the upper-right corner and select Shipping Rates. After setting that customer's shipping rates, then click Finish (for new) or Save and Exit (for existing), and the shipping rates will be applied to that particular customer.
Supplier warehouses and default warehouse
A database of all warehouses per supplier can be set up with one warehouse per supplier selected as your company default. ChannelOnline automatically populates the warehouse database for ChannelOnline supported suppliers. You can also manually enter warehouse information into the warehouse database for Custom Suppliers.
Availability per warehouse is displayed beside the warehouse name in parenthesis for 1WS Supported Suppliers (Ingram Micro, Tech Data, SYNNEX, etc) when selecting the Live Warehouse & Cost Update . The availability quantity will remain in parenthesis beside the warehouse up to (1) hour. If the quantify is empty, it is because it has been over (1) hour since real-time information has been updated. This is to ensure that you have current information when working with and submitting PO(s). Once you update Live Warehouse & Cost the availability will appear in the parenthesis once again. Any previously selected warehouse will stay selected and does not go back to the default warehouse.
Adding Warehouses
To add warehouses for custom suppliers, go to the Supplier View and select the Edit icon on the Supplier Info component. From there go down to the Default Payment Method & Warehouse option and select the Edit icon to the right of the Default Warehouse field. The warehouses that you enter will then appear in the warehouse drop-down list for the PO line items.
Setting a Default Warehouse
To add set a default warehouse for a supplier, go to the Supplier View and select the Edit icon on the Supplier Info component. From there go down to the Default Payment Method & Warehouse option and select the desired warehouse from the Default Warehouse dropdown field. Once selected, hit Save at the bottom of the page.
Selecting Item Type
ChannelOnline supports three main Item Types: Product , Service and Labor. Under the item labels called service and labor, items have the ability to assign performance or billing frequency. The Item Type selected determines the taxability of an item within the built-in tax tables. Below is a description of the Item Types within ChannelOnline:
- Product - A physical product, produced by a manufacturer.
- Service - A recurring service, subscription, warranty or contract for service to a product over a period of time.
- Labor - Work done to assemble, set up or repair a product.
- Bundles - A group of items put together and sold together for a single price. A bundle may, or may not, have a main item specified.
- Configurations- A group of items put together were the user gets to select from a combination of options. Typical configurations have at lease one included item and two or more selectable options.
- Paragraphs - Used to place information in the form of a block of text on a document.
Using Customer Cost Centers
Cost Centers are customer specific fields that can be enabled at the line item level on storesite quotes, orders and shopping carts. They give you the ability to allow your customers to enter an accounting code if necessary or specify which department should be billed for a given product. To enable the Cost Center feature for a specific customer:
- Locate the appropriate company.
- On Customer View, click the Edit icon in the Company Info section.
- In Company edit select the Custom Fields tab Scroll down until you see the Cost Center section and click the Add Cost Center link.
- Select Text Input or Drop-down. If you select Text, you can specify that the field contain text with a minimum and maximum number of characters, a number with a minimum and maximum number of digits, a date in the mm/dd/yyyy format or a regular expression (RegExp). If you select Drop-down, you can specify a list of custom options that can be selected by the customer. Select the Drop-down option, specify a name for the custom field and click the Save link next to the rule. You can now click the yellow Edit button and add your custom options manually or import them to the Drop-down.
- Once you've added the Cost Center you'll notice there are four check boxes for each custom field. Enable allows you to enable or disable the field for use, Required makes the fields a required entry (view or edit), Store View allows you to activate or deactivate them on your customer's cart, and Store Edit make the field editable by the end user on the cart. Choosing Required will automatically choose StoreSite because the customer will need to fill out the fields when placing orders.
- Once finished, click Save to save your changes.
- Locate the appropriate company.
- On Customer View, click the Edit icon in the Contact Info section.
- Scroll down until you see the Cost Center section and click the Assign Cost Center link.
- On the next page select the Cost Center to assign to the contact and click Add.
- Hit Save at the bottom of the page when you are done adding and removing Cost Centers.
- Locate the appropriate company.
- On Customer View, click the Edit icon in the Company Info section.
- In Company edit select the Custom Fields tab Scroll down until you see the Cost Center section and click the Add Cost Center link.
- Select Text Input or Drop-down. If you select Text, you can specify that the field contain text with a minimum and maximum number of characters, a number with a minimum and maximum number of digits, a date in the mm/dd/yyyy format or a regular expression (RegExp). If you select Drop-down, you can specify a list of custom options that can be selected by the customer. Select the Drop-down option, specify a name for the custom field and click the Save link next to the rule. You can now click the yellow Edit button and add your custom options manually or import them to the Drop-down.
- Once you've added the Cost Center you'll notice there are four check boxes for each custom field. Enable allows you to enable or disable the field for use, Required makes the fields a required entry (view or edit), Store View allows you to activate or deactivate them on your customer's cart, and Store Edit make the field editable by the end user on the cart. Choosing Required will automatically choose StoreSite because the customer will need to fill out the fields when placing orders.
- Once finished, click Save to save your changes.
- Locate the appropriate company.
- On Customer View, click the Edit icon in the Contact Info section.
- Scroll down until you see the Cost Center section and click the Assign Cost Center link.
- On the next page select the Cost Center to assign to the contact and click Add.
- Hit Save at the bottom of the page when you are done adding and removing Cost Centers.
Price Profile Rules – Order of Application
Below is the order to which price rules get applied with the use of both profiles and tiers (or groups). PRICE PROFILE Pricing rules for this profile will be applied as listed from the bottom up. The order of application (precedence) is: Part Number rules, Attribute / Tag rules, combined Category / Manufacturer rules, then either Category rules or Manufacturer rules (depending on your selection), and last is the Global Pricing Scheme that addresses items not directly affected by a specific rule. Also a Price Range set in Category / Manufacturer rule always takes precedence over a rule with no Price Range set. CAUTION: Use the "Never allow customer price to exceed list price" option with care. If set, it is possible for the price profile generated customer price to be less than your supplier cost. Selling below your supplier cost is also possible when using the "sell at" part number pricing method and the "discount from list" pricing method. To avoid selling below your cost, select the "Never allow customer price to go below cost" option at the price profile level. NOTE: The "Discount from List" pricing method relies on accurate list pricing which is not always consistent and guaranteed within supplier provided catalogs. In the event that a list price is not available for an item, the "Exceed List Rule" cannot be applied. So any item without list price will not have "Exceed List" price protection. PRICE TIERS Price Tiers makes managing large customer bases easier by assigning larger groups of accounts to tiers and creating smaller custom price variations at the Price Profile level if and when needed. Tiers do not take the place of Price Profiles, all accounts will still need to be assigned to a Price Profile for Tiers to work. When the a tier is assigned to an account the rule structure looks like (from granular to most broadest):
- Global Line Item Pricing (most specific, always applies)
- Price Profile - Part # specific rule
- Price Profile - Attribute Tags
- Price Profile - Category / Manufacturer
- Price Tier - Part # specific rule
- Price Tier - Category / Manufacturer
- Price Profile - Global settings (broadest rules, catches items without other rules)